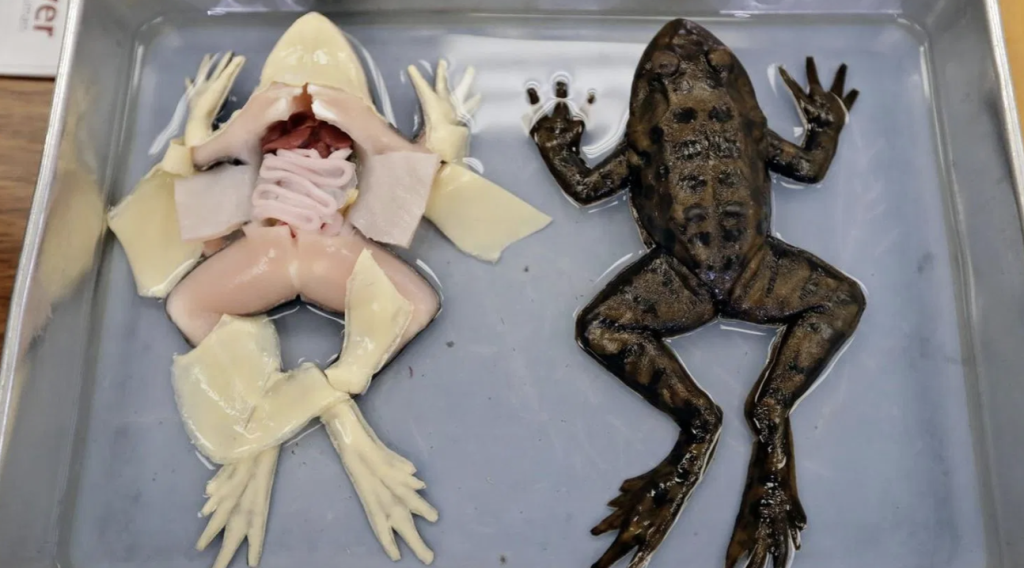
For decades, frog dissection has been a rite of passage in biology classrooms. But with advances in technology, changing educational standards, and a growing focus on ethical science practices, fake frogs in biology class are becoming a smarter, cleaner, and more compassionate alternative.
At Biology Junction, we’re committed to helping students, teachers, and schools explore modern tools in science education — and that includes highlighting the many benefits of frog dissection alternatives.
What Are Fake Frogs in Biology Class?
Fake frogs are realistic dissection models or virtual simulations used in place of actual preserved frogs. These tools mimic the anatomical structure of real frogs and offer a hands-on learning experience — without the ethical concerns or mess.
They come in several forms:
🐸 3D anatomical models
💻 Virtual dissection software
📱 Apps and interactive platforms
These tools are designed to provide highly accurate, engaging, and reusable alternatives to traditional dissection.
Why Schools Are Making the Switch
Ethical Education With increasing awareness around animal welfare, many schools are moving toward ethical biology learning. Using fake frogs eliminates the need to harvest real animals and teaches students respect for life.
Cost-Effective & Reusable Traditional dissection can be costly year after year. Frog dissection alternatives — like synthetic frogs or virtual tools — are reusable and budget-friendly in the long term.
Clean, Safe, and Inclusive No chemicals. No odor. No cleanup. Fake frogs make the dissection experience safer and more accessible — especially for students with ethical concerns, allergies, or sensitivities.
Aligned with Digital Learning Trends Schools are adopting more digital tools post-pandemic. Virtual frog dissections fit perfectly into hybrid or remote learning environments.
Do Fake Frogs Still Teach Students Effectively?
Absolutely. In fact, studies show that students using virtual dissection platforms often perform as well or better than those using traditional methods. Why?
✅ They can repeat the dissection multiple times ✅ They receive instant feedback and guidance ✅ They learn in a stress-free environment
At Biology Junction, we believe learning should be informative, inclusive, and inspiring — and fake frogs help us get there.
Trusted Tools & Resources for Educators
If you’re a teacher looking to introduce frog dissection alternatives into your curriculum, we recommend checking out:
Froggipedia – Award-winning AR app for virtual dissection
SynFrog – Hyper-realistic synthetic frog models
BioDigital Human – Virtual anatomy and biology exploration tool
We’re also working on new lesson plans, guides, and toolkits right here at Biology Junction to help educators integrate fake frogs in biology class effectively and confidently.
Final Thoughts: Building the Future of Biology Together
At Biology Junction, we’re more than just a resource hub — we’re a community of science educators and learners who believe in evolving with the times.
Embracing fake frogs in biology classisn’t just about keeping up — it’s about leading the way in ethical, modern, and effective science education.
Follow us for updates, classroom tools, and trusted tips to bring your biology curriculum into the future — frog-friendly and forward-thinking.
There are nearly 8,000 types of amphibians, including some of the most unusual and exciting creatures found on land and water.
About two million species of animals inhabit Planet Earth. More than that, scientists discover and categorize about 10,000 other new species every year. Animals are broken down into classes which include vertebrates and invertebrates, or animals with or without spines.
Amphibians belong to the vertebrate class along with birds, fish, mammals, and reptiles. All amphibians are cold-blooded, meaning they cannot generate body heat on their own. For that reason, they must rely on their environment to keep them cold or warm enough for survival.
Going further, most amphibians undergo a metamorphosis from a juvenile to an adult form. For example, frogs begin as tadpoles with gills and a tail. As they mature, they develop lungs. Over time, four legs replace most types of amphibians tails.
The Types of Amphibians
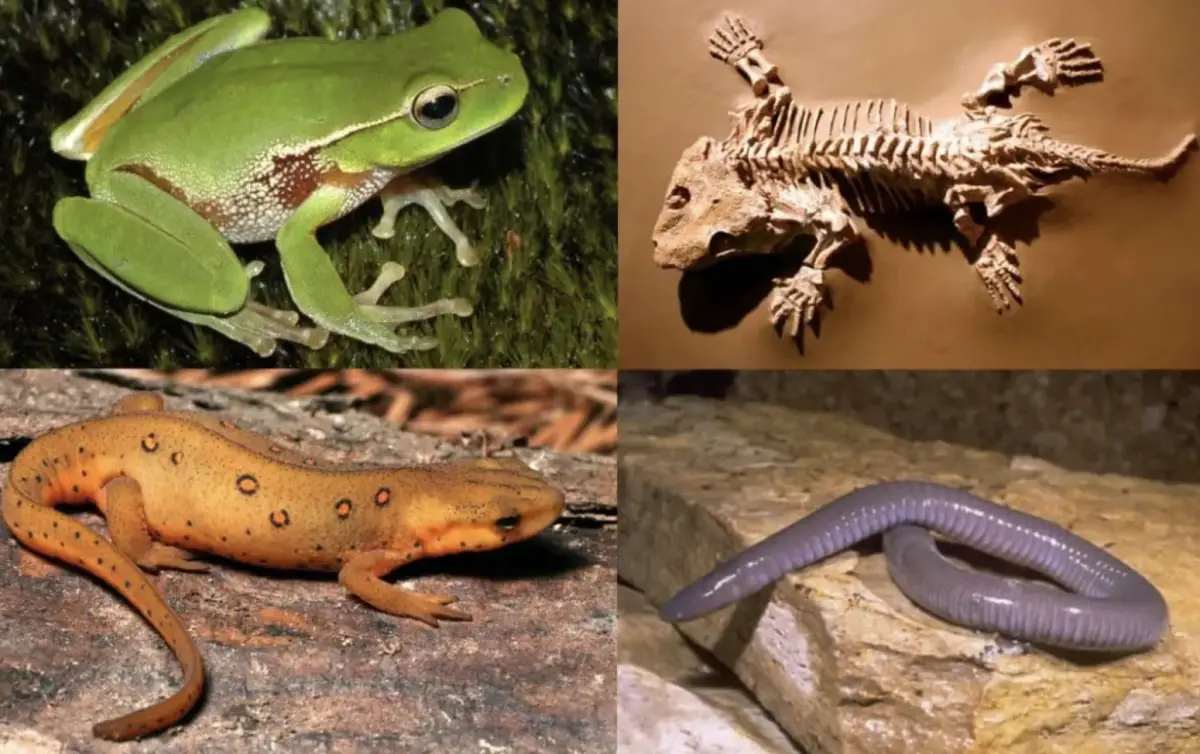
Amphibian species include three subgroups or orders. Firstly, there is the Order Anura which includes about 6,500 species of frogs and toads.
Secondly, the Order Caudata or Urodela includes about 680 species of newts and salamanders. Thirdly, Order Apoda or Gymnophiona, includes about 200 species of caecilians.
Frogs and toads typically have short bodies, webbed fingers and toes, and no tails. And, they usually have bulging eyes.
Newts and salamanders
Spotted salamander -Ambystoma maculatum
Newts and salamanders look similar to lizards and have short legs, skinny bodies, and long tails. Surprisingly, salamanders and newts have the remarkable ability to re-grow lost limbs and tails.
Caecilians
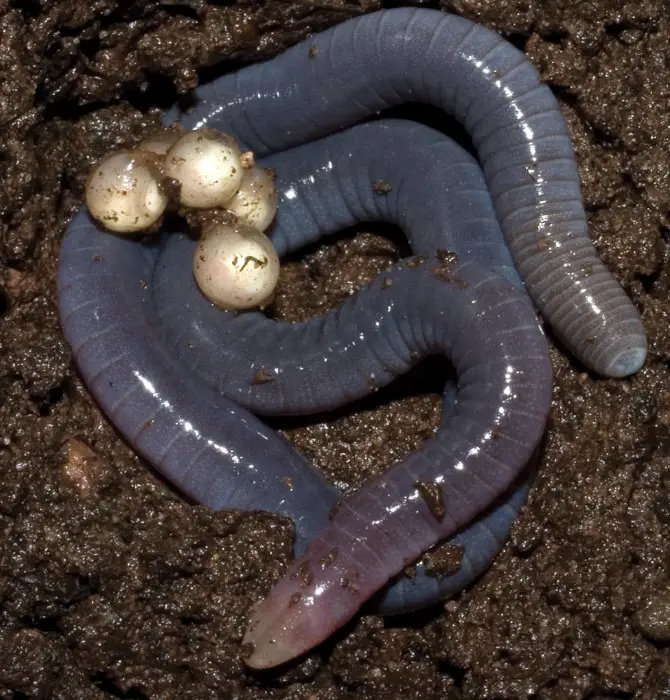
Presumed Microcaecilia dermatophaga mother with eggs: Image CC by A 2.5 Generic, by Wilkinson M, Sherratt E, Starace F, Gower DJ (2013), via Wikipedia Commons
Caecilians don’t have any legs and resemble worms or snakes. That is because they mostly live underground, or in the substrate under streams. As a result, they have strong skulls and pointed noses to help them burrow through mud and dirt.
Fun Facts About Types of Amphibians
Amphibians are an evolutionary link between water-dwelling animals such as fish and land-dwelling animals such as mammals. Let’s be honest, they are some of the most fascinating animals on Planet Earth.
For example, amphibians have extremely primitive lungs. However, they have thin, moist skin that absorbs limited amounts of oxygen. So, you could say some types of amphibians breathe through their skin.
Another exciting fact about them, amphibians are carnivores and predators. But, they cannot chew their food. So, they swallow their prey whole.
Amphibians are also one of the planet’s most endangered animal species. It is believed that nearly half of the world’s amphibians are threatened species. That’s due to a combination of factors, including habitat loss, pollution, and climate change.
10 Amazing Types of Amphibians
Amphibians include some of the most amazing and unusual vertebrates found on earth. Much like their ancestors, most of them stick close to water.
We gathered a collection of photos of 10 of the most exciting types of amphibians currently roaming the earth, below. Then, we included a brief introduction to each one.
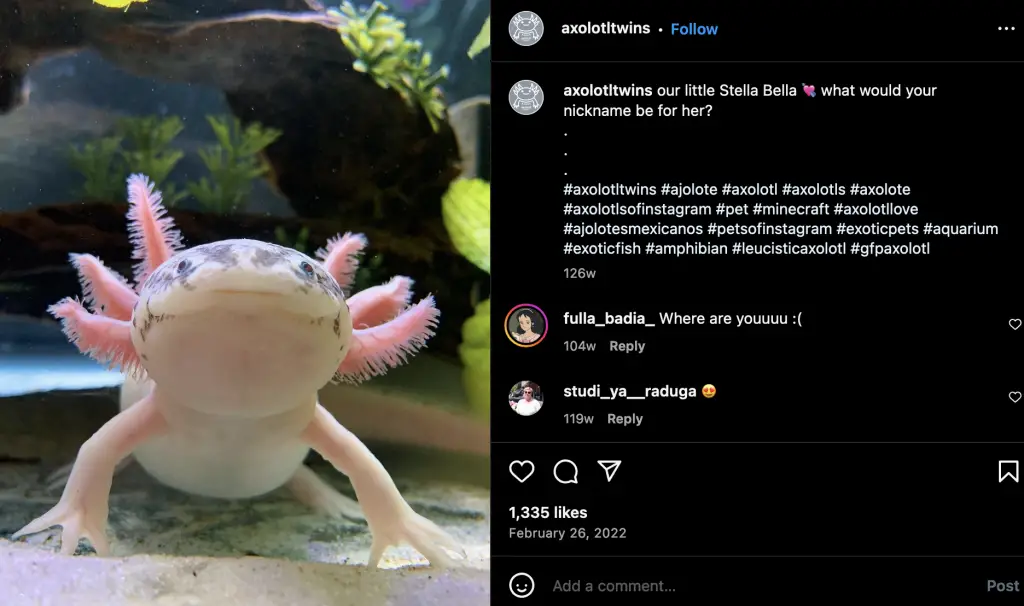
1. Axolotl
The axolotl is a type of salamander that is native to central Mexico. Unlike many other types of amphibians, axolotl larvae do not undergo metamorphosis when they reach maturity. As a result, they retain their gills, and tails, and are entirely aquatic throughout their life cycle.
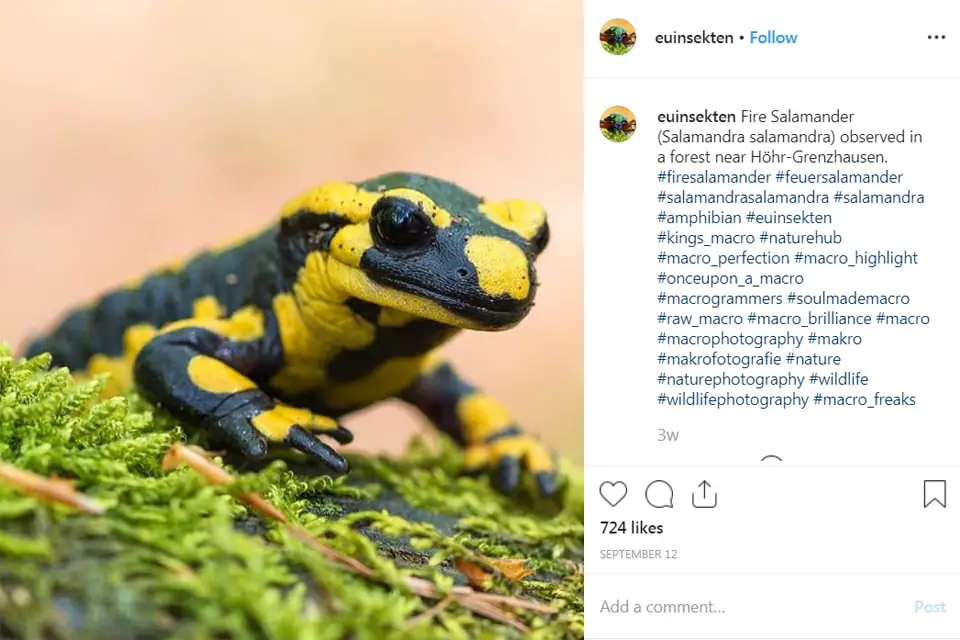
Fire salamanders are native to the forests of central and southern Europe. These types of amphibians stay near to ponds and streams, which they rely on for breeding. Another cool fact, they are active both night and day.
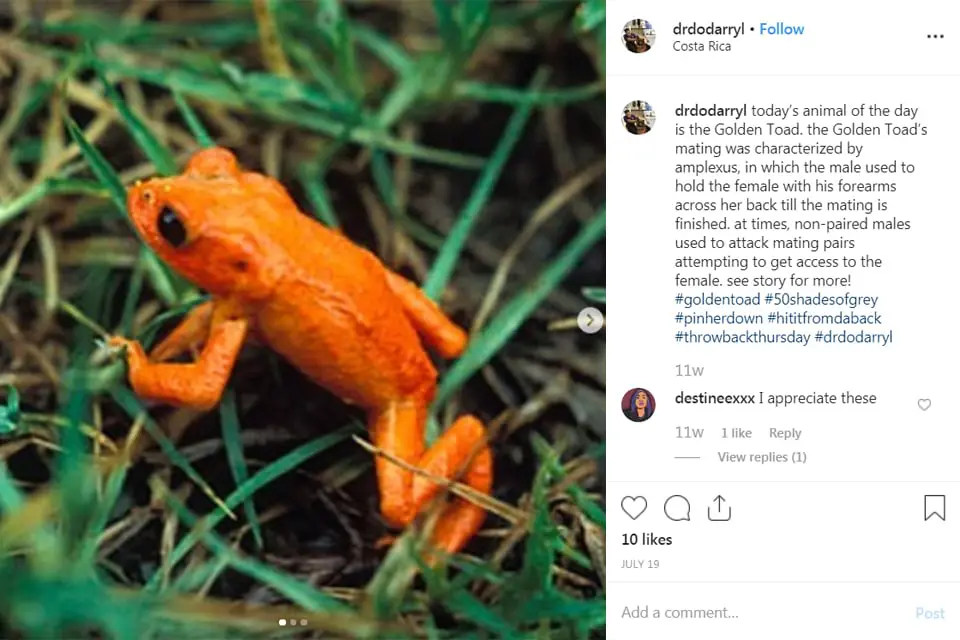
The golden toad was native to the tropical mountain regions of Costa Rica, known as montane cloud forests. Sadly, golden toads are one of many types of amphibians thought to be extinct since they have not been seen since 1989.
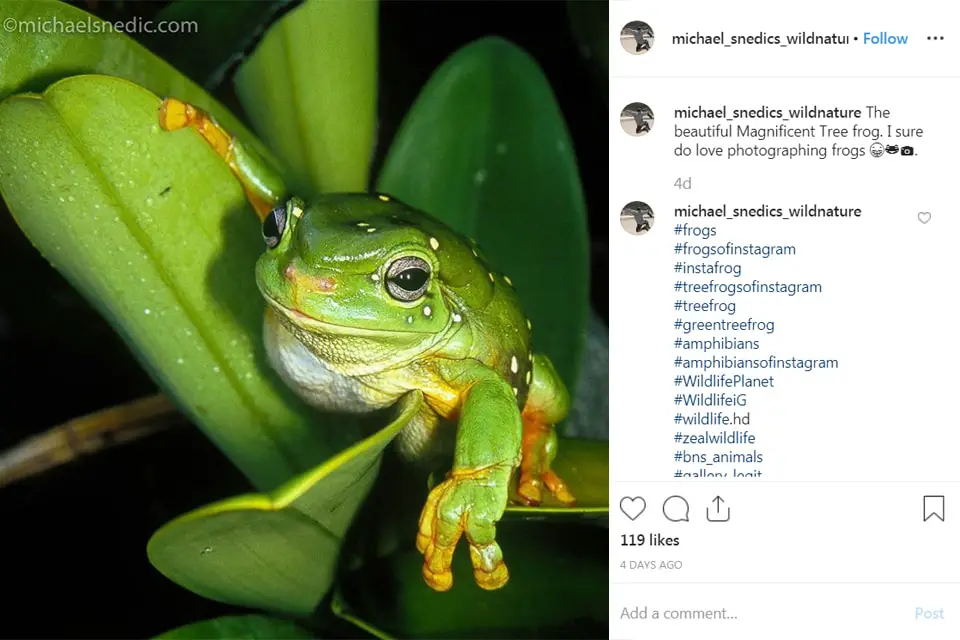
Green tree frogs are native to New Guinea and Australia. Their colors range from brown to green, depending on the surrounding air temperature. These are one of the most abundant types of amphibians dwelling in trees.
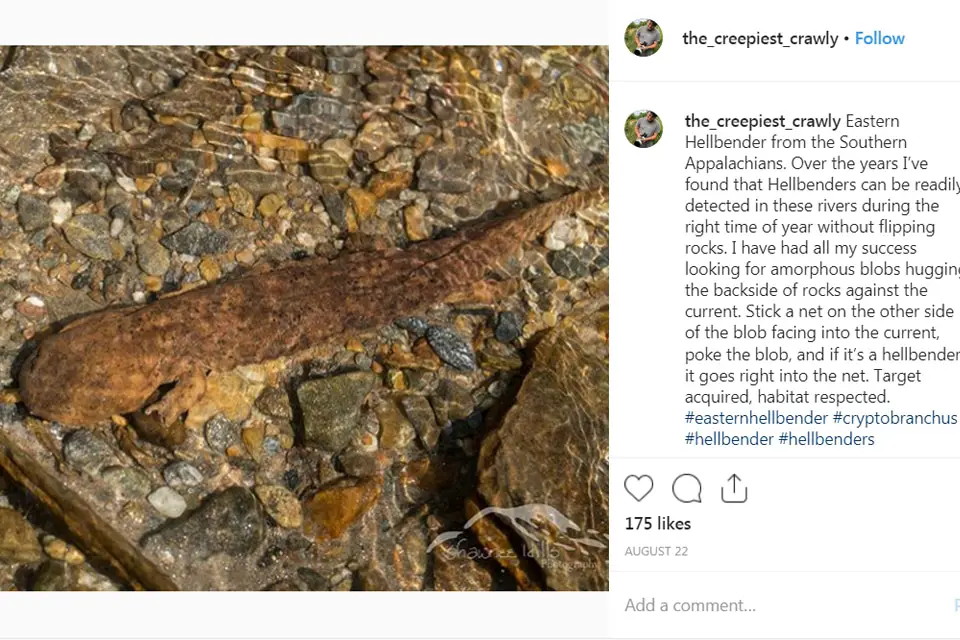
Hellbenders are native to wetlands of Kentucky, Pennsylvania, and Tennessee. However, they are sometimes located in smaller numbers in the surrounding states. Sadly, hellbenders join other types of amphibians on the IUCN Red List of Threatened Species.
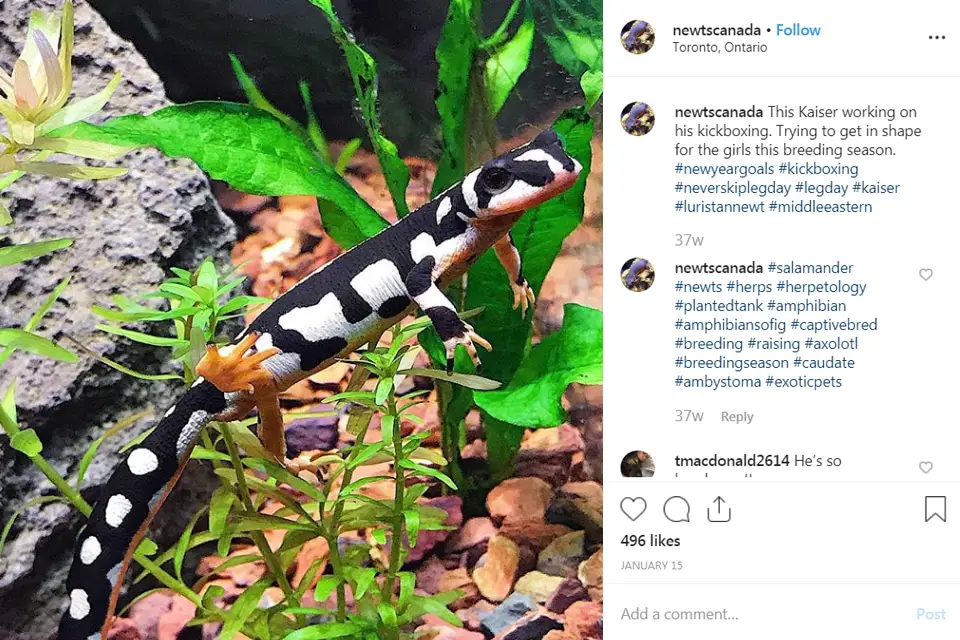
These black and white spotted newts are native to the Luristan Province of Iran. While they look like cows, they are clearly amphibians. The Luristan newt is listed as “critically endangered” on the IUCN Red List of Threatened Species. However, they are currently protected under Iranian law.
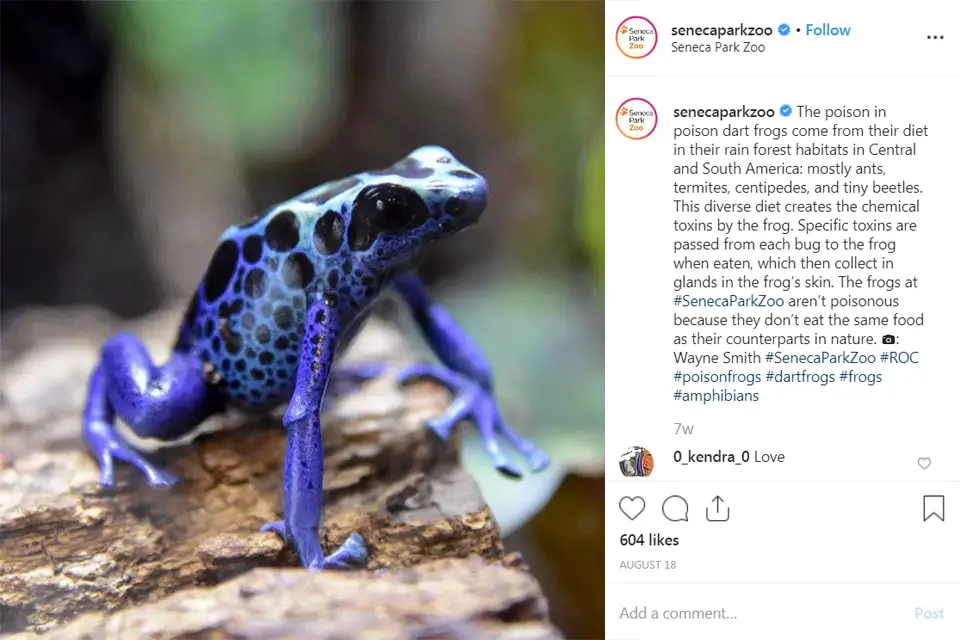
The poison dart frog is native to the subtropical and tropical regions of South America. They can also be found in Central America. Bright colored dart frogs are extremely poisonous. However, dart frogs with cryptic or dull coloring have nominal toxicity. In fact, some are not toxic at all.
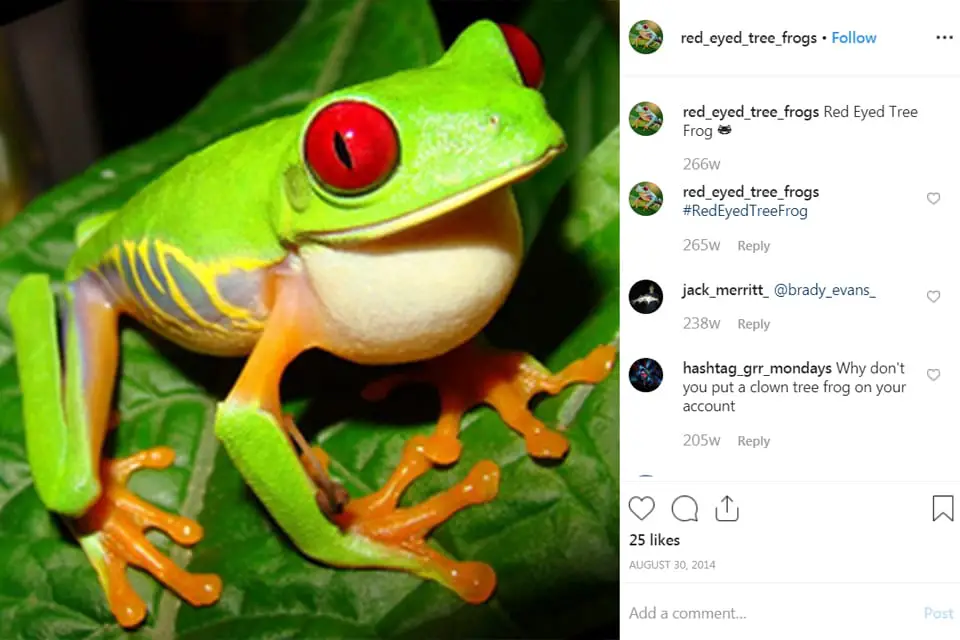
The red-eyed tree frog is native to the Neotropical rainforests of Mexico and Central America. In addition to their bulging red eyes, these tree frogs have webbed orange feet and blue and yellow flanks. Luckily, due to their large number, they are listed as “least concerned” by the IUCN Red List of Threatened Species.
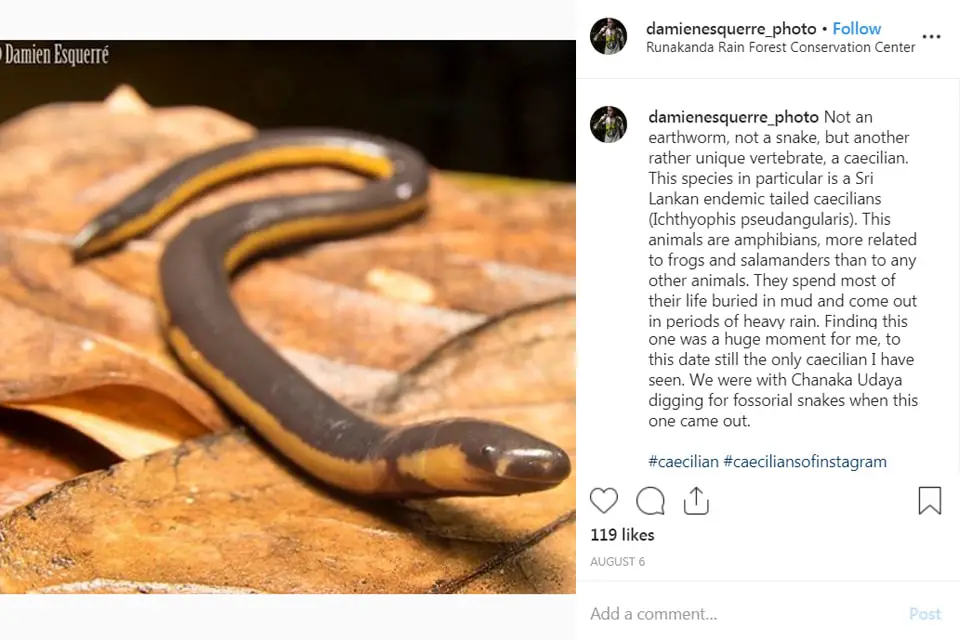
The endemic tailed caecilian is native to the tropical regions of Sri Lanka. Resembling a giant earthworm, endemic tailed caecilians range in size from 9 inches to nearly 16 inches. Additionally, the endemic tailed caecilian is listed as vulnerable by the IUCN Red List of Threatened Species.
Sri Lankan Endemic Tailed Caecilian. Image via Instagram.
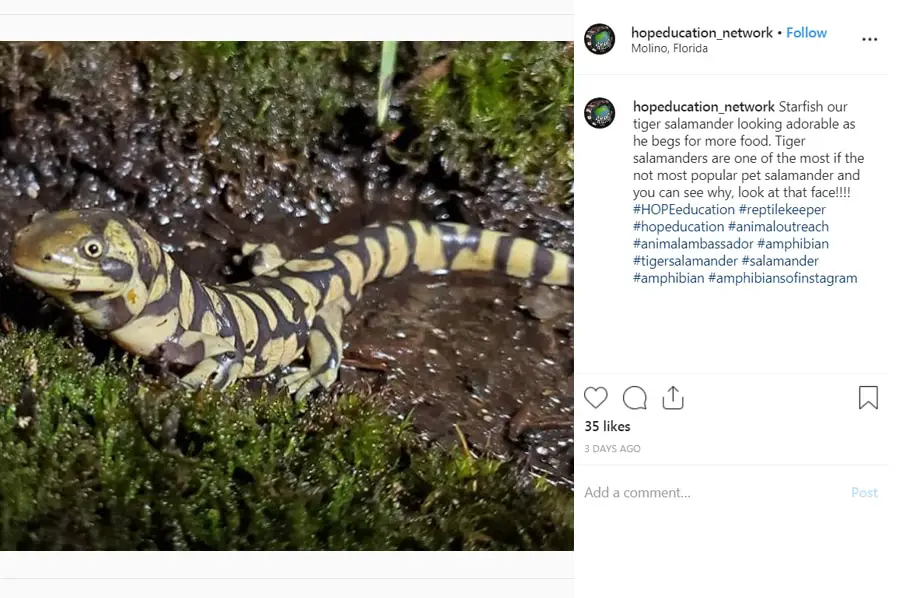
10. Tiger Salamander
The tiger salamander is native to the mountainous and lowland regions of the United States and Mexico. Unlike other types of amphibians, they tend to avoid water. Additionally, they can grow to lengths of 12 inches and larger.
We hope you enjoyed our article and accompanying photos of amazing and unique types of amphibians.
You have seen our favorite types of amphibians. Now we want to know about your faves. Using the comments section, let us know any unusual types of amphibians you would like to see included in future articles.
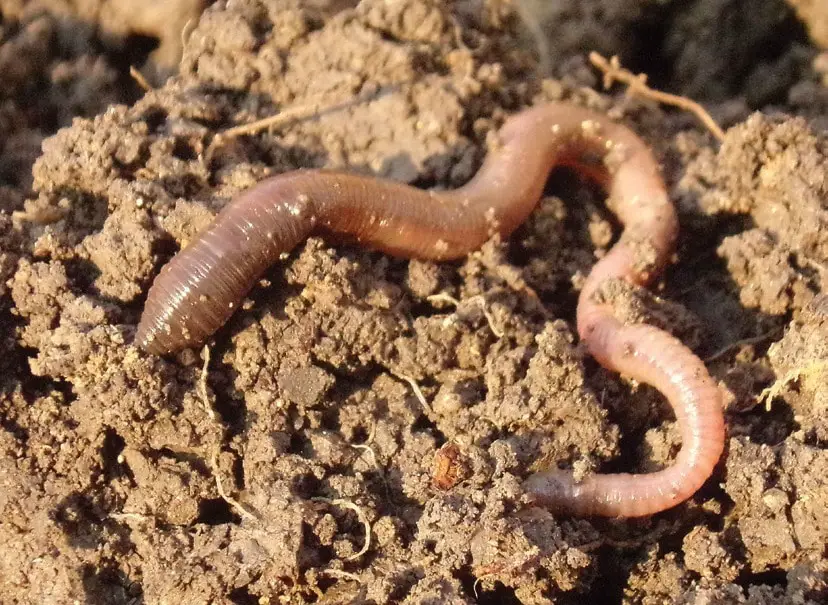
Earthworms play essential roles in many ecosystems. They help introduce oxygen to the soil and mix it up. As they tunnel through the ground, they enrich the soil and push it toward the surface where it’s easier for plants to get to the nutrients. You can see the organs that help these worms do their jobs by dissecting an earthworm.
Safety First
Safety is critical in all aspects of our lives. It may seem trivial in a controlled environment like a school biology lab, but it’s not, and all safety rules should be followed. They are in place to protect you and your classmates, so don’t skip any regulations just because you think it will be ok or those rules don’t seem to apply to your circumstances. The basic common-sense rules are:
Wear safety gear when necessary like goggles, gloves, and aprons.
Most preserved specimens contain formaldehyde, so wash them first.
Do not play with lab equipment or instruments such as scalpels and scissors.
Do not eat any parts of your specimen. Yes, there is an apparent reason for this rule.
Your lab should have the rules and safety measures available plus your instructor will go over them with you. Don’t assume the only rules are the ones we list here. The type of lab and type of specimen determine the rules. Ask for a copy of the rules if you don’t see one posted in the lab. Your teacher should be close by most of the time to help you guide you as well.
Always wear safety goggles and gloves. If you have to carry a sharp instrument, hold it with the pointed end pointing down and away from your body. Don’t rush or run while holding a scalpel or scissors. Never carry a knife or scissors by any part other than the handle. Scalpels are razor sharp, and it only takes a split second for them to cut you open.
Keep your station clean and tend to any spills immediately unless they pose a breathing hazard. Dispose of any blades, gloves, aprons, and specimens according to the established rules in your lab. Your teacher will probably explain all the rules to you, but don’t wait to ask if you aren’t sure what to do. Teachers are there to help educate you and keep you safe.
Earthworm Dissection Guide
Earthworms are great for helping you understand simple organisms and basic anatomy. They’ll help you get a grasp on lab safety before you progress to larger specimens like pigs or frogs. As a bonus, they’re small and soft, so handling them is much more comfortable as well.
The first step is to examine the exterior of the earthworm. Earthworms are segmented works, so they look like a long stack of small rings. They don’t have a head or any limbs, but they do have a fascinating exterior anatomy to study. The anterior end of the earthworm is a little fatter than the posterior. When you locate the anterior end of the work, pin it to the dissecting pan or tray.
Earthworms are annelids which means their bodies are composed of multiple ring-like sections or segments. This part may not be on your teacher’s list, but it’s always interesting to count the segments while you study the exterior anatomy of the earthworm. While you count, notice the small setae on the ventral surface. These little bristles help the worms move through the dirt with ease.
Each segment along the worm’s exterior has small pores. These pores excrete the sticky film you find when you run your finger along a live worm. You may need a magnifying glass or small microscope to see them. It depends on the size of your earthworm specimen and your eyesight as well.
From the anterior end of the worm, count your way down to segment fourteen. Typically, this is where the oviducts are located. The oviducts release the eggs when the worm reproduces. The exciting part is the next segment after the oviducts; it contains the sperm ducts. Earthworms have both male and female reproductive organs.
Further down the worm at segment 31 is the clitellum. It secretes a sticky mucus that binds two earthworms together while the mate. It develops a cocoon to hold the eggs and sperm after mating is finished. Earthworms are simple worms, but fantastic at the same time. Their exterior anatomy is fascinating to study.
Earthworms are hermaphroditic which means they have both female and male reproductive organs. Eggs come from the ovaries inside segment fourteen, sometimes thirteen. It can be hard to count the segments on small worms. Worms have testes which can form in segments near the oviducts. Study these segments and see if you can find the reproductive organs on your specimen.
When worms mate, they get stuck together briefly to help keep the reproductive organs aligned. Sperm from both worms travels into the other worms seminal receptacle. The clitellum creates the cocoon which moves along the outside of the worm to collect the semen and the eggs. The eggs are fertilized outside the worm in the cocoon.
By now, you should have a good understanding of the exterior anatomy of your earthworm specimen. Remove the pin from the anterior end of the earthworm and place it on its ventral side, then put the pin back in the anterior end of the worm. The ventral side of the worm is a little flatter than the dorsal side, and it may be a lighter color.
Carefully and slowly make a shallow incision using your scalpel from the anterior end of the work to the clitellum. Never cut toward your body or fingers. Be extra careful and keep the incision shallow, so you don’t cut into the worm’s digestive system and internal organs. Use your forceps to spread the worm open and pin the sides of its body to your dissection pan or tray.
The inside of the worm should be exposed now. You may want to lightly sprinkle water over the worm to keep it from drying out while you study the inside of it. The interior part of the walls is called the septa. See if you can tell the difference. If possible, ask your teacher to point them out and help you see the different layers.
Now, the internal digestive organs should be exposed and available for study. Starting with the mount on the anterior end of the worm, locate the organs. The first organ you see is the pharynx. The worm’s esophagus protrudes from the pharynx. About halfway down your incision are the crop and gizzard. Skip the other organs for now and find those two.
The crop is essentially a stomach. It stores food until the food is moved to the gizzard which grinds it up. The food leaves the gizzard and goes into the intestine, much like it does in humans, and travels to the anus. Along the way, the worm’s intestines absorb nutrients from the food the gizzard crushed and ground up. Earthworms don’t eat dirt. The consume organic materials found in the soil.
Make your way back up to the crop. If you look above the crop on the anterior side, you’ll find five pairs of aortic arches. This is the worm’s version of a heart. The hearts are located around the esophagus, and they connect to the dorsal blood vessel. That’s the worm’s version of an artery. Most earthworms can take direct damage to half their aortic arches and live.
Move your attention back to the pharynx at the anterior end of the worm. Locate the cerebral ganglia beneath the pharynx on the dorsal side. You may need to use your forceps to move some organs around to get a good look at it. The ventral nerve starts at the cerebral ganglia and runs the length of the worm. It may be hard to see if it is too small.
They are simple creatures speaking purely on their anatomy, but how their bodies and mating works are truly amazing. If you have time, go back over this tutorial again and study the worm longer. When you finish exploring, make sure you clean your workstation and dispose of your specimen correctly. Dispose of your lab gear according to the lab rules. Wash your hand thoroughly with soap and water.
Some Final Notes
Earthworms are vital to the health of our soil. The improve drainage, help stabilize the land, and add nutrients to the ground. Worms feed on organic materials they find in the dirt. Their bodies use the nutrients they need and deposit what’s left back into the soil as waste. Fortunately for plants, that waste is usually nitrogen-rich along with other nutrients plants need to grow.
Their worm tunnels help loosen the soil which aids plants in root development. We could go on and on about the benefits of earthworms. If you follow our guide to dissecting earthworms and read our interesting facts along the way, we’re sure you’ll be able to dissect an earthworm specimen safely. You may even appreciate these simple creatures a little more when you are done.
_%26_European_Toad_(Bufo_bufo)_(8618457301).jpg)

