Fermentation Rootbeer


FERMENTATION – MAKING ROOT BEER
David Fankhauser’s Main Page


Introduction:

Fermentation has been used by mankind for thousands of years for raising bread, fermenting wine and brewing beer. The products of the fermentation of sugar by baker’s yeast Saccharomyces cerevisiae (a fungus) are ethyl alcohol and carbon dioxide. Carbon dioxide causes bread to rise and gives effervescent drinks their bubbles. This action of yeast on sugar is used to ‘carbonate’ beverages, as in the addition of bubbles to champagne).

We will set up a fermentation in a closed system and capture the generated carbon dioxide to carbonate root beer. You may of course adjust the quantities of sugar and/or extract  (Zatarain’s) to taste. 

EQUIPMENT
SUPPLIES
  • clean 2 liter plastic soft drink bottle with cap
  • funnel
  • 1 cup measuring cup
  • 1/4 tsp measuring spoon
  • 1 Tbl measuring spoon
  • Cane (table) sugar [sucrose] (1 cup)
  • Zatarain’s Root Beer Extract (1 tablespoon)
  • (When I could not find it locally, I ordered a case of 12 bottles for $18 from Zatarain’s, New Orleans, LA 70114
  • powdered baker’s yeast (1/4 teaspoon)  (Yeast for brewing would certainly work at least as well as baking yeast.)
  • cold fresh water


INSTRUCTIONS:

1) Assemble the necessary equipment and supplies
2) With a dry funnel, add in sequence:

1 level cup of table sugar (cane sugar) (You can adjust the amount to achieve the desired sweetness.)

3) Add: 1/4 teaspoon powdered baker’s yeast ( fresh and active)

(Fleischmann’s or other brand)

4) You can see the yeast granules on top of the sugar.
5) Shake to distribute the yeast grains into the sugar.
6) Swirl the sugar/yeast mixture in the bottom to make it concave (to catch the extract).
7) Add with funnel:

1 Tbl of root beer extract (I prefer Zatarain’s, but Hires, etc. will work.)

on top of the dry sugar

8) The extract sticks to the sugar which will help dissolve the extract in the next steps.
9) Half fill the bottle with fresh cool tap water (the less chlorine, the better).

Rinse in the extract which sticks to the tablespoon and funnel. Swirl to dissolve the ingredients.

10) Q.s. [fill up] to the neck of the bottle with fresh cool tap water, leaving about an inch of head space, securely screw cap down to seal. Invert repeatedly to thoroughly dissolve.

If you leave it in a warm temperature longer than two weeks, you risk an explosion…

11) Place at room temperature about three to four days until the bottle feels hard to a forceful squeeze. Move to a cool place (below 65 F). refrigerate overnight to thoroughly chill before serving. Crack the lid of the thoroughly chilled root beer just a little to release the pressure slowly.

NOTE: Do not leave the finished root beer in a warm place once the bottle feels hard. After a couple weeks or so at room temperature, especially in the summer when the temperature is high, enough pressure may build up to explode the bottle! There is no danger of this if the finished root beer is refrigerated.

12) Move to a refrigerator overnight before opening.


NOTE: There will be a sediment of yeast at the bottom of the bottle, so that the last bit of root beer will be turbid. Decant carefully if you wish to avoid this sediment.

A WORD ABOUT THE ALCOHOL IN HOME MADE ROOT BEER: The alcoholic content which results from the fermentation of this root beer and found it to be between 0.35 and 0.5 %. Comparing this to the 6% in many beers, it would require a person to drink about a gallon and a half of this root beer to be equivalent to one 12 ounce beer. I would call this amount of alcohol negligible, but for persons with metabolic problems who cannot metabolize alcohol properly, or religious prohibition against any alcohol,  consumption should be limited or avoided.


Food Chemistry


Food Chemistry

Introduction:

All living things are made up of one or more cells, and the cells in turn contain many kinds of molecules.  In this lab we will be looking at several different macromolecules (large molecules): proteins, carbohydrates, and lipids (specifically fats).  Various chemicals will be used in this laboratory to test for the presence of these molecules.  Most often, you will be looking for a particular color change.  If the change is observed, the test is said to be positive because it indicates that a particular molecule is present.  If the color change is not observed, the test is said to be negative because it indicates that a particular molecule is not present.

You will be using these tests to determine which of the macromolecules are present in various samples of food.

In all of the procedures, you will need to include a distilled water sample as a control.  Usually, a control goes through all the steps of the experiment but lacks one essential factor (the experimental variable).  This missing factor allows you to observe the difference between a positive result and a negative result.  If the control sample tests positive, you know your test is invalid.  Some tests may also contain other controls to make sure certain additives are not contaminated with the substance for which you are testing.

Proteins:

Protein molecules are long chains of amino acids joined by peptide bonds.

Biuret reagent, which is a blue color, contains a strong solution of sodium or potassium hydroxide (NaOH or KOH) and a very small amount of very dilute copper sulfate (CuSO4) solution.  The reagent changes color in the presence of proteins or peptides because the amino group (H2N-) of the protein or peptide chemically combines with the copper ions in biuret reagent.

Carbohydrates:

Carbohydrates include sugars and molecules that are chains of sugars.  Glucose is a simple sugar, also known as a monosaccharide.  Sucrose, or table sugar is a disaccharide, two sugar units bonded together.  Starch is a polysaccharide, a long chain of glucose units.

Benedict’s reagent reacts with many sugars (both mono- and disaccharides) after being heated in a boiling water bath.  Increasing concentrations of sugar give a continuum of colored products ranging from green through yellow and orange to orange red.

Iodine solution reacts with starch to produce colors ranging from a brownish to blue black.

Lipids:

Lipids are hydrophobic molecules which are insoluble in water and soluble in solvents such as alcohol and ether.  Lipids include fats, oils, and cholesterol.

Lipids do not evaporate from brown paper, instead leaving an oily spot.  Lipids also do not mix with water, forming a separate layer, usually on top of the water.  However, some molecules mix with both water and lipids, and can be used to mix the two.  These molecules are known as emulsifiers.  The liver produces bile salts which act as emulsifiers in the digestive tract.  Soaps and detergents also act as emulsifiers.

Summary of tests:


Biuret Reagent
Benedict’s Reagent
Iodine Solution
Brown Paper
Reacts with proteins or peptides, turns purple (protein) or pink (peptides) Reacts with sugars, turns green through yellow to orange (green, less sugar, orange, more sugar) Reacts with starch, turns dark brown to black Lipids leave oily spot

Procedure:

Take some time to plan with your lab partner what tests you will do, and in what order before beginning the procedures.

There are available in the lab a variety of different types of common food.  Choose at least 3 foods and test each for the presence of protein, carbohydrate (both starch and simple sugars), and fats.  Be sure to plan your experiments before starting.

Form a hypothesis for each sample you have chosen to test.

Samples will need to be suspended in water for most tests.  Using a mortar and pestle if necessary, break each sample to be tested into small pieces and suspend the pieces in a small amount of distilled water.

Also available are samples of each of the types of molecules for which you will be testing.  Use these samples to try out the tests so that you will know what a positive result looks like.

Be sure to include a blank control (distilled water) with each test so you know what a negative result looks like.  You may also include a positive control, a sample which you know contains the substance for which you are testing.

The procedures for testing for each type of molecule are given below.

Proteins and Peptides

Proteins:

  1. Use a separate test tube for each sample to be tested, as well as one for a control.
  2. Label each test tube.
  3. Place about 1 mL of each sample (and control) in its test tube.
  4. Add 5 drops of copper sulfate solution to each tube.
  5. Add 10 drops of potassium hydroxide solution to each tube and mix.
  6. Record the tube contents and final color in a data table.
  7. Conclusions: which tubes contained protein?

Carbohydrates: Sugars and starch

Starch

  1. Use a separate test tube for each sample to be tested, as well as one (or two) for a control.
  2. Label each test tube.
  3. Place about 1 mL of each sample (and control) in its test tube.
  4. Add 5 drops of iodine solution to each tube and mix.
  5. Record the tube contents and final color in a data table.
  6. Conclusions: which tubes contained starch?

Sugar

  1. Use a separate test tube for each sample to be tested, as well as one (or two) for a control.
  2. Label each test tube.
  3. Place about 1 mL of each sample (and control) in its test tube.
  4. Add about 2 mL of Benedict’s reagent to each tube and mix.
  5. Heat the tubes in a boiling water bath for 5-10 minutes.
  6. Record the tube contents and final color in a data table.
  7. Conclusions: which tubes contained sugar?

Lipids

  1. Place a small sample of the material to be tested on a square of brown paper.
  2. Place a small drop of water on the square of brown paper.
  3. Compare the drop of water to the sample.
  4. Wait at least 5 minutes.  Evaluate which substance impregnates the paper and which is subject to evaporation.  Record your results.
  5. Conclusions: which sample contained lipids?

Conclusion Questions:

  1. Why do experimental procedures include control samples?
  2. How would you test an unknown solution for each of the following:
    1. Sugars
    2. Fat
    3. Starch
    4. Protein
  3. Assume that you have tested an unknown sample with both biuret solution and Benedict’s solution and that both tests result in a blue color.  What have you learned?
  4. What purpose is served when a test is done using water instead of a sample substance?
  5. Compare your results.

Lab report:

Lab reports must include the following:

  1. A Title to the lab.  A Purpose: What was studied in this lab, and why did we study it?
  2. Procedure: a brief description of each type of test, what constitutes a positive test and what constitutes a negative test.
  3. All data tables.
  4. For each food sample, state your hypothesis and your conclusions.  Did your results confirm or refute your hypothesis?
  5. Answers to questions.
  6. A brief analysis of what worked in this lab and what didn’t work, and why.


Fimbriae Article

Fimbriae, Fibrils, Sex and Fuzzy Coats


The Limitation of Light

One of the frustrating aspects of working with bacteria is that they are so small that it is almost impossible to see anything other than their shape when looking down even the very best of optical microscopes. Even then, their refractive index is so similar to that of water that they have to be stuck to a glass slide, killed and stained before even their shape is revealed. Microscopes which can make use of polarized light (Phase contrast microscopy) can be used to see living bacteria but apart from the added ability of seeing some species happily swimming around they add little to what we can see using conventional staining techniques.

The fact that some species could move quite rapidly intrigued many early microbiologists and eventually some special staining procedures lead to the discovery of thin whip-like appendages which they called flagellae and conferred motility.  This is not to say that light microscopy is not useful. It remains an essential tool in any bacteriology laboratory but it should be recognized that the information obtained, although extremely helpful in routine work, is limited.

Electron Microscopy Reveals More

The invention of the electron microscope revealed much more detail of bacteria. Compared to the fascinating structures uncovered in eukaryotic cells, bacteria, both inside and out, were pretty uninteresting.  It wasn’t until the early 1960s that some interesting surface features of some bacterial species were noticed. This delay was partly due to the electron microscopy techniques in use at that time. The convention at the time was to use ultra-thin sections of tissue, far thinner than sections used for light microscopy. It seemed normal then to prepare bacteria in the same way. Using these techniques, the outer surfaces of bacteria seemed fairly barren but the technique did reveal some of the double membrane-like composition of Gram-negative bacteria.

Shadow-Casting Reveals Still More

Although thin sections of bacteria did not allow flagella to be seen in their entirety it did reveal interesting cross-sections which showed their internal structure. It also enabled detail of flagella attachment to be demonstrated.  It was not until electron microscopes were used to look at whole cells rather than ultra-thin sections that more progress was made. This change required the development of new staining techniques known as shadow-casting where bacterial surfaces were sprayed with electron-dense material such as gold or carbon at an angle. This highlighted the fine surface structures in a way exactly analogous to light falling on a stone surface at an angle reveals more detail than light falling on it at right angles.

Shadows, Flagellae and Fimbriae

Once shadow-casting techniques had been developed the whip-like flagellae were the first to be examined in detail but one researcher in particular noticed the presence of previously undreamed of structures on the surface of some species.  The person who first described these structures which he found on strains of Escherichia coli and Salmonella was Professor James Duguid. He called them fimbriae.

What are Fimbriae?

Fimbriae are thin, hair-like, projections made of protein sub-units. A number of different types have been described (about 7 at the last count, labeled Types I-VII) which can be distinguished by their size (length and diameter) and the type of antigens they carry.  They are characteristic of some Gram-negative bacteria such as Escherichia coli and Salmonella spp and were first described back in the 1960s by JP Duguid who was the Professor of Microbiology at the University of Dundee . Later, it was discovered that these fimbriae would re-grow after they had been broken off e.g. by vigorous shaking and that this re-growth was from pre-formed protein sub-units which were stored inside the cells. Fimbriae originate in the cytoplasm of the cell and project through the cell membrane and the cell wall.


A Controversy
A short while after Duguid published his findings an American called Robert Brinton published much the same stuff and called them pili. What followed was a pretty acrimonious exchange of letters in the scientific press about what they should be called.

It was all pretty good fun but to this day our American cousins, and anybody who doesn’t know any better, call them pili whereas all right-thinking, clear-minded and fair microbiologists refer to them as fimbriae.


So What do Fimbriae Actually do?

Over the years we have learned quite a lot about fimbriae and right from the very early days it was thought that they were involved in helping the bacteria adhere to surfaces. There is now a substantial body of evidence in support of this much of it in relation to pathogenic strains of E coli.

Type I Fimbriae are Pathogenicity Factors

It’s clear these days that Type I fimbriae are involved in bacterial adhesion and the very best example are those carried by pathogenic strains of E.coli. These come in a variety of forms including plain old EnteroPathogenic E.coli (EPEC), EnteroToxigenic E.coli (ETEC), EnteroInvasive E.coli (EIEC) and VeroToxogenic E.coli (VTEC). These E.coli strains use Type I fimbriae to adhere to gut mucosal cells which is the first step in the pathogenic process. Without the fimbriae their capacity to cause disease is greatly diminished or abolished completely.

Type IV fimbriae are particularly interesting. These have also been referred to as “bundle forming pili” because of their ability to aggregate into bundles. These fimbriae are thought to be connected with the ability of EPEC strains to form microcolonies on tissue monolayers and mutants lacking this ability show reduced virulence. Type IV fimbriae have also been shown to be involved in the remarkable phenomenon of bacterial twitching motility which allows bacterial cells to crawl over a surface.

Type VII Fimbriae, Viruses and the Sex Bit

Type VII fimbriae are the conduit for DNA transfer between bacterial mating strains. As it happens they also provide a binding site for certain bacteriophages. The significance of this is a mystery but it does enable Type VII to be seen clearly because when some of the bacteriophage is added to a suspension of cells, the ‘phage coat the Type VII fimbriae.  In the electron microscope picture above right you can clearly see little particles stuck on two of the fimbriae which are much longer than the rest because size does matter, at least to E.coli. In a generous attempt to resolve the fimbriae/pili argument it was proposed that Type VII fimbriae were named the “sex pilus”.


 Sex Pili
The photograph above was taken using a transmission electron microscope. The Type I fimbriae are the thin projections sticking out from the surface of the cell. Some of the fimbriae have broken off indicating that they are quite brittle.


Surfaces of Streptococci

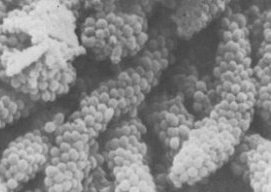
Back in the days before we knew much about fimbriae researchers looking at ultra-thin sections of the serious pathogen Streptococcus pyogenes noticed that the very outside of the cells had a fuzzy appearance. In a fit of imagination it was called “fuzzy coat”.  Later, when they learned about shadow-casting whole cells they applied this technique but it did not help to resolve any particular structures like fimbriae.


S. pyogenes Fuzzy Coat
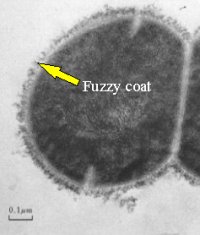
Even today we have not resolved any definite structure to the S. pyogenes “fuzzy-coat”. We do know, however, that it consists partly of a substance called “M-protein” which is a major pathogenicity factor of this species.


Negative Staining Reveals Surface Fibrils on Some Streptococci

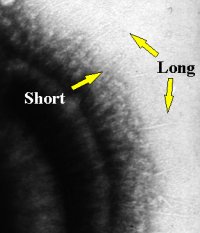
Towards the late 1970s a rather different technique which made use of a special type of stain called a “negative stain” revealed very thin, delicate, hair-like structures on some oral streptococci such as Streptococcus sanguis and Streptococcus salivarius. Take a look at the photograph on the right. This is an electron micrograph of the surface of a Streptococcus salivarius cell and although it may not be terribly clear on this reproduction, the original shots showed two types of these thin hair-like structures, long ones and short ones.  This negative-staining technique could not, by the way, reveal anything hair-like on the surface of Streptococcus pyogenes which had the fuzzy coat.

Fibrils are not Fimbriae

More research using lots of different strains of different species of oral streptococci showed these “hairs” came in all sorts of lengths and some cells carried more than one type. They were very thin and flexible. Although some fimbriae on E.coli can be very thin, “flexible” is not a term normally associated with fimbriae.  To begin with these hairs were called “fibrils” and there is a fair amount of evidence to suggest they are made of protein and some evidence which suggests that some are even made of glycoprotein although glycoproteins are generally considered pretty rare beasts in bacteria. As far as fibril synthesis goes, we don’t know much. Generally speaking they are difficult to remove, probably because they are so flexible, so it’s not possible to say whether they can re-grow like fimbriae.  The analogy was taken a stage further when a role in adhesion was postulated and, in fact, there is fairly good evidence to back this up, at least for the S.salivarius fibrils.

Unfortunately at this point the waters got a bit muddy when some people started referring to the long fibrils as “fimbriae” and the short ones as “fibrils”. Since they are kind of like fimbriae this wasn’t so surprising but what was surprising was that they were never referred to as pili!


Streptococcal Fibrils
Some Oral Streptococci Have Tufts of Fibrils
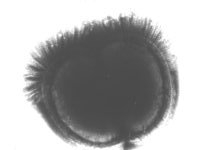
Some strains of oral streptococci were found to carry tufts of fibrils and looked rather like punk-rockers with Mohican hairstyles. Later these were grouped together into a new species and given the rather elegant name Streptococcus cristae.


Fibril Tufts and Co-aggregation

There is evidence that these may also be involved in adhesion, this time to rod-shaped bacteria to make the structures commonly found in mature dental plaque called “corn-cob-configuration”.  When bacteria of the same species stick to each other it’s known as “aggregation”. In this case the bacteria are from different species and it’s known as “CO-aggregation”.


“Corn Cobs” in Dental Plaque 


And finally

You may have guessed by now that I’m a bit skeptical about using the term “fimbriae” to describe the surface structures of these oral streptococci. I prefer to describe them all as fibrils but I’ll probably end up in the minority.  Sooner or later this is all going to be resolved but for the time being it’s probably best to keep the term “fimbriae” reserved for those brittle hair-like, proteinaceous surface projections of Gram-negative rods like Escherichia and Salmonella and call everything else “fibrils”.

Just remember pili are fimbriae and fibrils are different and you won’t go far wrong.


SUMMARY
1. Fimbriae are appendages which have been seen on the surfaces of a range of Gram-negative rods such as E.coli and various species of Salmonella
2. Fimbriae come in 7 different types (I-VII) distinguished by their length and width
3. Fimbriae are thought to be important in adhesion and have been shown to be pathogenicity factors in pathogenic strains of E.coli.
4. Type VII fimbriae allow DNA transfer between mating strains of certain species such as E.coli
5. Fibrils are found on streptococci
6. Fibrils are different from fimbriae, they are thinner and appear to be more flexible
7. Some fibrils have been shown to function in adhesion e.g. in corn-cob-formations found in dental plaque


http://www.ncl.ac.uk/dental/oralbiol/oralenv/tutorials/fimbriae.htm


First Semester Review


First Semester Review      


What is the study of life called?
What are the smallest units that can carry on life functions called?
Living things are composed of ______________.
Give an example of a scientific observation.
What is a hypothesis?
What 3 things compose an atom?
Matter is made of ________________.
When atoms gain energy, what happens to electrons?
Do  cells contain a few or thousands of different kinds of enzymes?
__________________ reactions are important in organisms because they allow the passage of energy from one molecule to another.
What is a polar molecule?
Water molecules break up other polar substances. Give an example of such a polar molecule.
What happens to ionic compounds in water?
Which is not a carbohydrate —– glycogen, steroids, cellulose, or sugars?
Amino acids are the monomers for making ________________.
Is ice an example of an organic molecule?
The type & order of the amino acids determines the ___________ of a protein.
Very active cells need more of which organelle?
What organelle is the packaging & distribution center of the cell?
What membrane surrounds the nucleus?
What is the function of mitochondria. Sketch their shape.
Where is chlorophyll found in plants?
Diffusion takes place from ________________ concentration to ___________.
If a cell has a high water content, will it lose or gain water?
Ink dispersing in a beaker is an example of ________________.
Very large molecules enter cells by a process called ________________.
Endocytosis and exocytosis occur in ______________ directions across a cell membrane.
What is photosynthesis?
Where do the dark reactions of photosynthesis take place?
When chlorophyll absorbs light energy ATP is made and what other energy carrying molecule?
When chlorophyll absorbs light energy, what happens to its electrons?
_______________ molecules are responsible for the photosystems.
Electrons that have absorbed energy & moved to a higher energy level enter what chain?
When cells break down food molecules, energy is temporarily stored in what molecule?
When muscles do not get enough oxygen, what acid forms during exercise?
If you are growing bacteria in a culture and lactic acids starts to form, the bacteria are not getting enough of what gas?
The 2 stages of cellular respiration are _____________ & oxidative respiration.
Citric acid forms in which cycle during cellular respiration?
ATP molecules are formed inside what cellular organelle?
The first filial generation is the result of  a __________________ cross.
If a genetic trait appears in every generation is it dominant or recessive?
When Mendel crossed pea plants & looked at 2 different traits (flower color & plant height), did the inheritance of one trait influence the other?
If a heterozygous individual is crossed with a homozygous recessive individual, how many phenotypes will result?
What is the expected genotypic ratio from a homozygous dominant X heterozygous monohybrid cross?
List several reasons for genetic counseling.
If a genetic disorder is found equally in males & females, is it autosomal dominant or recessive?
If both parents carry the gene for cystic fibrous, what is the chance that their child will develop the disease?
If a trait is sex-linked, will it occur more often in males or females?
If a gene is located on the X-chromosome, it is said to be ________________.
BACK