| Aseptic Techniques |  |
Aseptic Techniques are the precautionary measures taken to prevent contamination of pure cultures and sterile laboratory equipment. Treat all organisms as potential pathogens. Many of the organisms can be opportunistic in their abilities to cause infection. Microorganisms in the lab atmosphere may come to rest on the desktop between classes and overnight, so disinfect lab top thoroughly before and after each lab period.
This is accomplished by:
- Sterilize all materials before beginning.

- Spray the lab top down with a commercial disinfectant or a 10% bleach solution and allowing this to stand for a minute. You may then wipe down the bench with the paper towel.

- Wash hands before and after lab.

- You should have only the materials you’ll need and the written lab procedures on your bench top or desk.
- Keep petri dishes and test tubes covered as much as possible. If top must be removed completely do not LAY IT on the lab top. This lowers the probability of contamination and prevents “false positive” results.

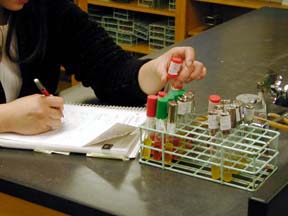
- Hold bottles and tubes at an angle to minimize the amount of airborne microbes that can fall into them (blue circle). Remove the caps as shown above and do not set the caps down. Keep the mouth of the facing cap down (red circle).
- Work quickly!
- It is important to use a new sterile loop for each different sample taken or removed because once a sterile loop is used it is no longer sterile.
- To remove a sterile loop from its container:
- Open the package on the side away from the loop.
- Keep the ends of the loop away from outside of the mouth of the package.
- Remove ONE loop and exercise caution not to TOUCH any outside surfaces
- Pay strict attention to the disposal of used laboratory material.
- Avoid placing things in your mouth (fingers, pen tops, etc…) and then laying them on your bench top.
- When using metal inoculating loops, HEAT the entire piece of metal of the inoculation instrument in the flame: it should be RED HOT. Be sure to COOL your inoculation instrument before picking the inoculum (broth or agar).

- When using antibiotic discs, The antibiotic discs come in a little tube-like dispenser. To remove the discs take a sterile toothpick and push out a disc into your plate. Use the toothpick to gently press the disc onto the agar.

- To inoculate a Petri plate: Lift one edge of the Petri plate cover to gain access to the culture medium. Keep the cover over the plate bottom to prevent dust and microbes from falling onto the agar.

- Wear gloves whenever you may come in contact with any type of microbe.
- If your gloves become contaminated, remove them and put on a new pair.
- Report any spills to me immediately!

| Cover the spill with paper towels and squirt disinfectant onto the towels. Wait 20 minutes then clean up the spill. |
- Label all test tubes and petri plates with your name (initials), your table #, date, exercise #, and name of organism BEFORE you add any solutions, bacteria, etc. Use small pieces of masking tape, but remove these labels whenever you are finished so the tubes can be autoclaved,

- Do not dump ANY microbial suspension down the drain or in the trash can. Place them in an autoclave bag.

- Place test tubes in racks when working at your table: never lay the tubes down—they leak.
- Keep test tube caps and petri dish covers on media to reduce contamination (matters not whether it is sterile media or already cultured).

- All agar plates are incubated UPSIDE DOWN to reduce bacterial contamination and to reduce the possibility of water condensation that may be on the lid dropping onto the agar, causing fluid to run across the agar medium.