Wildflowers of Arkansas
photography by Rebecca Buerkle
 |
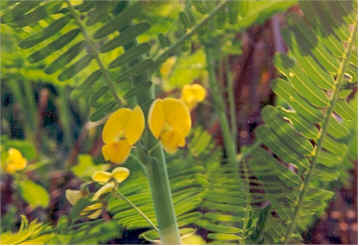 |
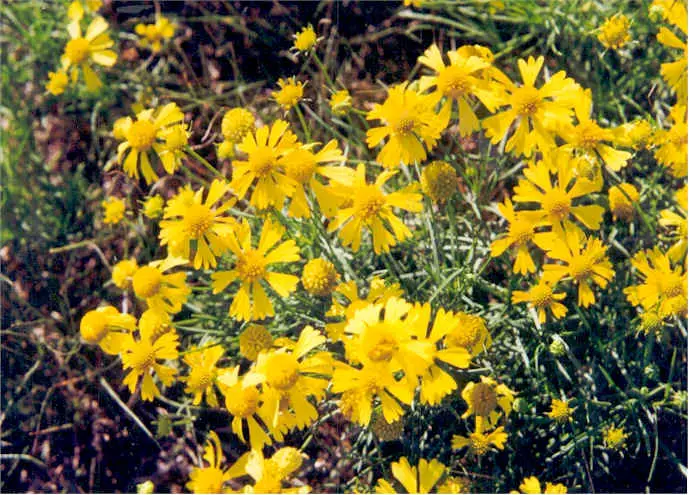
| Bitterweed | Partridge Pea |
 |
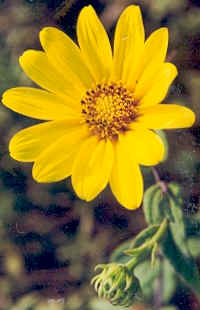 |
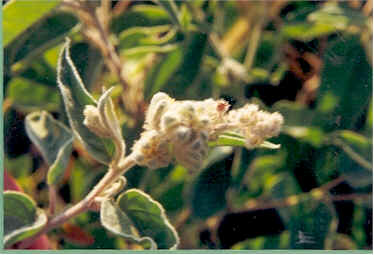
| Snow on the Prairie | Woodland Sunflower |
 |
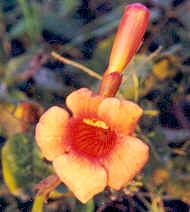 |
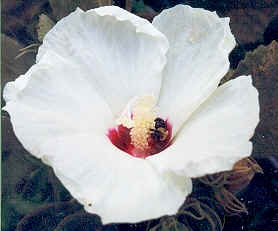
| Rose Mallow | Trumpet Creeper |
 |
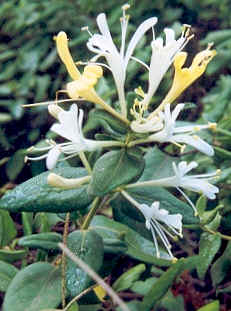 |
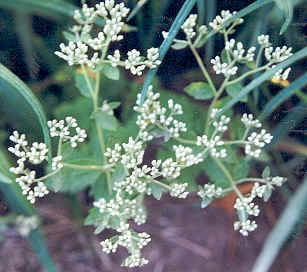
| Boneset | Honeysuckle |
 |
 |
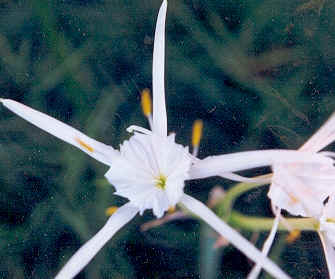
| Spider Lily | Rough Blazing Star |
Wildflowers of Arkansas
photography by Rebecca Buerkle
|
|
| Bitterweed | Partridge Pea |
|
|
| Snow on the Prairie | Woodland Sunflower |
|
|
| Rose Mallow | Trumpet Creeper |
|
|
| Boneset | Honeysuckle |
|
|
| Spider Lily | Rough Blazing Star |
Introduction:
DNA isolation from blood, hair, skin cells, or other genetic evidence left at the scene of a crime can be compared with the DNA of a criminal suspect to determine guilt or innocence. This is due to the fact that every person has a different sequence. Scientists use a small number of sequences of DNA that are known to vary among individuals, and analyze those to get a possibility of a match. DNA is isolated, cut using restriction enzymes and sorted by size by gel electrophoresis. DNA is placed in a gel and an electrical charge is applied to the gel. The positive charge is at the top and the negative charge is at the bottom. Because DNA has a slightly negative charge, the pieces of DNA will be attracted to the bottom. The smaller pieces move more quickly towards the bottom than the larger pieces. The DNA can then be analyzed.
Objectives:
In this simulation you will examine crime scene evidence to determine who is responsible for eating the Queen’s special imported Lindbergher Cheese (yes, the stinky cheese). You will model the process of electrophoresis and DNA fingerprinting.
|
ROYAL GUARD INCIDENT REPORT
|
||||||||||||||||||||||||
Incident Data
Property
Burglary DataMethod of Entry: Unknown, no evidence of force on doors or windows. Narrative: The cheese was allegedly stolen from the Queen’s sitting room the night before the grand ball. The cheese was listed as a gift from the Manchurian diplomat. Officer Li Gase dusted for fingerprints and found none on the table or doors, the maid claimed that they had been wiped clean earlier. The wheel of cheese was on a platform in the sitting room, and half of it had been eaten. We took pictures of the half eaten cheese and sent it to the lab for further tests. Edna N. Zime, the lab technician said that saliva samples could be taken from the teeth imprints of the cheese that was left behind. Suspect DataSuspect Number: 1 Suspect Number 2 Suspect Number 3 Suspect Number 4 Crime Lab Data
Narrative: After receiving the package with the plastic bag marked Crime Scene, the DNA was extracted. Because the sample was so mall, the DNA was amplified using the polymerase chain reaction. We isolated the DNA from the four suspects and compared them to the crime scene DNA using DNA restriction analysis. Results: See attached DNA Results |
 DNA Evidence Evaluation:
 1. Turn your paper strips (DNA sequences) so that the side with the bases is facing you. The restriction enzyme cuts at every point it finds C C G G, always cutting between the C and the G. Label the back of the slips with the suspect number so that you don’t get them confused after cutting. Use scissors to cut the DNA sequence at the C C G G points.
2. Count the number of base pairs (bp) in each piece of DNA that you created. Record the base pair number on the back side of the DNA fragment.
3. Make an enlarged chart like the one shown. Your teacher will give you paper for this. Use a ruler to ensure that the lengths are uniform.
4. Tape your DNA fragments to the chart, using the base pair numbers as a guideline for fragment placement.
5. Compare the crime scene DNA to the suspects and indicate on your chart, which suspect is guilty of eating the cheese.

ANALYSIS:
1. On your chart, label the positive (+) and the negative (-) ends. Circle the suspect’s DNA who matches the DNA at the crime scene and write the name of the suspect.
2. For each of the following tasks performed in the activity, describe what they are actually simulating.
Cutting the DNA into fragments:
Taping the DNA onto the large paper:
3. For each word below, describe how it relates to DNA Fingerprinting:
Polymerase Chain Reaction:
Gel Electrophoresis:
Restriction Enzyme:
| Where the Hippos Roam Holt, Rinehart, Winston |
 |
Introduction:
Millions of years ago, ancestors of modern crocodiles lurked in the shallow waters of lakes and other bodies of water. They hunted fish and other animals, much as their descendants do today. If you could travel back in time to visit one of those lakes, you might see the ancestors of today’s hippos there as well. Antelopes might browse along the edges of the lake, and rodents of various sizes might scurry back and forth. When paleontologists examine the fossil of a prehistoric organism, they may discover clues about the organism’s life. They may also answer questions about the environment it lived in: Was the area hot or cold? Was it humid or dry? Then, by putting all of these clues together, the paleontologists may be able to learn a little more about how organisms and environments change over time. Unfortunately, studying a fossil site is no easy task! Often, a paleontologist may find a few teeth scattered over a very large area. In such cases, keeping track of where the fossils were found is very important.
In this activity, you will use the data from a fossil site to create a map of fossil locations at that site. Then you will make some conclusions about the past environment, or paleoenvironment, at that location. The table below shows the locations of fossils that were found spread out over 22,500 m2. A team of paleontologists decided that this site, which measured 150 m x 150 m, was too large to work on all at once. Therefore, they decided to create a grid of 10 m squares.
Starting in the northwest corner, they labeled the squares with the letters A-O from west to east. Then the team numbered the squares 1-15 from north to south. In this way, each fossil could be labeled with a letter and a number, depending on where it was found. For instance, the label A1 would signify the 10 m x 10 m square in the northwest corner of the site. Similarly, the label O15 would indicate the square in the southeast corner of the site.
Activity:
Location of Fossils |
||||
| Layer | Hippos | Rodents | Crocodiles | *Bovids |
| A | B11,C6,D3, I15,J10,L7, M6 | C14,F7,G13, I3,L13,O2 | ||
| B | F2,J3,K1,K2 | B10,B11,F13 | H2,I7,K2, N5,N7 | G14 |
| C | B3,C10,D1, H8,M9,N4 | A5,A6,E2, E4,E14,H7, H8,H12,K4, M1,N15 | ||
* Bovids are antelopes and other similar animals
Problem:
Questions:

1. Definition:
2. It ________________ how living organism affect each other and the world they live in.
3. ____________________ is the place a plant or animal lives in.
4. ____________________ is an organism’s total way of life (its job)
5. ____________________ factors are the nonliving parts of an organism’s environment.
6. 4 Examples of abiotic factors are:
7. _____________________ factors are all the living organisms that inhabit an environment.
8. Some things that organism’s rely on each other are _________________, ______________________, __________________ or _________________
9. What are the levels of simple organization from simplest to most complex?
10. _________________________ have organized the interactions an organism takes part in to different levels according to ________________
11. Level 1 Organism:
12. Level 2 Population:
13. Level 3 Biological Community:
14. Level 4 Ecosystem:
15. Level 5 Biosphere:
16. Where can you find life?

Have you ever wondered what your future children will look like? Have you ever wondered if they will be completely healthy? Have you ever thought about having yourself or your children cloned? This will more than likely be different things that you may have to deal with as an adult or parent.
This WebQuest, geared for high school biology students, attempts to explain different genetic disorders by dividing the class into different roles. With several cooperative groups presenting on different disorders, the whole class will be able to see the different types of genetic disorders, if they are treatable, and what we are doing as a human race to try to cure these disorders.
As a class you have already done some basic studies on the concepts of genetics. Now we will be embarking on the content of genetic disorders – how people get them, karyotyping of the disorder, types of treatments, and any type of genetic testing that could have been taken advantage of prior to the birth of your child. Lastly, you will want to look at what your ‘child’ will look like.
The class will divide up into groups of 4 students. Within these cooperative groups each student will be given an area of study that they will need to attempt to draw conclusions from.
In the end your group will need to display the information that they find along the way as a class project. Your group will need to create a multimedia presentation that will be shared with the class and graded. You may want to include a suggested list of readings and/or Internet sources that may be of interest to the class.
Your group should include 4 students total. One student will be a genetic counselor. One student will be a disorder specialist. Another person will be a perspective parent whose child will have the disorder. The last student will be the human genome specialist.
1. Genetic Counselor – Your role as the genetic counselor is to examine what types of treatment there are for the disorder and how you can advise these perspective parents on the disorder that their child has been exposed to.
2. Disorder Specialist – Your role as the disorder specialist is to karyotype the disorder, find out all of the signs and symptoms of the given disorder, and to find out what different prenatal tests could have been provided to the parent to have found out about this disorder prior to birth.
3. Parent – Your role as the parent is to find out what your child would look like using your own genetic features along with ‘your mate’s’ genetic features. Using Punnett’s squares you need to show what features will show up in your children and what the possibilities are that they will show up. You will also need to show a possible image of the child you and your mate could have.
4. Human Genome Expert – Your goal as the human genome expert is to find out all about the human genome project. What is it? What is their mission? How far along are they? How long has this project been in progress? Why is it important? And any other information that you feel is relevant that you would like to share.
Some Internet resources that may be helpful to your groups will include the following:
1. Genetic Counseling: Ask NOAH. This site contains a lot of information about the different types of genetic disorders.
2. Yahoo – Genetic Disorders This site lists several different disorders and contains several links to all of the different types of genetic disorders.
3. Genetic & Rare Conditions Site This site lists several links to different types of disorders in alphabetical order.
4. What can our chromosomes tell us? This is a site that talks about karyotyping and what we can understand due to karyotyping. Newsletter from the Genetics Science Learning Center.
5. A Genetics Glossary This is your basic genetic glossary however you really need to know what you are looking for so that it will be useful.
6. Genetics Education Center This is a site dedicated to the education of genetics with several links to other sites.
7. The National Human Genome Research Institute . This site tells you all about the human genome project.
8. Department of Energy – Human Genome Project Information This site also gives a lot of information about the human genome project. It also includes some fact sheets on cloning and gene testing.
9. A Gene Map of the Human Genome Within this site you can see the mapping of several different chromosomes found within the body.
10. Learning about the Human Genome Project and Genetics through the World Wide Web http://www.kumc.edu/gec/hgpwww.html. This site includes a section on the ethics issues of genetic research that the genetic counselor may want to look at.
11. Understanding Gene Testing This site talks of how genes are linked to disease, how does a faulty gene trigger disease, and much more.
12. Ask Noah : on Birth Defects and Genetics This site includes information about fetal testing, and different types of birth defects.
13. Basics of DNA Fingerprinting This site will give you the basic understanding of DNA fingerprinting.
14. What is Genetic Testing? This site shows the basics of genetic testing and also gets into some of the ethical issues of genetic testing.
15. Human Genetics : Human Karyotype This site talks about karyotypes, chromosomal abnormalities, and allelic disorders.
| Beginning 5 |
Developing 10 |
Accomplished 15 |
Exemplary 20 |
Score | |
|---|---|---|---|---|---|
|
Quality of Information and ideas |
|||||
|
Amount of Information found
|
|||||
|
|
|||||
|
Use of class time
|
|||||
| |
Conclusion:
Answer the following questions and turn in after your presentation:
Modified from web quest by Michelle Olsham