| August
Student Learning Expectations:
Nature of Science
Standard 10: Students shall demonstrate an understanding that science is a way of knowing.
Explain why science is limited to natural explanations of how the world works
NS.10. B.1
Explain why science is limited to natural explanations of how the world works
NS.10. B.2
Compare and contrast hypotheses, theories, and laws
NS.10. B.3
Distinguish between a scientific theory and the term “theory” used in general conversation
NS.10. B.4
Summarize the guidelines of science:
A. Explanations are based on observations, evidence, and testing
B. Hypotheses must be testable
C. Understandings and/or conclusions may change with additional empirical data
D. Scientific knowledge must have peer review and verification before acceptance
Standard 11: Students shall design and safely conduct scientific inquiry
NS.11. B.1
Develop and explain the appropriate procedure, controls, and variables (dependent and independent) in scientific experimentation
NS.11. B.2
Research and apply appropriate safety precautions (refer to ADE Guidelines) when designing and/or conducting scientific investigations
NS.11. B.3
Identify sources of bias that could affect experimental outcome
NS.11. B.4
Gather and analyze data using appropriate summary statistics
NS.11. B.5
Formulate valid conclusions without bias
NS.11. B.6
Communicate experimental results using appropriate reports, figures, and tables
Standard 12: Students shall demonstrate an understanding of current life science theories.
NS.12.B.1
Recognize that theories are scientific explanations that require empirical data, verification, and peer review
NS.12.B.2
Understand that scientific theories may be modified or expanded based on additional empirical data, verification, and peer review
Standard 13: Students shall use mathematics, science equipment, and technology as tools to communicate and solve life science problems
NS.13.B.1.
Collect and analyze scientific data using appropriate mathematical calculations, figures, and tables
NS.13.B.2
Use appropriate equipment and technology as tools for solving problems (e.g., microscopes, centrifuges, flexible arm cameras, computer software and hardware)
NS.13.B.3
Utilize technology to communicate research findings
Standard 14: Students shall describe the connections between pure and applied science.
NS.14.B.1
Compare and contrast biological concepts in pure science and applied science
NS.14.B.2
Discuss why scientists should work within ethical parameters
Standard 15: Students shall describe various life science careers and the training required for the selected career
NS.15.B.1
Research and evaluate science careers using the following criteria:
- educational requirements
- salary
- availability of jobs
- working conditions
|
The major content themes of biology
Ø Matter and Energy
Ø Cells
Ø Interdependence
Ø Reproduction and Inheritance
Ø Evolution
Ø Homeostasis and Stability
What science is and is not
Ø Deals only with natural world
Ø Explanations can be tested
Ø Explanations are used to make predictions
Ø Is revised to account for new evidence
Ø Also refers to a body of knowledge that has accumulated after repeated attempts to verify/refute
Process of science
Ø Starts with observation
Ø Form inferences
Ø Develop hypotheses
Ø Test hypotheses
Ø Form Theories
Hypotheses vs. theories vs. laws
Ø What if statements
Ø Researched, hypothesized and tested
Ø Statements of occurrences in natural world
Ø Peer collaboration
Ø Peer verification
Designing an Experiment
Ø Stating the problem
Ø Forming hypotheses
Ø Setting up controlled experiment
Ø Recording and analyzing results
Ø Drawing conclusions
Ø *Science Fair Proposals
Graphing
Ø How raw data must be organized to reveal patterns
Ø How to take data and create charts
Ø Using charts to create graphs
Ø Interpret results by what is seen and not what it is thought to be
Analyzing data includes
Ø Understanding slope and rates of change
Ø Extrapolating information from graphs
Ø Recognizing patterns in data plots
Ø The role of dependent and independent variables
A theory is more than a guess
Ø It involves research
Ø Tested hypothesis
Ø Peer review
Ø Must be repeatable
Ø May combine several ideas
Ø Ex. Plate Tectonic Theory and how it developed
The tools of science are
Ø Mathematics
Ø The metric system
Ø Various lab equipment
Ø Data collecting equipment
Ø Rulers
Ø Calculators
Ø Computers
The role of science in society
Ø Science leads to changes in technology
Ø the goal of science is to improve human condition
Ø Life has value and should be respected even during research
Ø Pure science is research that leads to the research being applied or used for the good of humankind
Careers in science
Ø What are some of the various life science careers?
Ø What kind of training does it take to be a life scientist?
Ø What are the working conditions and compensation for being a life scientist?
|
How can you use the same skills and strategies as a scientist to learn about your world?
Guiding Questions
1. What is the importance of the major themes of biology?
2. What is the role of experimental design in biology?
3. What systematic procedures are necessary to investigate biological problems?
4. What are important tools used in the study of biology?
5. What are useful data types and how are they analyzed?
6. What important mathematical manipulations should be performed on qualitative data?
7. Why is the scientific method a logical process for observing the natural world
8. What is the difference between a hypothesis and a theory?
9. Why it is important to acknowledge that science is a human endeavor, not separate from society but a part of society?
10. In what ways do scientists make accommodations for differences in racial, social, and ethnic backgrounds among scientists?
Essential Question
What are some of the various roles that science plays in society, especially in the workforce?
|
Anchor Assessments:
Scientific Method Lab (Vitruvian Man) Lab Report
Anchor Assessment
Careers in Life Science Term Paper and Presentation
|
Equipment Survey
Problem Solving
Liquid Volume Lab OR Volume Lab
Mystery Canisters OR Length Lab
Scientific Method: Vitruvian Man
|
August Vocabulary
Resources
Outline for Lab Reports
Rubric for Lab Reports
Rules for Diagramming
Lab Safety Contract
Lab Safety Test
Solutions and Dilutions
Literacy Items ( found in LRSD Biology Literacy Notebook)
“Owls use dung to “Fish” for Beetles”
“Distinguishing Science and Pseudoscience”
“Scientific Laws, Hypotheses, and Theories”
“Wrong! Wrong! Wrong!”
“Designing an Experiment”
“The effects of steroids on athletes”
“Experimental Design/Presentation Rubric”
“ Experimental Design Reference”
“Natural plant defenses-fight or flight?”
“Suicide grasshoppers”
“Brainwashed by Parasite Worms”
“Toads that Go Pop in the night”
“Weapons of Mouse Destruction?”
“A Weed, a Fly, a Mouse and a Chain of Unintended
Consequences”
“Future Tech, Spare Parts”
“Device Uses Sewage Bacteria to Produce Electricity”
“Locus Inspire Technology That May Prevent Car Crashes”
“Scientists sticking it to nature by replicating tiny gecko feet”
|
| September
Ecological and Biological Relationships
Standard 8: Students shall demonstrate an understanding of ecological and behavioral relationships among organisms.
EBR.8. B.1
Cite examples of abiotic and biotic factors of ecosystems.
EBR.8. B.2
Compare and contrast the characteristics of biomes.
EBR.8. B.3
Diagram the carbon, nitrogen, phosphate, and water cycles in an ecosystem.
EBR.8. B.4
Analyze an ecosystem’s energy flow through food chains, food webs, and energy pyramids.
EBR. 8. B.5
Identify and predict the factors that control population, including predation, competition, crowding, water, nutrients, and shelter.
EBR.8 B.6
Summarize the symbiotic ways in which individuals within a community interact with each other: commensalisms, parasitism and mutualism
EBR.8. B.7
Compare and contrast primary succession with secondary succession.
EBR.8. B.8
Identify the properties of each of the five levels of ecology: organism, population ,community ,ecosystem and biosphere
MC 2.B.6
Compare and contrast the functions of autotrophs and heterotrophs
Standard 9: Students shall demonstrate an understanding of ecological impact of global issues.
EBR.9. B.1
Analyze the effects of human population growth and technology on the
Environment/biosphere.
EBR.9. B.2
Evaluate long range plans concerning resource use and by-product disposal in terms of their environmental, economic, and political impact.
EBR.9. B.3
Assess current world issues applying scientific themes (e.g., global changes in climate, epidemics, pandemics, ozone depletion, UV radiation, natural resources, use of technology, and public policy).
Molecules and Cells
Standard 1: Students shall demonstrate an understanding of the role of chemistry in life processes.
MC.1.B.1
Describe the structure and function of the major organic molecules found in living systems:
Carbohydrates
Proteins
Lipids
Nucleic Acids
MC.1.B.2
Investigate the properties and importance of water and its significance for life:
· surface tension
· adhesion
· cohesion
· polarity
· pH
MC. 1.B.3
Describe the relationship between an enzyme and its substrate molecule(s)
MC. 1.B.4
Explain the role of energy in chemical reactions of living systems:
- activation energy
- exergonic reactions
- endergonic reactions
|
Ecology
Levels of Organization
Ø biosphere àBiomeà ecosystem à community à population à species à organism
Energy flow
Ø Autotroph vs. Heterotroph
Ø Producers: photosynthesis and chemosynthesis
Ø Consumers: herbivore, carnivore, detritivore, omnivore, decomposer
Ø Feeding relationships: food chain vs. food web
Ø Energy conversion and transfer by trophic levels
Biosphere recycling
Ø Water cycle
Ø Nutrient cycles: Carbon, Nitrogen, Phosphorous
Ecosystem productivity and biomass
Factors shaping ecosystems:
Ø Climate zones and Greenhouse phenomenon
Ø Biotic and Abiotic factors
Ø Niche concept
Ø Community interactions: competition, predation, symbiotic interactions (commensalisms, mutualism, parasitism)
Succession
Ø Primary succession and pioneer species
Ø Secondary succession
Biomes
Ø Identify defining characteristics of each
Ø Terrestrial biomes: tropical rain and dry forests, savanna, desert, grassland, temperate woodland and shrubland, temperate forests, coniferous forests, boreal (taiga) forests, tundra
Ø Aquatic ecosystems:
Ø Freshwater – flowing, standing,
Ø Wetland
Ø Estuary
Ø Marine – photic vs. aphotic
Ø Zones, intertidal, coastal, coral
Ø Reef, open ocean, benthic zone
Population growth
Ø Factors affecting and limiting growth
Ø Density-dependent and density independent factors
Ø Carrying capacity vs. exponential growth
Ø Describe human population growth, analyze age structures, describe how humans growth has affected other species
Human impact on the environment:
Ø Biodiversity threat
Ø 6th mass extinction
Ø pollution, acid rain, ozone depletion, and greenhouse affect
Ø global warming
Ø exotic (introduced) species
Ø conservation efforts and how individuals can affect change
Review basic chemistry concepts:
Ø atomic structure
Ø bonding
Ø covalent, ionic, hydrogen
Ø elements and isotopes
Carbon
Ø chemistry of carbon
Ø macromolecules of life – identify and describe structure (monomers) and examples of polymers
Ø lipids, carbohydrates, proteins,
Ø nucleic acids
Chemistry of water:
Ø polarity
Ø hydrogen bonding
Ø water properties
Ø solutions and suspensions
Ø pH – acids and bases and buffers
Enzymes
Ø reactions and activation energy
Ø enzymes as catalysts
Ø 3-D structure of enzymes
Ø examples of enzymes
Ø how enzymes work
Ø regulation of enzymes
|
How are all living things connected to one another and to the universe?
1. How are the biotic factors of an ecosystem different from the abiotic factors?
2. What are the biotic and abiotic factors present in a temperate deciduous forest?
3. What is the general climate in each of the 7 major biomes?
4. What role does the climate play in determining the types of organisms that can live in specific biomes?
5. How does carbon enter the living part of the carbon cycle?
6. How does carbon re-enter the environment from living things?
7. How does nitrogen cycle from the environment into living things?
8. How does water enter and exit the biotic part of the water cycle?
9. How does energy cycle through an ecosystem?
10. What are some specific factors that limit growth of animal populations?
11. What are three types of symbiotic relationships between organisms? Give an example of each type or relationship.
12. How does primary succession differ from secondary succession?
13. How do humans impact the carbon cycle and what are the global consequences?
14. What factors should be taken into consideration when deciding the location for a new landfill?
15. What human activities have impacted the ozone layer?
16. Why is sustainable use of natural resources important?
Biochemistry
How do molecules sustain living things?
1. What are the major groups of organic compounds and how do they function in living things?
2. What is an enzyme and how does it function in cells?
3. Why is water essential to life?
4. What are the distinguishing chemical and physical properties of water?
|
Anchor Assessment:
Biomes Brochure
And
Models from Carbohydrate Modeling Lab
OR
Models from Amino Acid Modeling Lab
|
Ecology Labs
Population Ecology (Goldfish) OR Random Sampling
Food Web construction and manipulation
Biomes Brochures
Graphing Growth Rate
Loss of Vegetation (trophic interaction)
Biochemistry Labs
Measuring pH
Chemistry of Carbohydrates (models)
Testing for Organic Compounds
Properties of Water Lab
Chemistry of Amino Acids and Proteins (models)
Pineapple Enzyme Lab OR Lactase Enzyme Lab
|
September Vocabulary
HOLT INTERACTIVE “Ecosystem Dynamics”
Literacy Materials (Ecology)
“Soil Fertility in Agricultural Systems”
“Power or Plants?”
“What’s the big Deal About dirt?”
“ A Diverse Ecosystem Offers Little or No Protection Against Invading Species”
“Earth’s Uncanned Crusaders: Will Sardines Save Our Skin?”
“A melting Glacier in Tibet serves as an Example and a Warning”
“Overfishing is Emptying World’s Rivers, Lakes, Experts Warn”
“Global Warming is Spurring Evolution, Study Says”
“Is Global Warming Harmful to Health?”
Literacy Materials-Biochemistry
“Enzymes may help brain clean the slates”
“Enzyme may aid people with Celiac Disease”
“Tiny Invader”
“Lactic acid is not muscles’ foe, it’s fuel” |
| October( thru end of 1st 9 weeks)
Nature of Sci.
Standard 12
Students shall demonstrate an understanding of current life science theories.
NS.12.B.4.
Relate the development of the cell theory to current trends in cellular biology.
Molecules and Cells
Standard 2: Students shall demonstrate an understanding of the structure and function of cells.
MC 2.B.1
Construct a hierarchy of life from cells to ecosystems.
MC 2.B.2
Compare and contrast prokaryotes and eukaryotes.
MC 2. B.3
Describe the role of sub-cellular structures (organelles, ribosomes, & cytoskeleton) in the life of a cell.
MC.2.B.5
Compare and contrast the structures of an animal cell to a plant cell.
October (thru remainder of month during 2nd 9 weeks)
MC 2.B.4
Relate the function of the plasma (cell) membrane to its structure.
MC. 2.B.11
Discuss homeostasis using thermoregulation as an example.
MC.2. B. 7
Compare and contrast active transport and passive transport mechanisms:
- Diffusion
- Osmosis
- Endocytosis
- Exocytosis
- Phagocytosis
- Pinocytosis
|
Cell structure and function
Ø History: Hooke, van Leeuwenhoek
Ø History: cell theory (Schleiden, Schwann, Virchow)
Ø Symbiotic theory: Margulis
Ø Levels of Organization
Atoms -> Molecules->Cells-> Tissue->Organ->Organ System->Organism->Species->Population-> Community->Ecosystem->Biome->Biosphere
Ø Eukaryotes vs. Prokaryotes
o Be able to compare and contrast
Eukaryotic cell structure
o Organelles
o Cytoplasm
o Nucleus
o Compare plant vs animal cell
Ø Levels of organization
Microscope use:
Ø Identify parts of a microscope
Ø Make specimen slides
Ø Identify parts of cell
Ø Cell membrane structure and function
Ø Lipid bilayer
Ø Cell wall
Ø Diffusion through
Ø Osmosis
Ø Active transport
Ø Homeostasis
|
Cells Essential question
What are the activities cells carry out that are necessary to sustain life?
Guiding Questions
1. The invention of what important tools led to the formation of the cell theory?
2. What is the cell theory? What evidence supports the cell theory?
3. What are prokaryotic cells?
4. What are eukaryotic cells?
5. How do prokaryotic and eukaryotic cells compare?
6. What organelles are found in eukaryotic cells?
7. What is the function of each organelle?
8. What is the difference between animal and plant cells?
Plasma Membrane Essential Question:
How does the Plasma membrane function as the gateway of a cell?
1. How do the responsibilities of cells in multi cellular organisms compare to the cells that comprise single-celled organisms?
2. What is the composition of the cell (plasma) membrane?
3. What are the processes that allow materials to enter and exit the cell?
4. What is homeostasis?
5. How do cells maintain homeostasis? |
Anchor Assessment:
Cell Analogy
Anchor Assessment:
Plasma Membrane Drawings
|
Use of Microscope & Techniques For Better Use
Cells-Basic Unit of Life
osmosis/diffusion from AP lab book
OR
Plasmolysis with Elodea
|
October Vocabulary
HOLT INTERACTIVE “Cell Transport and Homeostasis”
Literacy Materials (Cell)
“How Human Cells Get Their Marching Orders”
“ Stressed to Death”
“Stem Cell Surprise”
“ Cells that Read Minds”
|
| November
Cellular Respiration and Photosynthesis
Standard 3: Students shall demonstrate an understanding of how cells obtain and use energy. (Energetics)
MC.3.B.1
Compare and contrast the structure and function of mitochondria and chloroplasts.
MC.3 B.4
Describe and model the conversion of light energy to chemical energy by photosynthetic organisms (light dependent & independent reactions).
MC.3.B.5
Compare and contrast cellular respiration and photosynthesis as energy conversion pathways.
MC.3.B.2
Describe and model the conversion of stored energy (glycolysis, citric acid cycle, electron transport chain) in organic molecules into usable cellular energy (ATP).
Standard 2: Students shall demonstrate an understanding of the structure and function of cells.
MC.3.B.3
Compare and contrast aerobic and anaerobic respiration (lactic acid and alcoholic fermentation).
MC.3.B.4 Describe and model the conversion of light energy to chemical energy by photosynthetic organisms:
- light dependent reactions
- light independent reactions
The Cell Cycle
MC.2.B.8
Describe the main events in the cell cycle (mitosis, interphase, & cytokinesis), including the differences in plant and animal cell division.
MC.2.B.9
List in order and describe the stages of mitosis (prophase, metaphase, anaphase, & telophase).
MC.2.B.10
Analyze the meiotic maintenance of a constant chromosome number from one generation to the next.
|
Photosynthesis
Ø Explain where plants get energy to produce food
Ø Describe the role of ATP in cellular activities
Photosynthesis overview:
Ø Experiments of van Helmont, Priestley, Ingenhousz
Ø Photosynthesis equation
Ø Describe role of light and chlorophyll
Photosynthesis reactions
Ø Describe structure and function of chloroplast
Ø Light-dependent reactions – describe what happens
Ø Light-independent reactions – describe Calvin cycle
Ø Identify factors that affect the rate of photosynthesis
Cellular respiration
Ø Chemical pathways
o Explain what cellular respiration is
o Describe what happens during glycolysis and products produced
o Name and describe two main types of fermentation
Ø Krebs cycle and Electron transport
o Describe what happens during Krebs cycle and products produced
o Explain how high-energy electrons are used in transport chain
o Identify pathways the body uses to release energy during exercise
Compare photosynthesis and cellular respiration
Cell cycle and Growth/Division
Ø Describe and identify typical stages in cell’s life cycle
Ø Somatic cell reproduction
o Mitotic stages, identify and describe
Ø Gamete production
o Meiosis, identify and describe stages
o Spermatogenesis vs. Oogenesis
Ø Compare mitosis and meiosis
Ø Regulation of cell cycle
Ø How do cancer cells differ from other cells
|
Cellular Energetics”
Why do living things make or eat food?
Guiding Questions
1. How is the sun the ultimate source of energy for all living things?
2. How do organisms produce and use energy?
3. What is cellular fuel?
4. What are the reactants and products of respiration?
5. What is the difference between aerobic and anaerobic respiration?
6. What is the role of ATP in photosynthesis and respiration?
Mitosis & Meiosis:
How do cells grow, divide, and make new cells?
Guiding Questions
1. What are mitosis and meiosis and which cells perform each process?
2. How does the chromosome number in parent cell and daughter cells differ with regards to mitosis and meiosis?
3. What is the difference in the way plant and animals undergo cell division?
4. How does crossing over act as the genetic mechanism for diversity? |
Anchor Assessments:
Cellular Energetics Open Response item
“How do certain living things use sunlight to make food and why are they eaten?”
Compare and Contrast Respiration vs. Photosynthesis. Be sure to include the cell structures involved in each and how energy flows from the sun through living things.
Compare/Contrast Essay on Mitosis vs. Meiosis
OR
Flip Book
|
Respiration & Photos Labs
Chromatography/ Photosynthesis lab from AP book
Respiration of Germinating Seeds Lab
Mitosis & Meiosis Labs
Cell Reproduction/ Mitosis Flip-Book |
November Vocabulary
HOLT INTERACTIVE” Cellular Respiration”
HOLT INTERACTIVE “Photosynthesis”
HOLT INTERACTIVE “Cell Reproduction”
Literacy Materials
“Lactic Acid Is Not Muscles’ Foe, It’s Fuel”
“Breakthroughs/Immunology”
“Modified Mice Stay Super-fit”
“In the Genes”
“Grow in The Dark”
“Source of Half Earth’s Oxygen Gets Little Credit”
|
| December
Heredity and Evolution
Standard 4: Students shall demonstrate an understanding of heredity.
HE.4.B.1
Summarize the outcomes of Gregor Mendel’s experimental procedures.
HE.4.B.2
Differentiate among the laws and principles of inheritance (dominance, segregation, independent assortment).
HE.4.B.3
Use the laws of probability and Punnett squares to predict genotypic and phenotypic ratios.
HE.4.B.4Examine different modes of inheritance
· sex linkage
- codominance
- crossing over
- incomplete dominance
- multiple alleles
HE.4.B.5
Analyze the historically significant work of prominent geneticists.
HE.4.B.6
Evaluate karyotypes for abnormalities such as monosomy & trisomy.
|
Genetics
The work of Gregor Mendel
Ø Describe Mendel’s work and summarize his conclusions
Ø Explain principle of dominance
Ø Law of segregation and independent assortment
Probability
Ø Describe what probability is
Ø Explain how probability is used in genetics
Ø Construct and read Punnett Squares
Patterns of inheritance
Ø Simple dominance
Ø Co-dominance
Ø Incomplete dominance
Ø X-linked
Ø Pedigree and karyotypes
o Mutations/diseases
|
Genetics:
Why do living things not look the same?
Guiding Questions
1. What are Mendel’s laws of heredity?
2. What are genotype and phenotype?
3. How do the terms heterozygous, homozygous, dominant and recessive relate to Mendelian genetics
4. What are the potential effects of genetic recombination and mutation on organisms? |
Anchor Assessment:
Performance Assessment: Correctly Created and Diagnosed
Karyotype |
Karyotyping
Baby Face Lab
|
December Vocabulary
HOLT INTERACTIVE “Heredity”
Literacy Materials
“ Gene that led to man found”
“ Gene Study Identifies 5 Main Human Populations, Linking Them to Geography”
“Still Evolving , Human Genes Tell New Story”
“Without Gene, timid Mice Turn into Daredevils”
“Study Offers New Insight Into Why Learning Disorders Are Genetic”
“Early Risers have Mutated Gene, Study Says”
“A Gene for Romance? So It seems( Ask the Vole)
|
| January
Standard 5: Students shall investigate the molecular basis of genetics.
HE.5.B.1
Model the components of a DNA nucleotide and an RNA nucleotide.
HE.5.B.2
Describe the Watson-Crick double helix model of DNA, using the base-pairing rule (adenine-thymine, cytosine-guanine).
HE.5.B.3
Compare and contrast the structure and function of DNA and RNA.
HE.5.B.4
Describe and model the processes of replication, transcription, and translation.
HE.5.B.5
Compare and contrast the different types of mutation events, including point mutation, frameshift mutation, deletion, and inversion.
HE.5.B.6
Identify effects of changes brought about by mutations (beneficial, harmful, & neutral).
Molecules and Cells
Standard 1
MC.1.B.1
Describe the structure and function of nucleic acids found in living systems.
Nature of Science
Standard 12
NS.12.B.6
Relate the chromosome theory of heredity to recent findings in genetic research (e.g., Human Genome Project-HGP, chromosome therapy).
NS.12.B.7
Research current events and topics in Biology
Standard 6: Students shall examine the development of the theory of biological evolution.
HE.6.B.1
Compare & contrast Lamarck’s explanation of evolution with HE.6.B.2
Darwin’s theory of evolution by natural selection.
HE.6.B.3
Recognize that evolution involves a change in allele frequencies in a population across successive generations.
HE.6.B.4
Analyze the effects of mutations and the resulting variations within a population in terms of natural selection.
HE.6.B.5
Illustrate mass extinction events using a time line.
HE.6.B.6
Evaluate evolution in terms of evidence as found in the following:
- fossil record
- DNA analysis
- artificial selection
- morphology
- embryology
- viral evolution
- geographic distribution of related species
- antibiotic and pesticide resistance in various organisms
Nature of Science
Standard 12
NS.12.B.2
Compare the processes of relative and radioactive dating to determine the age of fossils.
NS.12.B.3
Understand that scientific theories may be modified or expanded based on empirical data, verification, & peer review.
Heredity and Evolution
Standard 6
HE.6.B.7
Interpret a Cladogram |
Molecular biology
Ø History of DNA – Griffith, Avery, Pauling, Franklin, Watson/Crick
Ø Summarize relationship between genes and DNA
Ø Describe structure of DNA
Ø Summarize events of DNA replication
Ø RNA and protein synthesis
o Compare DNA and RNA
o Describe types of RNA
o Stages in protein synthesis
§ Transcription
§ Translation
o Contrast gene and chromosomal mutations
Ø Gene regulation
Ø Genetic engineering
Evolution
What is evolution?
Ø Fact and theory
Ø Review what a theory is
History of evolutionary thought
Ø Lamarck
Ø Darwin and Wallace
Ø Voyage of the Beagle
Darwin’s theory
Ø Four postulates
Ø Influences on his theory: Hutton, Lyell, Malthus, Wallace
Ø Support for natural selection
Other mechanisms of evolutionary change
Ø Genetic drift
Speciation and Extinction
Evidence for evolution
Ø Fossil record
Ø Geographic distribution
Ø Comparative morphology
Ø Comparative embryology
Ø Artificial selection
Ø Observational examples (resistant bacteria)
Genetic equilibrium
Ø Hardy-Weinberg conditions
|
How does DNA function as the basic set of instructions for all living things?
Guiding Questions
1. How can the structure and function of DNA and RNA be characterized?
2. How are the structures of DNA and RNA similar and different? How do DNA and RNA molecules replicate themselves? What was the nature of the quest for discovering the source of heredity in living things?
3. What types of methodology were used to conclude that DNA is the genetic material?
4. How can the structure of DNA be described? Who are notable contributors to our knowledge of DNA? What are the roles of DNA and RNA in the construction of proteins?
5. What is involved in the processes of transcription and translation?
6. What are some of the new DNA techniques molecular biologists have created to allow them to identify, study, and modify genetic information?
7. What is the Human Genome Project?
8. What are some issues that have arisen as a result of new DNA technologies?
9. How does DNA function as the basic set of instructions for all living things?
Evolution
How do species change over time?
Guiding Questions
1. What were some early models for how life formed on Earth?
2. What types of evidence support the theory of evolution?
3. How do environmental pressures cause variations in populations?
4. How does natural selection explain the idea of change over time? |
Anchor Assessment
Performance Assessment: Correctly Constructed DNA models
Anchor Assessment
Graphing Data from Gene frequency (Beans) Lab OR Evolution (Peppered moth) Lab
|
DNA Labs
1. Isolating DNA (strawberries)
Or
Strawberry DNA Extraction
And
2. DNA models
Or
DNA models with protein Synthesis Lab
Model Templates
And
3. Who ate the Cheese-Electrophoresis Lab
Electrophoresis Template
Base Pairs of Crime Scene DNA for Who ate the Cheese
Evolution Labs
Evolution (Peppered moth)
Gene frequency (Beans)
Hemoglobin and Fitness
|
January Vocabulary
HOLT INTERACTIVE “Gene Expression”
Literacy Materials
“Molecular Structure of nucleic Acids”
“Chemical Achievers: Watson, Crick, Wilkins, and Franklin”
“Human, Chimp Ancestors may Have Mated, DNA suggests
Literacy Materials-Evolution
Global warming is spurring evolution, study says
Still evolving, human genes tell new story
New study supports idea that primates, dinosaurs coexisted
Twenty species we may lose in the next twenty years
Hobbit-like human ancestor found in Asia
Fear of snakes, spiders rooted in evolution
Sex speeds up evolution
Rodent has long lineage
Fins to limbs: New fossil gives evolution insight
Spike seen in drug-resistant germ
Fins to limbs: New fossil gives evolution insight
Hard-wired for prejudice
|
| Classification and the Diversity of life
Standard 7: Students shall demonstrate an understanding that organisms are diverse.
CDL.7.B.1
Differentiate among the different domains (Bacteria, Archaea, & Eukarya).
CDL.7.B.2
Differentiate the characteristics of the six kingdoms:
- Eubacteria
- Archaea
- Protista
- Fungi
- Plantae
- Animalia
CDL.7.B.3
Identify the seven major taxonomic categories:
- kingdom
- phylum
- class
- order
- family
- genus
- species
CDL.7.B.4
Classify and name organisms based on their similarities and differences applying taxonomic nomenclature using dichotomous keys.
Bacteria, Protists and Fungi
CDL.7.B.6
Compare and contrast the structures and characteristics of viruses (lytic and lysogenic cycles) with non-living and living things.
CDL.7.B.7
Evaluate the medical and economic importance of viruses.
CDL.7.B.8 Compare and contrast life cycles of familiar organisms
- sexual reproduction
- asexual reproduction
- metamorphosis
- alternation of generations
CDL.7.B.9
Classify bacteria according to their characteristics and adaptations.
CDL.7.B.10
Evaluate the medical and economic importance of bacteria.
CDL.7.B.11
Describe the characteristics used to classify protists:
- plant-like
- animal-like
- fungal-like
CDL.7.B.12
Evaluate the medical and economic importance of protists .
CDL.7.B.13
Compare and contrast fungi with other eukaryotic organisms.
CDL.7.B.14
Evaluate the medical and economic importance of fungi.
|
Classification
Ø What is taxonomy?
Ø Explain how living things are organized
Ø Describe binomial nomenclature
Ø Explain Linnaeus’s hierarchical system
Ø Modern evolutionary classification
o Cladistics and acquired characteristics
o Explain evolutionary relationships
Ø Kingdoms and Domains
o Name the six kingdoms and explain characteristics of each
o Describe domain system of classification
Microbiology
Ø Viruses and Bacteria
Ø Protists
Multicellular organisms – structure and function
Ø Fungi
|
How do scientists organize all the known living things on Earth?
Guiding Questions
1. What do taxonomists use to determine similarity between organisms?
2. How does taxonomy lend insight into the process of evolution
3. What are the major divisions in the modern classification system?
Why are bacteria, protists and fungi so abundant, diverse and successful?
Guiding Questions
1. How do microscopic organisms affect our lives?
2. How do viruses compare to organisms? What are the components of a typical virus?
3. How do viruses replicate?
4. How are viruses specific to particular host cells?
5. How does the virus that causes AIDS reproduce?
6. How can the spread of AIDS be prevented
7. What are the distinguishing characteristics of monerans, protists, and fungi in terms of anatomic features, food getting and reproductive methods; metabolic activities, and environmental responses? |
Anchor Assessment:
Cladistics Lab
Cladogram
Anchor Assessment
Project Based Assessment:
Wanted Poster
Students construct a wanted poster on any disease causing bacteria or virus. At minimum it must include a picture, a description of the microorganism and the symptoms it causes |
Classification Labs
Cladistics Lab
Dichotomous Key Lab (Mythological Creatures &/or Sharks)
PamishanTaxonomy
Virology Lab
Patient Zero
Or
Communicable Disease Lab (LRSD Lab Handbook)
And
Bread Mold Lab(LRSD Lab Handbook)
|
February Vocabulary
Literacy Materials (classification)
Creating order out of chaos
It’s alive
Stinging fire ants have good points
Group revamps world of taxonomy
Linnean naming system faces challenges
Team races to catalog every species on earth
Literacy Items (Microorganisms)
The mighty worm
Device uses sewage bacteria to produce electricity |
| May
Differentiate the characteristics of the kingdom Animalia .
Compare and contrast the major invertebrate classes according to their nervous, respiratory, excretory, circulatory, and digestive systems
Differentiate the characteristics of the kingdom Animalia.
Compare and contrast the major vertebrate classes according to their nervous, respiratory, excretory, circulatory, digestive, reproductive and integumentary systems.
Compare and contrast life cycles of familiar organisms
- sexual reproduction
- asexual reproduction
- metamorphosis
|
Invertebrates
Dissection and comparative anatomy
Vertebrates
Dissection and comparative anatomy
|
Why are invertebrates so diverse, successful and abundant?
Guiding Questions
1. How are the body plans of invertebrates different from those of vertebrates?
2. What are the eight major invertebrate phyla and the major characteristics of each in terms of anatomical features; food getting and reproductive methods; metabolic activities; and environmental responses?
How does the spinal cord allow diversity in the form and function of vertebrates?
Guiding Questions
1. What distinguishes chordates from other animals?
2. What are the major structural and functional adaptations found in fish, amphibians, reptiles, birds, and mammals? What are the major vertebrate systems that can be studied and compared?
3. How did the evolution of the spinal cord allow for diversity in the form and function of vertebrates? |
Labeled/colored diagram from Earthworm Dry Lab
|
Earthworm Dry Lab
Earthworm Dissection
Clam Dissection
Squid dissection
Arthropod Comparison
Crayfish Dissection
Grasshopper Dissection
Bess Beetles
Starfish dissection
Perch Dissection
FrogDissection
Frog dissection on FrogGuts
Pig Dissection |
(FroGuts Software-link to brochure)
Literacy Materials
Suicide grasshoppers brainwashed by parasite worms
Toads that go pop in the night
Weapons of Mouse destruction?
Earth’s uncanned crusaders: Will sardines save our skin?
Owls use dung to “fish” for beetles |
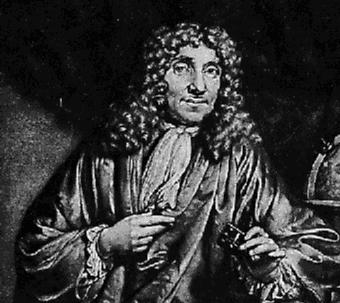
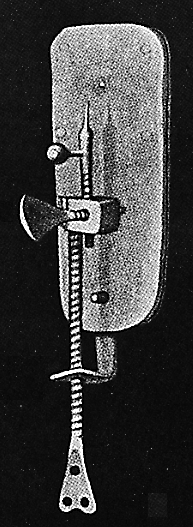 Leeuwenhoek is known to have made over 500 “microscopes,” of which fewer than ten have survived to the present day. In basic design, probably all of Leeuwenhoek’s instruments — certainly all the ones that are known — were simply powerful magnifying glasses, not compound microscopes of the type used today. A drawing of one of Leeuwenhoek’s “microscopes” is shown at the left. Compared to modern microscopes, it is an extremely simple device, using only one lens, mounted in a tiny hole in the brass plate that makes up the body of the instrument. The specimen was mounted on the sharp point that sticks up in front of the lens, and its position and focus could be adjusted by turning the two screws. The entire instrument was only 3-4 inches long, and had to be held up close to the eye; it required good lighting and great patience to use.
 In a letter of September 7, 1674, Leeuwenhoek described observations on lake water, including an excellent description of the green charophyte alga Spirogyra: “Passing just lately over this lake, . . . and examining this water next day, I found floating therein divers earthy particles, and some green streaks, spirally wound serpent-wise, and orderly arranged, after the manner of the copper or tin worms, which distillers use to cool their liquors as they distil over. The whole circumference of each of these streaks was about the thickness of a hair of one’s head. . . all consisted of very small green globules joined together: and there were very many small green globules as well.”