
Protection from arthropod bites is best achieved by avoiding infested habitats, wearing protective clothing, and using insect repellent. In many circumstances, applying repellent to the skin may be the only feasible way to protect against insect bites. Given that a single bite from an infected arthropod can result in transmission of disease, it is important to know which repellent products can be relied on to provide predictable and prolonged protection from insect bites. Commercially available insect repellents can be divided into two categories — synthetic chemicals and plant-derived essential oils. The best-known chemical insect repellent is N,N-diethyl-m-toluamide, now called N,N-diethyl-3-methylbenzamide (DEET). Many consumers, reluctant to apply DEET to their skin, deliberately seek out other repellent products. We compared the efficacy of readily available alternatives to DEET-based repellents in a controlled laboratory environment.
Methods
Product Selection
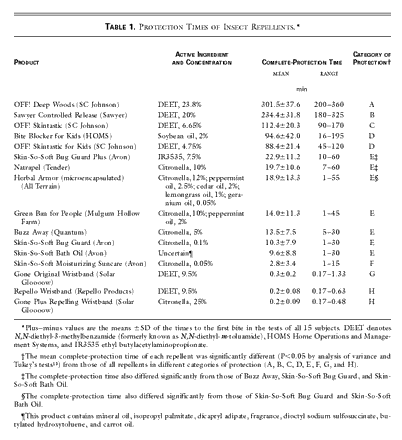
In January 2001, we purchased a total of 16 products for testing, choosing repellents with national, rather than local, distribution (Table 1). Seven widely available botanical repellents were included in the study. Multiple concentrations and formulations of DEET are readily available. We chose and tested three DEET-based repellents (ranging from 4.75 to 23.8 percent DEET) that we believe represented the range of commonly purchased repellents in the United States. We also tested a controlled-release 20 percent DEET formulation to determine whether it had a longer duration of action. The only synthetic repellent containing IR3535 (ethyl butylacetylaminopropionate) that is available in the United States and three wristbands impregnated with either DEET or citronella were also tested. Finally, we tested the efficacy of a proprietary moisturizer that is commonly believed to have repellent effects.
Testing Methods
The duration of protection provided by each product was tested by means of arm-in-cage studies, in which volunteers insert their repellent-treated arms into a cage with a fixed number of unfed mosquitoes, and the elapsed time to the first bite is recorded. Testing of repellents is usually conducted either in a laboratory or at outdoor field sites. Conducting such studies indoors makes it possible to reduce potential confounding variables, such as wind speed, temperature, humidity, density of the mosquito population, the level of the mosquitoes’ hunger, and the species of the mosquitoes, that can make it difficult to interpret comparisons among products made in outdoor-field trials. We conducted our tests with a low density of mosquitoes per cage rather than a high density (some studies use more than 250 mosquitoes per cage) because the low-density environment more accurately reflects the typical biting pressures that are encountered during most outdoor activities.
For each test, 10 disease-free, laboratory-reared Aedes aegypti female mosquitoes that were between 7 and 24 days old were placed into separate laboratory cages measuring 30 cm by 22 cm by 22 cm. A batch of 10 mosquitoes that had not been exposed to the repellent being tested was used for each arm insertion. Mosquitoes were provided with a constant supply of 5 percent sucrose solution. Cages were placed in a walk-in incubator measuring 2.2 m by 2.2 m by 2.2 m, in which the temperature was maintained at 24 to 32°C, the relative humidity at 60 to 70 percent, and the light–dark cycle at 12 hours of light followed by 12 hours of darkness.
Fifteen volunteers (5 men and 10 women) were recruited from the staff of the Medical Entomology Laboratory at the University of Florida. The study was reviewed and approved by the institutional review board of the University of Florida, and subjects gave written informed consent before participating.
As repellents were purchased, they were labeled sequentially from 1 to 16. A random-number generator was then used to determine the order in which the products would be tested on each subject. A total of 720 individual tests were conducted, with each repellent being tested three times on each subject. Most subjects only completed one test per day. The average time to completion of all three tests was 10.2 days. In the case of repellents that were identified as very short-acting in the initial test, subjects were permitted to conduct all three tests of the repellent in a single day, washing the skin with an unscented soap before each application of the repellent. Subjects did not test more than one repellent product on a single day. No information on the likely duration of action of each repellent was provided to subjects before they began their tests.
Before each test, the readiness of the mosquitoes to bite was confirmed by having subjects insert their untreated forearm into the test cage. Once subjects observed five mosquito landings on the untreated arm, they removed their arm from the cage and applied the repellent being tested from the elbow to the fingertips, following the instructions on the product’s label. After the application of the repellent, subjects were instructed not to rub, touch, or wet the treated arm. Repellent-impregnated wristbands were worn on the wrist of the arm being inserted into the cage. Subjects were provided with a standardized log sheet to ensure accurate documentation of the duration of exposure and the time of the first bite. The elapsed time to the first bite was then calculated and recorded as the “complete-protection time” for that subject in that particular test.
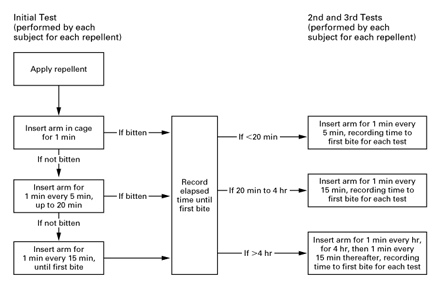
Subjects were asked to follow the testing protocol shown in Figure 1. Subjects conducted their first test of each repellent by inserting the treated arm into a test cage for one full minute every five minutes. If they were not bitten within 20 minutes, then the arm was reinserted for 1 full minute every 15 minutes, until the first bite occurred. On the basis of this initial complete-protection time, the subject’s next two tests of that particular repellent were conducted as follows: if the repellent had initially worked for less than 20 minutes, the subject placed his or her arm in the cage for 1 minute every 5 minutes; if the repellent had initially worked for 20 minutes to 4 hours, the subject placed his or her arm in the cage for 1 minute every 15 minutes; and if the repellent had initially worked for more than 4 hours, the subject placed his or her arm in the cage for 1 minute every hour (up to 4 hours). If a repellent was still working after 4 hours, then the subject continued to place his or her arm in the cage every 15 minutes thereafter, until the first bite occurred. If at any point during testing, subjects noted mosquitoes landing but not biting (a behavior that typically occurs when the efficacy of a repellent begins to wane), then the intervals between insertions were decreased to five minutes.
Discretionary funds from the State of Florida were used to support this study. We received no financial support from industry, including the manufacturers whose products were tested in the study. Data analysis was performed within the Florida Medical Entomology Laboratory at the University of Florida, without input from any outside sources.
Statistical Analysis
Two-way analysis of variance (involving two factors, subject and repellent) followed by Tukey’s tests was used to compare the mean complete-protection time for the 16 tested repellents. All P values are two-sided; a P value of less than 0.05 was considered to indicate statistical significance.
Results
Of the products tested, those containing DEET provided the longest-lasting protection (Table 1). The complete-protection times of DEET-based repellents correlated positively with the concentration of DEET in the repellent. The formulation containing 4.75 percent DEET provided an average of 88.4 minutes of complete protection; the formulation containing 23.8 percent DEET protected for an average of 301.5 minutes. There was a statistically significant difference in complete-protection time between each DEET-based repellent and the product with the next higher concentration of DEET (P<0.001 for all comparisons). The controlled-release formulation we tested did not prolong the duration of action of DEET. The alcohol-based product containing 23.8 percent DEET protected significantly longer than the controlled-release formulation containing 20 percent DEET (P<0.001).
No non-DEET repellent fully evaluated in this study was able to provide protection that lasted more than 1.5 hours. Only the soybean-oil–based repellent was able to provide protection for a period similar to that of the lowest-concentration DEET product we tested (94.6 and 88.4 minutes, respectively).
The IR3535-based repellent protected against mosquito bites for an average of 22.9 minutes. The citronella-based repellents we tested protected for 20 minutes or less. There was no significant difference in protection time between the slow-release formulation containing 12 percent citronella and the formulation containing 5 percent citronella (P=0.07) or the two formulations containing 10 percent citronella (P=0.16 and P=0.80). The repellent containing only 0.05 percent citronella provided less protection than the Skin-So-Soft mineral-oil–based moisturizer (Avon) (P<0.001). Repellent-impregnated wristbands, containing either 9.5 percent DEET or 25 percent citronella (by weight), protected the wearer for only 12 to 18 seconds, on average.
In arm-in-cage studies, testing must be conducted with insertions at limited intervals, with a new batch of mosquitoes for each test, because continuous exposure may cause mosquitoes to fatigue or may induce prolonged blockage of their antennal chemoreceptors, both of which will prevent further biting. Conducting tests of a repellent in which the arm is inserted into the cage at fixed intervals, however, has some obvious limitations. A repellent might stop working between the removal of the arm and the subsequent insertion, but the failure would not be detected until the next scheduled insertion, causing an inflated measure of the duration of protection provided by that repellent. In our study, the greatest risk of overestimation of complete-protection times would affect the repellents that were tested with once-hourly insertions into the cage. According to our protocol, however, hourly insertions were only used by subjects who found that a repellent initially protected them for more than four hours. Only the two highest-concentration DEET-based repellents in our study (20 percent and 23.8 percent DEET) qualified for once-hourly insertions by some of the subjects, and the range of protection these repellents afforded (180 to 360 minutes) is consistent with previously published reports of the efficacy of DEET. Any rounding errors resulting from the intervals between insertions into the cage would also tend to overestimate the efficacy of the other repellents we tested, and 11 of the 12 non-DEET products still had mean complete-protection times of less than 23 minutes.
After the original studies for this article were completed, a new botanical repellent was introduced in the United States. The repellent contains oil of eucalyptus and is marketed under two names: Repel Lemon Eucalyptus Insect Repellent (WPC Brands) and Fite Bite Plant-Based Insect Repellent (Travel Medicine). We evaluated this type of repellent using the same testing methods in six subjects (five men and one woman). In one subject, a localized cutaneous reaction developed after the first test, and the subject discontinued the study. All other subjects completed three tests each of the repellent. The repellent had a mean (±SD) complete-protection time of 120.1±44.8 minutes, with a range of 60 to 217 minutes.
Discussion
Protection against arthropod bites is best achieved by avoiding infested habitats, wearing protective clothing, and applying insect repellent. The insect repellents that are currently available to consumers are either synthetic chemicals or are derived from plants. The most widely marketed chemical-based insect repellent is DEET, which has been used worldwide since 1957. DEET is a broad-spectrum repellent that is effective against many species of mosquitoes, biting flies, chiggers, fleas, and ticks. The protection provided by DEET is proportional to the logarithm of the dose; higher concentrations of DEET provide longer-lasting protection, but the duration of action tends to plateau at a concentration of about 50 percent. Most commercially available formulations now contain 40 percent DEET or less, and the higher concentrations are most appropriate to use under circumstances in which the biting pressures are intense, the risk of arthropod-transmitted disease is great, or environmental conditions promote the rapid loss of repellent from the surface of the skin.In our study, a formulation containing 23.8 percent DEET provided an average of five hours of complete protection against A. aegypti bites after a single application. Depending on the formulation and concentration tested, DEET-based repellents have been shown in other studies to provide complete protection against arthropod bites for as long as 12 hours, even under harsh climatic conditions.
The most recent addition to the synthetic insect repellents on the market in the United States is IR3535, which is classified by the Environmental Protection Agency as a biopesticide because of its structural similarity to the amino acid alanine. This repellent has been used in Europe for more than 20 years and was approved for use in the United States in 1999. In our tests, this repellent fared poorly, yielding a mean complete-protection time that was one quarter that of the lowest-concentration DEET product we tested (22.9 vs. 88.4 minutes).
Skin-So-Soft Bath Oil, which consumers commonly claim has a repellent effect on insects, provided only a mean of 9.6 minutes of protection against aedes bites in our study. This extremely limited repellent effect has previously been documented in other studies.
Thousands of plants have been tested as potential botanical sources of insect repellent. Most plant-based insect repellents currently on the market contain essential oils from one or more of the following plants: citronella, cedar, eucalyptus, peppermint, lemongrass, geranium, and soybean. Of the products we tested, the soybean-oil–based repellent was able to protect from mosquito bites for about 1.5 hours. All other botanical repellents that we tested in our initial studies, regardless of their active ingredients and formulations, gave very short-lived protection, ranging from a mean of about 3 to 20 minutes. Preliminary studies suggest that the oil-of-eucalyptus products will confer longer-lasting protection than other available plant-based repellents.
Most alternatives to topically applied repellents have proved to be ineffective. No ingested compound, including garlic and thiamine (vitamin B1), has been found to be capable of repelling biting arthropods. Small, wearable devices that emit sounds that are purported to be abhorrent to biting mosquitoes have also been proved to be ineffective. In our study, wristbands impregnated with either DEET or citronella similarly provided no protection from bites, consistent with the known inability of repellents to protect beyond 4 cm from the site of application.
Multiple factors play a part in determining how effective any repellent will be; these factors include the species of the biting organisms and the density of organisms in the immediate surroundings; the user’s age, sex, level of activity, and biochemical attractiveness to biting arthropods; and the ambient temperature, humidity, and wind speed. As a result, a given repellent will not protect all users equally. Examination of the ranges of complete-protection times in Table 1 shows variation in the ability of each repellent to protect different subjects. Thus, these times should be taken not as absolute values but, rather, as an indication of the relative effectiveness of the tested repellent products.
Our study shows that only products containing DEET offer long-lasting protection after a single application. Certain plant-derived repellents may provide short-lived efficacy, which may be sufficient when arthropod bites are primarily a nuisance. Frequent reapplication of these repellents would partially compensate for their short duration of action. However, when one is traveling to an area with prevalent mosquito-borne disease that could be transmitted through a single bite, the use of non-DEET repellents would seem to be ill-advised. Given our findings, we cannot recommend the use of any currently available non-DEET repellent to provide complete protection from arthropod bites for any sustained outdoor activity.
Although this study shows that DEET-based products can be depended on for long-lasting repellent effect, they are not perfect repellents. DEET may be washed off by perspiration or rain, and its efficacy decreases dramatically with rising outdoor temperatures. DEET is also a plasticizer, capable of dissolving watch crystals, the frames of glasses, and certain synthetic fabrics.
Despite the substantial attention paid by the lay press every year to the safety of DEET, this repellent has been subjected to more scientific and toxicologic scrutiny than any other repellent substance. The extensive accumulated toxicologic data on DEET have been reviewed elsewhere. DEET has a remarkable safety profile after 40 years of use and nearly 8 billion human applications. Fewer than 50 cases of serious toxic effects have been documented in the medical literature since 1960, and three quarters of them resolved without sequelae. Many of these cases of toxic effects involved long-term, heavy, frequent, or whole-body application of DEET. No correlation has been found between the concentration of DEET used and the risk of toxic effects. As part of the Reregistration Eligibility Decision on DEET, released in 1998, the Environmental Protection Agency reviewed the accumulated data on the toxicity of DEET and concluded that “normal use of DEET does not present a health concern to the general U.S. population.” When applied with common sense, DEET-based repellents can be expected to provide a safe as well as a long-lasting repellent effect. Until a better repellent becomes available, DEET-based repellents remain the gold standard of protection under circumstances in which it is crucial to be protected against arthropod bites that might transmit disease.
Source Information
From Chapel Hill Dermatology, Chapel Hill, N.C. (M.S.F.); and the Florida Medical Entomology Laboratory, University of Florida, Vero Beach (J.F.D.).