
Cells and Transport Teaching Resources · High school biology; AP extensions where noted.
This introductory investigation uses a printed lowercase letter to teach microscope handling before students observe biological specimens. Allow about one class period, adjusted for equipment and student experience.
Student handout: Download the printable student sheet (PDF). Use the reference below to check labels. Teacher explanations are separate at the end of this page.
Prepare the letter-e wet mount
Objectives and prerequisites
Students will prepare a wet mount, bring a specimen into focus safely, calculate total magnification, and describe how the image changes when the slide moves. First identify the parts in the microscope reference.
Materials and safety
- Compound light microscope and its operating instructions
- Clean slide and coverslip, dropper, water, paper towel
- A small printed lowercase “e” on thin paper and scissors
- Notebook and pencil
Follow the school’s eye-protection policy. Handle glass by the edges; report broken glass and use the designated sharps procedure. Keep water away from plugs and cords. A teacher-prepared slide is an alternative for students who cannot handle glass. No stains or biological samples are needed.
Procedure
- Carry and set up the microscope using the manufacturer’s instructions. Locate the lowest-power objective and read the eyepiece and objective markings.
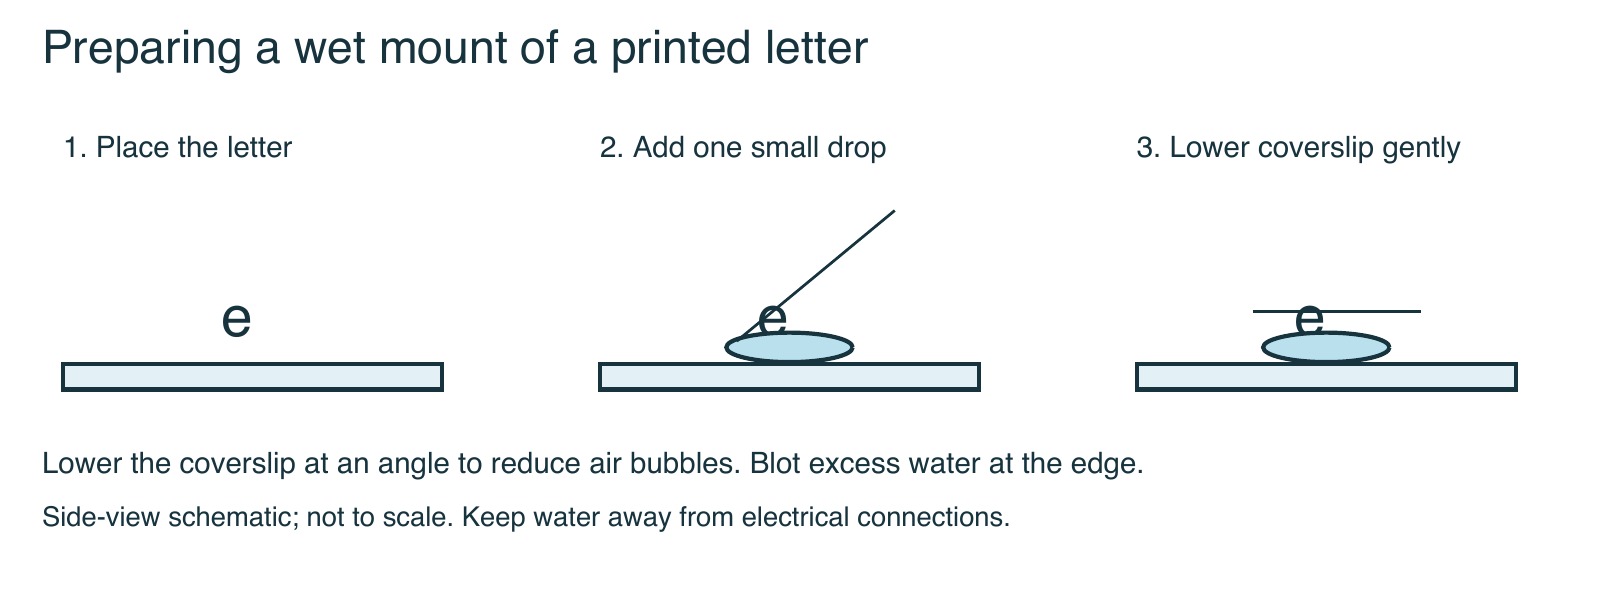
- Place the paper letter on the slide in its normal reading orientation. Add one small drop of water. Lower a coverslip at an angle to reduce trapped air; blot excess liquid at the edge.
- Secure the slide and center the letter above the light opening.
- Begin at the lowest power. Watch from the side while positioning the objective near the slide, leaving clearance. Follow the model-specific focusing method so the objective cannot strike the coverslip.
- Look through the eyepiece and focus gently. Adjust illumination for comfortable contrast. Draw the letter as observed and note whether its orientation differs from the uncovered letter.
- Move the slide a small distance to the right. Record the image’s direction of movement. Repeat upward, then recenter the letter.
- With the specimen centered and in focus, switch to the next approved objective. Use fine focus only. Record how much of the letter is visible.
- Remove the slide, clean the work area, and store the microscope as directed. Wash hands after cleanup.
Student record: observations and calculations
Use the printable sheet for drawing circles and writing space, or copy this table into your notebook. Write the actual lens markings; instruments differ. Total magnification = eyepiece magnification × objective magnification.
| Objective used | Eyepiece power | Objective power | Total magnification |
|---|---|---|---|
| Lowest power | ________ | ________ | ________ |
| Next approved power | ________ | ________ | ________ |
- Draw the letter in normal reading orientation, then draw the microscope image at each power.
- Describe the image orientation and how much of the letter is visible.
- Move the slide right, then upward. Record each image movement separately.
- Explain why you center the letter before changing objectives.
- Explain why a larger image may still look blurry.
- Write a cleanup and storage checklist that follows your instrument’s manual.
Analysis and teaching notes
- Why start at low power? The larger field makes locating and centering the specimen easier, and the working distance is generally greater.
- What happens when the slide moves right? In a typical compound microscope the image moves left. Let observations establish the relationship; digital display settings can alter orientation.
- Does higher power always improve an image? No. Focus, illumination, resolution, and specimen preparation still matter.
Assess handling with a brief demonstration: the student must find the letter, center it, change power safely, and explain a magnification calculation. Students can give an oral explanation or annotate a photograph instead of drawing by hand.
AP extension: Measure field diameter using a calibrated slide or suitable ruler at low power. Estimate the higher-power field diameter using the inverse magnification relationship; identify why this estimate is less dependable across different optical configurations.
Teacher explanations for the new student sheet
Show expected observations and assessment notes
For a typical compound microscope, the image is rotated 180 degrees relative to the letter on the slide. Moving the slide right moves the image left; moving the slide up moves the image down. Digital display settings can alter orientation, so assess recorded observations rather than forcing an expected result.
At higher magnification, the visible field usually becomes smaller. Centering first helps keep the letter in view. A 10× eyepiece with a 4× objective gives 40× total magnification; a 10× objective gives 100×. Accept the student’s instrument-specific calculations.
Magnification cannot recover unresolved detail. Blur can reflect poor focus, bubbles, thick paper, illumination or dirty optics. The cleanup checklist should include removing and disposing of materials as directed, drying spills, turning off and unplugging safely when instructed, returning to the model’s storage position, and covering/storing the microscope.
Do not award a fixed magnification answer when the classroom lens powers differ. These notes support this activity, not an unverified legacy answer key.
Continue the unit
Sources and further reading
New diagrams and student sheets: original Biology Junction teaching resources, 2026. Teachers may print these new sheets for classroom use. Diagrams are simplified models, not photomicrographs.