Mollusk & Annelid Study Guide B1

Mollusk & Annelid Study Guide

Be able to answer these questions:

  • Name the kingdom for mollusks & annelids.
  • What is the oldest part of a bivalves shell called?
  • What muscles open & close a bivalves shell?
  • What tissue surrounds & protects the soft body of mollusks?
  • What is the larval stage of mollusks called & describe it?
  • What structure enables a squid to move by jet propulsion?
  • What are the external segments of an earthworm’s body called?
  • Name the internal shell of a squid.
  • How do earthworms breathe?
  • Earthworms are hermaphrodites. What does this mean?
  • What type of symmetry do annelids & mollusks have?
  • What are the respiratory organs of aquatic mollusks & annelids called?
  • What are aortic arches & what organism has them?
  • What type of circulatory system do mollusks & annelids have?
  • What is the tongue-like structure called that snails use to scrap algae?
  • What is the “lip” of an earthworm called & how is it used?
  • Name the muscular organ used by mollusks for movement.
  • Name several examples of bivalve mollusks.
  • Give an example of a univalve mollusk.
  • Give an example of a marine, shelled cephalopod mollusk.
  • What is the area of a mollusk’s body called that contains most of the body organs?

Know the class for each of the following mollusks & annelids:

  • clams & scallops
  • snails & slugs
  • clam worms
  • chitons
  • squid & octopus
  • leeches
  • earthworms

Be able to label these internal parts of a clam:

  • heart
  • gills
  • anus
  • adductor muscles
  • incurrent siphon

Be able to recognize pictures of these mollusks & annelids:

  • clam
  • snail
  • lugworm
  • leech
  • earthworm
  • chiton
  • squid
  • octopus

Mitosis PPT Questions

Cell Cycle and Mitosis
ppt Questions

Cell Cycle

1.Prokaryotic organisms include ___________, while plants and animals are ____________.

2. Describe prokaryotes.


3. How do bacteria asexually reproduce?

4. Name the 3 main steps of binary fission in bacteria.

    a.

    b.

     c.

5. Name a bacterial cell that reproduces by binary fission.

6. Describe eukaryotes.


7. How do eukaryotes asexually reproduce cells?

8. The stages in the growth and reproduction of a cell are called the __________ ___________.

9. List the 5 stages in the cell cycle.


10. What does G1 stage stand for?

11. Name two things that happen to a cell during G1?


12. What is the S stage of the cell cycle?

13. _________ instructions are copied in the S phase as ___________ are duplicated.

14. _______ stands for second growth stage.

15. G2 is the time between ____________ and ___________.

16. Cells continue to _________ during G2 and to make __________ that will be needed for mitosis or cell division.

17. Mitosis or cell division is known as the ________ stage.

18. How does a cell use its energy during the M phase?

19. Does a cell continue growing & making proteins in the M phase?

20. Mitosis is also called _______________ which means division of the ____________.

21. ____________ is called the resting stage and makes up the longest part of a cell’s life cycle.

22. What happens to cells during interphase?


23. Are chromosomes visible during interphase?

Mitosis

24. Name the 4 stages of mitosis.


25. Name 2 things that happen to a cell during prophase.

     a.

     b.

     c.

     d.

     e.

26. Can chromosomes be seen during prophase?

27. Sketch a eukaryotic chromosome and label the centromere and kinetochore fiber that attaches to it.


28. How many pairs of chromosomes are found in humans?

29. List 3 things that occur during metaphase.

     a.

     b.

     c.

30. Where are chromosomes located during metaphase of a cell?

31. What stage occurs after metaphase?

32. List 2 things that happen to cells during anaphase.

     a.

     b.

33. Sketch and label the mitotic spindle and attached chromosomes.


34. What is the last stage of mitosis?

35. Where are the two sets of chromosomes located at Telophase?

36. What two things reform during Telophase?

37. Chromosomes ___________ during Telophase so they are no longer visible.

38. In plants, what begins to form that will separate the two cells?

39. How are the two cells separated from each other in animals?


40. _____________ or division of the cytoplasm follows ___________, division of the nucleus, and forms ____________ daughter cells.

41. How do the two, new daughter cells compare to each other?


42. Label the following stages of mitosis.


Printable Copy

Mitosis and Meiosis


Mitosis and Meiosis

Introduction
All new cells come from previously existing cells. New cells are formed by the process of cell division which involves both replication of the cell’s nucleus (karyokinesis) and division of the cytoplasm( cytokinesis).

There are two types of nuclear division: mitosis and meiosis. Mitosis typically results in new somatic (body ) cells. Formation of an adult organism from a fertilized egg, asexual reproduction, regeneration, and maintenance or repair of body parts are accomplished through mitotic cell division. Meiosis results in the formation of either gametes (in animals) or spores ( in plants). These cells have half the chromosome number of the parent cell. You will study meiosis in Exercise 3B. Where does one find cells undergoing meiosis? Plants and animals differ in this respect. In higher plants the process of forming new cells is restricted to special growing regions called meristems. These regions usually occur at the tips of stems or roots. In animals, cell division occurs anywhere new cells are formed or as new cells replace old ones. However, some tissues in both plant and animals rarely divide once the organism is mature.

Exercise 3A.1: Observing Mitosis in Plant and Animal Cells Using Prepared Slides of the Onion Root Tip and Whitefish Blastula

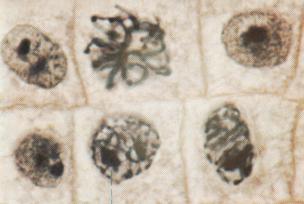
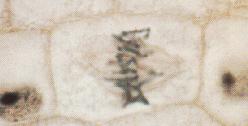
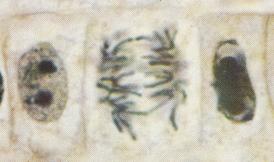
Figure 3.1 Close up view of different stages of mitosis in an onion root tip:


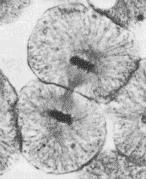
Figure 3.2 Whitefish Blastula


Procedure:
Examine prepared slides of either onion root tips or whitefish blastula. Locate the meristematic region of the onion, or locate the blastula with 10X objective, and then use the 40X objective to study individual cells. Identify one cell which clearly represents each phase of mitosis. Sketch and label the cell in the box provided.

1. The non dividing cell is in a stage called interphase. The nucleus may have one or more dark-stained nucleoli and is filled with a fine network of threads, the chromatin. During interphase, DNA replication occurs.

Interphase


2. The first signs of cell division occurs in prophase. There is a thickening of the chromatin threads, which will continue until it is evident that the chromatin has condensed into chromosomes. With somewhat higher magnification you may be able to see the two chromatids held together by the centromere. As prophase continues , the chromatids continue to thicken and shorten. The nuclear envelope disappears and the beginnings of the spindle apparatus begin to appear.


Prophase

3. At metaphase, the chromosome pairs have moved to the center of the spindle. One particular part of each chromosome, the centromere, attaches to the spindle. The centromeres of all the chromosomes lie about the same level of the spindle called the metaphase plate.


r

Metaphase

4. At the beginning of anaphase, the centromere regions of each pair of chromatids separate and are moved by the spindle fibers toward opposite poles of the spindle, dragging the rest of the chromatid behind them. Once each chromatid is separate it is called a chromosome.


r

Anaphase

5. Telophase, the last stage of division, is marked by a pronounced condensation of the chromosomes, followed by the formation of a new nuclear envelope around each group of chromosomes. The chromosomes gradually uncoil into the fine threads of chromatin, and the nucleoli reappears. Cytokinesis may occur. This is the division of the cytoplasm into two new cells. In plants, a new cell wall is laid down between the daughter cells. In animal cells, the old cells will pinch off in the middle along a cleavage furrow to form two new daughter cells.


Telophase


Analysis Questions:
1. Why is it more accurate to call mitosis “nuclear replication” rather than “cellular division”?

_____________________________________________________________________

_____________________________________________________________________

_____________________________________________________________________

_____________________________________________________________________

_____________________________________________________________________


2. Explain why the whitefish blastula and onion root tip are selected for study of mitosis.

_____________________________________________________________________

_____________________________________________________________________

_____________________________________________________________________

_____________________________________________________________________

Exercise 3A.2: Time for Cell Replication
Procedure:

It is hard to imagine that you can estimate how much time a cell spends in each phase of cell replication from a slide of dead cells. Yet this is precisely what you are going to do in this part of the lab. Since you are working with a prepared slide, you cannot get any information about how long it takes a cell to divide. What you can determine is how many cells are in each phase. From this, you can infer the percent of time each cell spends in each phase.

1. Observe every cell in one high power field of view and determine which phase of the cell cycle it is in. This is best done in pairs. The partner observing the slide calls out the phase of each cell while the other partner records. Then switch so the recorder becomes the observer and visa versa. Count at least two full fields of view. If you have not counted 200 cells, then count a third field of view.

2. Record your data in Table 3.1.

Table 3.1

Number of Cells

Percent of Total Cells Counted Time in Each Stage
Field 1 Field 2 Field 3 Total
Interphase
Prophase
Metaphase
Anaphase
Telophase
Total Cells Counted

3. Calculate the percentage of cells in each phase.

Consider it takes, on average, 24 hours (or 1,440 minutes) for onion root-tip cells to complete the cell cycle. You can calculate the amount of time spent in each phase of the cell cycle from the percent of cells in that stage.

Percent of cells in stage X 1,440 minutes = ___________ minutes of cell cycle spent in stage.

Questions:
1. If your observations had not been restricted to the area of the root tip that is actively dividing, how would your results have been different?

_____________________________________________________________________

_____________________________________________________________________

_____________________________________________________________________

_____________________________________________________________________

_____________________________________________________________________

2. Based on the data in Table 3.1, what can you infer about the relative length of time an onion root-tip cell spends in each stage of cell division?

_____________________________________________________________________

_____________________________________________________________________

_____________________________________________________________________

_____________________________________________________________________

_____________________________________________________________________


Mitosis Activity


Stages of Mitosis

Introduction

Mitosis, also called karyokinesis, is division of the nucleus and its chromosomes.  It is followed by division of the cytoplasm known as cytokinesis.  Both mitosis and cytokinesis are parts of the life of a cell called the Cell Cycle.  Most of the life of a cell is spent in a non-dividing phase called Interphase.  Interphase includes G1 stage in which the newly divided cells grow in size, S stage in which the number of chromosomes is doubled and appear as chromatin, and G2 stage where the cell makes the enzymes & other cellular materials needed for mitosis.

Mitosis has 4 major stages — Prophase, Metaphase, Anaphase, and Telophase. When a living organism needs new cells to repair damage, grow, or just maintain its condition, cells undergo mitosis.

During Prophase, the DNA and proteins start to condense. The two centrioles move toward the opposite end of the cell in animals or microtubules are assembled in plants to form a spindle. The nuclear envelope and nucleolus also start to break up.


Prophase

During Metaphase, the spindle apparatus attaches to sister chromatids of each chromosome. All the chromosomes are line up at the equator of the spindle. They are now in their most tightly condensed form.


Metaphase

During Anaphase, the spindle fibers attached to the two sister chromatids of each chromosome contract and separate chromosomes which move to opposite poles of the cell.


Anaphase

In Telophase, as the 2 new cells pinch in half (animal cells) or a cell plate forms (plant cells), the chromosomes become less condensed again and reappear as chromatin. New membrane forms nuclear envelopes and the nucleolus is reformed.


Telophase

Objective: 

In this lab, you will determine the approximate time it takes for a cell to pass through each of the four stages of mitosis. You may use your textbook and class notes to help you identify the stages of mitosis as seen under the microscope. 

Materials:

Microscope, prepared slide onion root tip or whitefish blastula, textbook, lab worksheet, pencil

Procedure:

  1. Set up a compound light microscope and turn on the light.
  2. Place a slide containing a stained preparation of the Allium (onion root tip) or Whitefish blastula.
  3. Locate the meristematic or growth zone, which is just above the root cap at the very end of the tip or
  4. Focus in on low power, and then switch to medium or high power. Below find micrographs of the four stages of mitosis. Use them to help you identify the stages on the microscope slide.


Prophase (onion)


Metaphase (onion)


Anaphase (onion)


Telophase (whitefish)


  1. Now count the number of cells found in each stage of mitosis and place the data in the chart below.
  2. Determine the percentage of time each cell will spend in each stage of mitosis. Divide the number of each cell by the total number of cells and multiply by 100 to determine the percentage. Place these values in the chart below.


Stage of Mitosis Number of Cells Percent of time in each stage =

# of cells in stage     X  100%
Total # of Cell

Prophase %
Metaphase %
Anaphase %
Telophase %
Interphase
(Not a Mitotic Stage)
%
Total # cells 100%


  1. Line graph the data you have just collected.  Be sure to label the X and Y axis & include the units of measurement.

Title: __________________________________________________

Graph Legend:


Questions:

1. Of the four stages of mitosis, which one takes the most time to complete? 


2. Which is the shortest stage in duration?


3. What would happen if the process of mitosis skipped metaphase?  telophase?

Further Study:

Normal Cell Division may be observed in onion root tips. Many of the processes are similar to those in animal cells. However, in plant cells, the cell plate between daughter cells forms from the Golgi.

Find all of the stages of mitosis and  interphase in the above picture. Make a sketch of each stage and briefly describe what is occurring. Count and record the number of cells you see in each stage.

Projects
Notes


Introduction to the Microscope Lab


Introduction to the Microscope Lab Activity

Introduction

“Micro” refers to tiny, “scope” refers to view or look at. Microscopes are tools used to enlarge images of small objects so as they can be studied. The compound light microscope is an instrument containing two lenses, which magnifies, and a variety of knobs to resolve (focus) the picture. Because it uses more than one lens, it is sometimes called the compound microscope in addition to being referred to as being a light microscope.  In this lab, we will learn about the proper use and handling of the microscope.

Objectives – Students will be able to:

  • Demonstrate the proper procedures used in correctly using the compound light microscope.
  • Prepare and use a wet mount.
  • Determine the total magnification of the microscope.
  • Explain how to properly handle the microscope.
  • Describe changes in the field of view and available light when going from low to high power using the
    compound light microscope
  • Explain why objects must be centered in the field of view before going from low to high power using the compound light microscope.
  • Explain how to increase the amount of light when going from low to high power using the compound light microscope.
  • Explain the proper procedure for focusing under low and high power using the compound light microscope.

Hypothesis

The process known as wet-mount can be used to prepare a specimen on a slide which can be viewed with a compound light microscopes to produce an enlarged image.

Materials

  • Compound microscope
  • Glass slides
  • Cover slips
  • Eye dropper
  • Beaker of water
  • The letter “e” cut from newsprint
  • Scissors


Procedures

I. Microscope Handling

  1. Carry the microscope with both hands — one on the arm and the other under the base of the microscope.
  2. One person from each group will now go over to the microscope storage area and properly transport one microscope to your working area.
  3. The other person in the group will pick up a pair of scissors, newsprint, a slide, and a cover slip.
  4. Remove the dust cover and store it properly. Plug in the scope. Do not turn it on until told to do so.
  5. Examine the microscope and give the function of each of the parts listed on the right side of the diagram.


Give the function(s) for the numbered parts of the compound microscope.
MICROSCOPE FUNCTIONS PARTS
 

1. ___________________________________

2. __________________________________

3. __________________________________

4. __________________________________

5. __________________________________

6. __________________________________

7. __________________________________

8. __________________________________

9. __________________________________

10. _________________________________

11. _________________________________

12. _________________________________

13. _________________________________

  1. eyepiece or ocular
  2. body tube
  3. fine adjustment knob
  4. nosepiece
  5. high power objective
  6.  low power objective
  7. diaphragm
  8. mirror (many   microscopes have a light instead)
  9. base
  10. coarse adjustment
  11. arm
  12. stage clip
  13. inclination joint


Part II. Preparing a wet mount of the letter “e”.

  1. With your scissors cut out the letter “e” from the newspaper.
  2. Place it on the glass slide so as to look like (e).
  3. Cover it with a clean cover slip. See the figure below.

  1. Using your eyedropper, place a drop of water on the edge of the cover slip where it touches the glass slide. The water should be sucked under the slide if done properly.
Technique for Adding a Stain when making a Wet Mount
  1. Turn on the microscope and place the slide on the stage; making sure the “e” is facing the normal reading position (see the figure above). Using the course focus and low power, move the body tube down until the “e” can be seen clearly. Draw what you see in the space below.

  1. Describe the relationship between what you see through the eyepiece and what you see on the stage.

    __________________________________________________

7.  Looking through the eyepiece, move the slide to the upper right area of the
stage.  What direction does the image move?

__________________________________________________

8.      Now, move it to the lower left side of the stage. What direction does the image move?

__________________________________________________

9.   Re-center the slide and change the scope to high power. You will notice the “e” is out of focus. Do Not touch the coarse focus knob, instead use the fine focus to resolve the picture.    Draw the image you see of the letter e (or part of it) on high power.

10.  Locate the diaphragm under the stage. Move it and record the changes in light intensity as you do so.

_______________________________________________________________________________________


III. Determining Total Magnification:

  1. Locate the numbers on the eyepiece and the low power objective and fill in the blanks below.


Eyepiece magnification ______________ (X) Objective magnification ______________ = Total Magnification _____________X

2.       Do the same for the high power objective.

Eyepiece magnification ______________ (X) Objective magnification ______________ = Total Magnification _____________X

3.     Write out the rule for determining total magnification of a compound microscope. 

_____________________________________________________________________________________________

  1. Remove the slide and clean it up. Turn off the microscope and wind up the wire so it resembles its original position. Place the low power objective in place and lower the body tube. Cover the scope with the dust cover. Place the scope back in its original space in the cabinet.

Conclusion Questions:

1.      State 2 procedures which should be used to properly handle a light microscope.

2.      Explain why the light microscope is also called the compound microscope.


3.      Images observed under the light microscope are reversed and inverted.   Explain what this means.


4.      Explain why the specimen must be centered in the field of view on low power before going to high power.

5.       A microscope has a 20 X ocular (eyepiece) and two objectives of 10 X and 3 X respectively:

a.) Calculate the low power magnification of this microscope.
Show your formula and all work.

b.) Calculate the high power magnification of this microscope.
Show your formula and all work.

6.       In three steps using complete sentences, describe how to make a proper wet mount of the letter e.

7.       Describe the changes in the field of view and the amount of available light when going from low to high power using the      compound microscope.

8.      Explain what the microscope user may have to do to combat the problems incurred in question # 7.

9.      How does the procedure for using the microscope differ under high power as opposed to low power?

10.     Indicate and describe a major way the stereomicroscope differs from the compound light microscope in terms of its use.


BACK