Molecular Biology
Introduction:
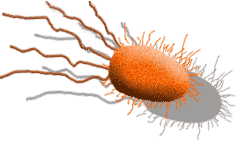
The bacterium Escherichia coli or E. coli is an ideal organism for the molecular geneticist to manipulate and has been used extensively in recombinant DNA research. It is a common inhabitant of the human colon and can easily be grown in suspension culture in a nutrient medium such as Luria broth, or in a petri dish of Luria broth mixed with agar (LB agar) or nutrient agar.
The single circular chromosome of E. coli contains about five million DNA base pairs, only 1/600th the haploid amount of DNA in a human cell. In addition, the E.coli cell may contain small circular DNA molecules (1,000 to 200,000 base pairs) called plasmids, which also carry genetic information. The plasmids are extra chromosomal; they exist separately from the chromosome. Some plasmids replicate only when the bacterial chromosome replicates, and usually exists only as single copies within the bacterial cell. Others replicate autonomously and often occur in as many as 10 to 200 copies within a single bacterial cell. Certain plasmids, called R plasmids, carry genes for resistance to antibiotics such as ampicillin, kanamycin, or tetracycline.
In nature, genes can be transferred between bacteria in three ways: conjugation, transduction, and transformation. Conjugation is a mating process during which genetic material is transferred from one bacterium to another of a different mating type. Transduction requires the presence of a virus to act as a vector to transfer small pieces of DNA from one bacterium to another. Bacterial transformation involves transfer of genetic information into a cell by direct uptake of the DNA. During gene transfer, the uptake and expression of foreign DNA by recipient bacterium can result in the conferring a particular trait to a recipient lacking the trait.
Plasmids can transfer genes that occur naturally within them, or plasmids can act as carriers for introducing foreign DNA from other bacteria, plasmids, or even eukaryotes into recipient bacterial cells. Restriction endonucleases can be used to cut and insert pieces of foreign DNA into the plasmid vectors (figure 6.1).
Figure 6.1 Bacterial Transformation using a Restriction Endonuclease

Exercise 6A: Bacterial Transformation-Ampicillin Resistance*
Background Information:
You will insert a plasmid that contains a gene for the resistance to ampicillin , an antibiotic that is lethal to many bacteria, into competent E.coli cells. Transformed bacteria can be selected based on their resistance to ampicillin by spreading the transformed cells on nutrient medium containing ampicillin. Any cell that grown on this mediums has been transformed.
Procedure:
1. Mark one 15 mL tube “+”; this tube will have the plasmid added to it. Mark another tube “-” ; this tube will have no plasmid added.
2. Use a sterile pipette to add 250 micro liters (uL) of ice cold 0.05M CaCl2 to each tube.
3. Transfer a large (3 mm) colony of E.coli from a starter plate to each of the tubes using a sterile inoculating loop. Try and get the same amount of bacteria into each tube. Be careful not to transfer any agar.
4. Vigorously tap the loop against the wall of the tube to dislodge the cell mass.
5. Mix the suspension by repeatedly drawing in and emptying a sterile micro pipette with the suspension.
6. Add 10 uL of pAMP solution (0.005 ug/uL) directly into the cell suspension in tube “+”. Mix by tapping the tube with your finger. This solution contains the antibiotic resistance plasmid.
7. Keep both tubes on ice for 15 minutes.
8. While the tubes are on ice, obtain two LB agar plates and two LB/Amp agar(LB agar containing ampicillin) plates. Label each plate on the bottom as follows: one LB agar plate “LB+” and the other “LB-“. Label one LB/Amp plate “LB/Amp+” and the other “LB/Amp-.”
9. A brief pulse of heat facilitates entry of foreign DNA into the E. coli cells. Heat shock cells in both the “+” and “-” tubes by holding the tubes in a 42 degree C water bath for 90 seconds. It is essential that cells be given a sharp and distinct shock, so take the tubes directly from the ice to the 42 degree C water bath.
10. Immediately return cells to ice for two minutes.
11. Use sterile micro pipette to add 250 uL of Luria broth to each tube. Mix by tapping with your finger and set at room temperature. Any transformed cells are now resistant to ampicillin because they possess the gene whose product renders the antibiotic ineffective.
12. Place 100 uL of “+” cells on the “LB+” plate and on the “LB/Amp+” plate. Place 100 uL of “-” cells on the “LB-” plate and on the “LB/Amp-” plate.
13. Immediately spread the cells using a sterile spreading rod. ( Remove the spreading rod from alcohol and briefly pass it through a flame. Cool by touching it to the agar on a part of the dish away from the bacteria. Spread the cells and once again immerse the rod in alcohol and flame it.) Repeat the procedure for each plate.
14. Allow plates to set for several minutes. Tape your plates together and incubate inverted overnight at 37 degrees C.

* Exercise 6A is adapted with permission from DNA Science: A First Course in Recombinant-DNA Technology by David A Micklos, DNA Learning center of Cold Spring Harbor Laboratory , and Greg A. Freyer, Columbia University College of Physicians and Surgeons, Copyright 1990 Cold Spring Harbor Laboratory Press and Carolina Biological Supply Company. It is based on a protocol published by Douglas Hanahan, University of California, San Francisco
Analysis of Results:
1. Observe the colonies through the bottom of the culture plate. Do not open the plates. Count the number of individual colonies; use a permanent marker to mark each colony as it is counted. If cell growth is too dense to count individual colonies, record “lawn.”
LB + ( Positive Control ) ___________________ LB – ( Positive Control ) ______________________
LB/Amp + ( Experimental ) _________________ LB/Amp – ( Negative Control ) _________________
2. Compare and contrast the number of colonies on each of the following pairs of plates. What does each pair of results tell you about the experiment/
a. LB+ and LB- _______________________________________________
b. LB/Amp- and LB/Amp+ ____________________________________________________________
c. LB/Amp + and LB+ _____________________________________________________________
3. Transformation efficiency is expressed as the number of antibiotic-resistant colonies per microgram of pAMP. Because transformation is limited to only those cells that are competent, increasing the amount of plasmid used does not necessarily increase the probability that a cell will be transformed. A sample of competent cells is usually saturated with small amounts of plasmid and excess DNA may actually interfere with the transformation process.
a. Determine the total mass of pAMP used. _____________________
( you used 10 uL of pAMP at a concentration of 0.005ug/uL.)
Total Mass = volume x concentration.
b. Calculate the total volume of cell suspension prepared. _______________________
c. Now calculate the fraction of the total cell suspension that was spread on the plate.
( Number of uL spread/total volume) _____________________________________
d. Determine the mass of pAMP in cell suspension. __________________________
(Total mass of pAMP X fraction spread.)
e. Determine the number of colonies per ug of plasmid. Express in scientific notation.
( Number of colonies observed/mass pAMP spread ( from calculation in step (d) = transformation efficiency.)
4. This is the transformation efficiency. What factors might influence transformation efficiency? Explain the effect of each you mention.
___________________________________________________________________
___________________________________________________________________
___________________________________________________________________
___________________________________________________________________
___________________________________________________________________
___________________________________________________________________
Exercise 6B: Restriction Enzyme Cleavage of DNA and Electrophoresis
Background Information:
Restriction enzymes or restriction endonucleases are essential tools in recombinant DNA methodology. Several hundred have been isolated from a variety of prokaryotic organisms. Restriction endonucleases are named according to a specific system of nomenclature. The letters refer to the organism from which the enzyme was isolated. The first letter of the name stands for the genus name of the organism. The next two letters represent the second word or the species name. The fourth letter (if there is one) represents the strain of the organism. Roman numerals indicate whether the particular enzyme was the first isolated, the second, or so on.
Examples:
EcoRI E = genus Escherichia
co= species coli
R = strain RY13
I = first endonuclease isolated
HaeII H = genus Haemophilus
ae= species aegyptus
I I = second endonuclease isolated
Restriction endonucleases recognize specific DNA sequences in double stranded DNA (usually a four to six base pair sequence of nucleotides) and digest the DNA at these sites. The result is the production of fragments of DNA of DNA of various lengths. Some restriction enzymes cut cleanly through helix at the same position on both strands to produce fragments with blunt ends ( figure 6.2a ). Other endonucleases cleave each strand off center at specific nucleotides to produce fragments with “overhangs” or sticky ends (figure 6.2b). By using the same restriction enzyme to “cut” DNA from two different organisms, complementary “overhangs” or sticky ends will be produced and allow the DNA from two sources to be “recombined.”
Figure 6.2a
Hae III
Cleavage by HaeIII produces blunt ends
5’…GGCC…3′
3’…CCGG…5′
Figure 6.2b
EcoR I
Cleavage by EcoRI produces sticky ends
5’…GAATTC…3′
3’…CTTAAG…5′
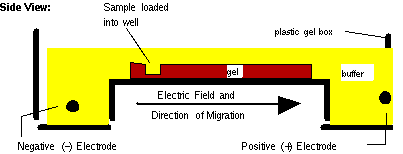
In this exercise, samples of DNA obtained from the bacteriophage lambda have been incubated with different restriction enzymes. The resulting fragments of DNA will be separated by using gel electrophoresis. One sample has been digested with the restriction endonuclease EcoRI, one with the restriction endonuclease HindIII, and the third sample is uncut. The DNA samples will be loaded into wells of an agarose gel and separated by the process of electrophoresis. After migration of the DNA through an electrical field, the gel will be stained with methylene blue, a dye which binds to DNA.
When any molecule enters an electric field, the mobility or speed at which it will move is influenced by the charge of the molecule, the strength of the electrical field, the size and shape of the molecule, and the density of the medium (gel) through which it is migrating. When all molecules are positioned at a uniform starting site on a gel and a gel is placed in a chamber containing a buffer solution and electricity is applied, the molecules will migrate and appear as bands. Nucleic acids, like DNA and RNA, move because of the charged phosphate group in the backbone of the DNA molecule. Because the phosphates are negatively charged at neutral pH, the DNA will migrate through the gel toward the positive electrode.
In this exercise, we will use an agarose gel. In agarose, the migration rate of linear fragments of DNA is inversely proportional to their size; the smaller the DNA molecules, the faster it migrates through the gel.
General Procedure:
A: Preparing the Gel
1. Prepare the agarose gel for electrophoresis according to the directions given by you teacher or in the kit.
2. Obtain the phage lambda DNA digested with EcoRI endonuclease. The DNA is mixed with a gel-loading solution containing a tracking dye, bromophenol blue, that will make it possible to “track” the processes of its migration in the agarose gel.
3. Obtain the phage lambda DNA digested with HindIII endonuclease. The DNA fragments are of a known size and will serve as a “standard” for measuring the size of the EcoRI fragments from step 2. It also contains the tracking dye.
4. Obtain the undigested phage lambda DNA to use as a control. It also contains the tracking dye.
B: Loading the Gel
| Helpful Hints for Loading Gel
1. Put a small amount of gel-loading solution into the end of a micropipette. Do not allow the solution to move up into the pipette, or bubbles will be introduced into the well of the agarose gel during loading. loading.
2. Hold the tip of the pipette above the gel and gently dispense the solution. The loading dye is denser than the buffer and will move into the well. ( Do not place the tip of the pipette into the well or you might puncture the gel). |
1. Pour enough buffer gently over the gel to cover it.
2. Load 5-10 uL of undigested lambda phage DNA (control) into a well.
3. Load 5-10 uL of the HindIII digest into a second cell.
4. Load 5-10 uL of the EcoRI digest into a third well.
See the figure below for a side view of a typical gel box.
Figure 6.3 Gel Box.
C: Electrophoresis:
1. Place the top on the electrophoresis chamber and carefully connect the electrical leads to an approved power supply (black to black and red to red). Set the voltage to the appropriate level for your apparatus. When the current is flowing, you should see bubbles on the electrodes.
2. Allow electrophoresis to proceed until the tracking dye has moved nearly to the end of the gel.
3. After electrophoresis is complete, turn off the power, disconnect the leads, and remove the cover of the electrophoresis chamber.
D: Staining and Visualization:
Note: Wear Gloves!
1. Carefully remove the gel bed from the chamber and gently transfer the gel to a staining tray for staining. Use the metal spatula under the gel during the transfer. Do not stain in the electrophoresis chamber.
E: Determining Fragment Size:
1. After observing the gel, carefully wrap it in plastic wrap and smooth out all the wrinkles.
2. Using a marking pen, trace the outlines of the sample wells and the location of the bands.
3. Remove the plastic wrap and flatten it out on a white piece of paper on the laboratory bench. Save the gel in a zip lock bag. Add several drops of buffer, store at 4degrees C. You can make your measurements directly from the marks on the plastic wrap.
Analysis and Results:
Background Information
The size of the fragments produced by a specific endonuclease can be determined by using standard fragments of known size. When you plot the data on semilog graph paper, the size of the fragments is expressed in the log of the number of base pairs they contain. This allows data to be plotted on a straight line. The migration distance of the unknown fragments, plotted on the x-axis, will allow their size to be determined on the standard curve.
Graphing:
A. Standard Curve for HindIII
1. Measure the migration distance in cm) for each HindIII band on your gel. Measure from the bottom of the sample well to the bottom of the band. Measurement of the longest standard fragment does not need to be measured (23,120 base pairs). Record these measurements on table 6.1.
2. Plot the measured migration distance for each band of the standard HindIII digest against the actual base pair (bp) fragment sizes given in Table 6.1 using the semilog graph paper. Draw the best fit line to your points. This will serve as a standard curve.
B. Interpolated Calculations for EcoRI:
From your standard curve for HindIII, made from known fragment sizes, you can calculate fragment sizes resulting from a digest with EcoRI. The procedure is as follows:
1. Measure the migration distance in cm for each EcoRI band. Record the data in Table 6.1
2. Determine the sizes of fragments of lambda phage DNA digested with EcoRI. Locate on the x axis the distance migrated by the first EcoRI fragment. Using a ruler, draw a vertical line from this point to its intersection with a best fit data line. Now extend a horizontal line from intersection point to the Y axis. This point gives the base pair size for this EcoRI fragment. Repeat this procedure and determine the remaining EcoRI fragments. Enter your interpolated data in Table 6.1, in the interpolated bp column.
3. Your teacher will provide you with the actual bp data. Compare your results to these actual sizes. Note: This interpolation technique is not exact. You should expect as much as 10% to 15% error.
Table 6.1: Distance HindIII produced fragments migrate in agarose gel (cm)
| HindIII |
| Actual bp |
Measured Distance (cm) |
| 23,130 |
|
| 9,416 |
|
| 6,557 |
|
| 4,361 |
|
| 2,322 + |
|
| 570 *+ |
|
| 125 * |
|
| + may form a single band |
* may not be detected |
Table 6.2: Distance EcoRI produced fragments migrate in agarose gel (cm)
| |
EcoRI |
| |
Measured Distance (cm) |
Interpolated bp |
Actual bp |
| Band 1 |
|
|
|
| Band 2 |
|
|
|
| Band 3 |
|
|
|
| Band 4 |
|
|
|
| Band 5 |
|
|
|
| Band 6 |
|
|
|
4. For which fragment size was your graph most accurate? For which fragment size was it least accurate/ What does this tell you about the resolving ability of agarose-gel electrophoresis?
_____________________________________________________________________
_____________________________________________________________________
_____________________________________________________________________
_____________________________________________________________________
_____________________________________________________________________
_____________________________________________________________________
Analysis:
1. Discuss how each of the following factors would affect the results of electrophoresis:
a. Voltage used _____________________________________________________________________
_____________________________________________________________________
b. Running time_________________________________________________________________
_____________________________________________________________________
c. Amount of DNA used_________________________________________________________________
_____________________________________________________________________
d. Reversal of polarity______________________________________________________________
____________________________________________________________________
2. Two small restriction fragments of nearly the same base-pair size appear as a single band, even when the sample is run to the very end of the gel. What could be DNA to resolve the fragments? Why would it work?
_____________________________________________________________________
____________________________________________________________________
____________________________________________________________________
____________________________________________________________________
Questions:
1. What is a plasmid? How are plasmids used in genetic engineering?
____________________________________________________________________
____________________________________________________________________
____________________________________________________________________
____________________________________________________________________
2. What are restriction enzymes? How do they work? What are recognition sites?
____________________________________________________________________
____________________________________________________________________
____________________________________________________________________
____________________________________________________________________
3. What is the source of restriction enzymes? What is there function in nature?
____________________________________________________________________
____________________________________________________________________
____________________________________________________________________
____________________________________________________________________
4. Describe the function of electricity and agarose gel in electrophoresis.
____________________________________________________________________
____________________________________________________________________
____________________________________________________________________
____________________________________________________________________
5. If restriction enzyme digest resulted in DNA fragments of the following sizes: 4, 000 base pairs, 2,500 base pairs, 2,000 base pairs, 400 base pairs, sketch the resulting separation by electrophoresis. Show starting point, positive and negative electrodes, and the resulting bands.
6. What are the functions of loading dye in electrophoresis? How can DNA be prepared for visualization?
____________________________________________________________________
____________________________________________________________________
____________________________________________________________________
____________________________________________________________________
7. Use the graph you will prepared from your lab data to predict how far in centimeters a fragment of 8,000 bp would migrate.
____________________________________________________________________
____________________________________________________________________
____________________________________________________________________
____________________________________________________________________
8. How can a mutation that alters a recognition site be detected by gel electrophoresis?
____________________________________________________________________
____________________________________________________________________
____________________________________________________________________
____________________________________________________________________
Graph paper: