Safety Guidelines

Safety Guidelines
All Materials © Cmassengale


  1. Safety goggles/glasses & aprons must be worn at all times in the laboratory.
  2. Tie back long hair & secure lose clothing.  
  3. No horseplay is allowed in the lab.
  4. No food or drink is allowed in the laboratory.  
  5. Practice good “housekeeping” techniques.  Return items to proper places in good condition.  Avoid cluttering your work area.
  6. Never use chemicals from unlabeled containers.  Check each label before dispensing a chemical, & do not return a chemical to a bottle without the teacher’s permission.
  7. Unless told otherwise, treat all chemicals as poisonous or corrosive.  Wash hands immediately with plenty of water if chemical gets on them and always wash your hands before leaving lab.  
  8. No unauthorized lab work may be done, & a teacher must be present to do lab work.  
  9. Read & study each lab assignment before coming to lab.  Pay attention to safety notes in the lab manual and from the instructor.  Some common lab concerns:
    * Never pipette by mouth
    * Never use chipped or cracked glassware
    * Do not heat a closed system
    * Do not point heated containers at yourself or another person
    * Use a fume hood for noxious fumes
    * Place heated glass on wire gauze until cool
    * Do not use flammable material near open flame
    * Wear gloves when dispensing irritating chemicals
    * Dilute concentrated acids by adding acid to water
    * Turn off burners and water faucets when not in use & before leaving lab
    * Only heat glassware marked Kimex or Pyrex
    * Use glycerin and a twisting motion to insert glass tubing into stoppers
    * Use tongs, test tube holders, or heat-resistant gloves to handle hot glassware
    * Use pins to secure dissecting organisms to the dissecting tray before cutting with a scalpel
    * Wash hands before and after dissecting and keep hands away from your face
  10. Report all accidents immediately to the teacher.
  11. Know the location and proper use of all safety equipment in the lab.
  12. Know where all exits are from the lab.


PRINT SAFETY RULES & LAB CONTRACT HOME      PRINT SAFETY WORKSHEET


Scientific Equipment


Scientific Equipment

All Materials © Cmassengale

Click HERE for Notebook Copy

Compound Light Microscope (LM)-used to enlarge an image Graduated Cylinder – used to measure the volume of liquids
Microscope Slide – supports an item being examined under the microscope Image result for cover slip 
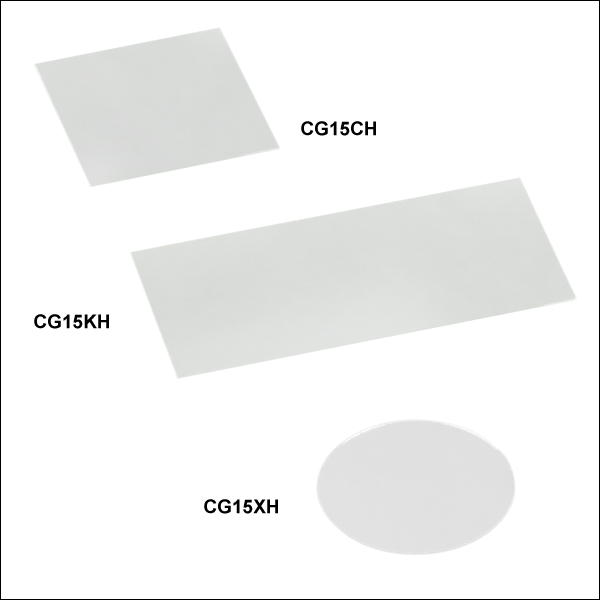
Cover slip – covers specimen on a slide
Beaker, Glass, Cup, Chemistry, Flask, Laboratory Beaker – holds liquids while they are being stirred or heated Test Tube Brush – used to clean test tubes
Image result for evaporating dish Evaporating Dish – used for heating solids Image result for pinch clamps Pinch Clamps – used to control the flow of liquids through tubing
Image result for funnel Funnel – assists in transferring liquids to containers with smaller openings Striker – used to ignite a burner
Test Tubes – holds liquids for observation or testing Safety goggles – protects the eyes from damaging substances
Pipet pump – dispenses known volumes of liquids Eyedropper – used to transfer small amounts of liquids
Image result for forceps Forceps – used to hold or lift specimens Magnifying glass – enlarges the image of an object
Related image 
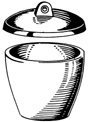
Crucible – containers used for “strong” heating Test Tube Rack – holds test tubes during observation or testing
Wash Bottle – used for rinsing solids out of a container Pipet – used for exact measurements of liquids
Image result for spatula drawing 
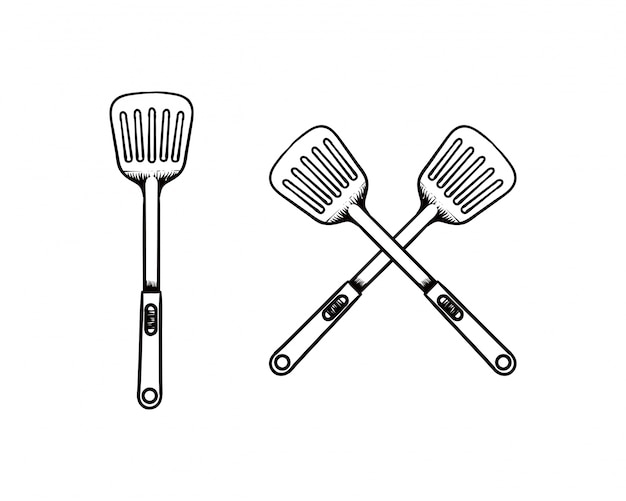
Spatula – chemical spoons used to transfer solids from their original container to a scale for weighing Image result for wire gauze Wire Gauze – adds additional support for containers held on tripods or O-rings
Crucible Tongs – used for picking up crucibles & crucible covers only Mortar & Pestle – used to grind solids into powders
Florence Flask – used to store liquids Erlenmeyer Flask -used to store solutions
Dissecting Pan – holds specimen being dissected test tube holder Test Tube Holder – holds test tubes while heating
an electronic balance Electronic Balance – used for weighing substances a proper lab burner flame Bunsen Burner – heat source
Thermometer – used to measure temperature Stopper – used to cap flasks containing liquids
Scalpel – used for cutting specimens being dissected Tubing – hose used for connecting glassware
Image result for petri dish Petri Dish – plate used to culture microorganisms a triple-beam balance Triple Beam Balance – used for weighing substances
O-Ring – used with ring stands to support heated vessels Volumetric Flask – used to mix precise volumes of liquids
Related image Watch Glass – used on top of beakers when heating Desiccators – used to remove moisture from substances
PRINT EQUIPMENT SHEET FOR NOTEBOOK      BACK

Scientific Laws


Scientific Laws, Hypotheses, and Theories


Scientific Theory versus “Just a theory” Layman’s term:

In layman’s terms, if something is said to be “just a theory,” it usually means that it is a mere guess, or is unproved. It might even lack credibility. But in scientific terms, a theory implies that something has been proven and is generally accepted as being true.

Scientific Meanings:

SCIENTIFIC LAW: This is a statement of fact meant to describe, in concise terms, an action or set of actions. It is generally accepted to be true and universal, and can sometimes be expressed in terms of a single mathematical equation. Scientific laws are similar to mathematical postulates. They don’t really need any complex external proofs; they are accepted at face value based upon the fact that they have always been observed to be true. Specifically, scientific laws must be simple, true, universal, and absolute. They represent the cornerstone of scientific discovery, because if a law ever did not apply, then all science based upon that law would collapse.  Some scientific laws, or laws of nature, include the law of gravity, Newton’s laws of motion, the laws of thermodynamics, Boyle’s law of gases, the law of conservation of mass and energy, and Hook’s law of elasticity.

HYPOTHESIS: This is an educated guess based upon observation. It is a rational explanation of a single event or phenomenon based upon what is observed, but which has not been proved. Most hypotheses can be supported or refuted by experimentation.

THEORY: A theory is more like a scientific law than a hypothesis. A theory is an explanation of a set of related observations or events based upon proven hypotheses and verified multiple times by detached groups of researchers. One scientist cannot create a theory; he can only create a hypothesis. Theories may be expanded or modified with further scientific evidence.

Development of a Simple Theory by the Scientific Method:

  • Start with an observation that evokes a question: Broth spoils when I leave it out for a couple of days. Why?
  • Using logic and previous knowledge, state a possible answer, called a Hypothesis: Tiny organisms floating in the air must fall into the broth and start reproducing.
  • Perform an experiment or Test: After boiling some broth, I divide it into two containers, one covered and one not covered. I place them on the table for two days and see if one spoils. Only the uncovered broth spoiled.
  • Then publish your findings in a peer-reviewed journal. Publication: “Only broth that is exposed to the air after two days tended to spoil. The covered specimen did not.”
  • Other scientists read about your experiment and try to duplicate it. Verification: Every scientist who tries your experiment comes up with the same results. So they try other methods to make sure your experiment was measuring what it was supposed to. Again, they get the same results every time.
  • In time, and if experiments continue to support your hypothesis, it becomes a Theory: Microorganisms from the air cause broth to spoil.

BACK


Scientific Method Notes


Scientific Method
All Materials © Cmassengale
How can we determine if something is a fact or an opinion? How can we determine an answer to a problem? The answer is use the scientific method.What is the Scientific Method? It is a series of steps used to help solve a problem.

  • Step 1. Make an Observation. After making an observation of the natural world, define the problem and make sure only one problem is being studied. ALL scientific experimentation starts with observation.
  • Step 2. Research the problem (question). Use all available resources to collect data on the subject being covered. Libraries, Internet, books, magazines, personal interviews, etc.
  • Step 3. Develop a hypothesis (educated guess). Make it a short definitive statement. It may be an “if” then” statement. The “if” part will become the hypothesis and the then part should be the results received at the end of the controlled experiment. Remember your hypothesis can be changed if the results do not support it.
  • Step 4. Develop a controlled experiment. A controlled experiment is an experiment that contains only one experimental variable. An experimental or independent variable is the thing being tested (what the scientist changes). Everything else in the experiment or all other variables must be the same. These variables are also called the controlled variables. Keeping these variables the same allows the experimenter to show that it was the experimental variable that caused the results. The dependent variable is what changes when the independent variable changes – the dependent variable depends on the outcome of the independent variable.  Data should be organized into charts, tables, or graphs.
  • Step 5. Analyze the data and come up with a conclusion. Data may be quantitative (numbers) or qualitative (appearance, properties, etc.).  The conclusion may or may not support the hypothesis. Additional experimentation must then take place to build documentation concerning the problem. If the hypothesis is proven wrong, change the hypothesis, not the data. Scientists must be unbiased.
  • WHAT FOLLOWS: Scientific research must be published, but first it must be reviewed by peers (other scientists) and verified for accuracy.  Research may result in a scientific theory or law.

Example:

Observation: Toaster stops working.
Question/Research: What is wrong with the toaster? (Read toaster Manual.)
Hypotheses: (1) It is unplugged. (2) The unit is burned out.
Experiments:  (1) Check the plug. (2) Take the toaster apart and look at the heating wires.
Results & Conclusion: If it was unplugged the first hypothesis is supported, if the wires inside are broken, then the second hypothesis is supported.


BACK

Pzz Intro to Biology


Introduction to Biology
Unscramble the following words & then tell their meaning: 


1) mosagrin __________________________
2) lobygio __________________________
3) nelllaiuurc __________________________
4) limrlulcautle __________________________
5) fdrionteitfanie __________________________
6) ahimetsosso __________________________
7) drooutienrpc __________________________
8) dryixiloouecnecb cdia __________________________
9) leuaasx __________________________
10) lniovoetu __________________________
11) yecolog __________________________
12) tmeysecsos __________________________
13) runatla scelnoiet __________________________
14) hhisotsnyepots __________________________
15) outtropah __________________________
16) rrooehhtpet __________________________
17) eedltovepnm __________________________
18) gnee __________________________
19) mtbeolisma __________________________


Solution