Pasteur Experiment

Recreation of Pasteur’s Experiment

Introduction:

Today, we take many things in science for granted. Many experiments have been performed and much knowledge has been accumulated that people didn’t always know. For centuries, people based their beliefs on their interpretations of what they saw going on in the world around them without testing their ideas to determine the validity of these theories — in other words, they didn’t use the scientific method to arrive at answers to their questions. Rather, their conclusions were based on untested observations.

Among these ideas, for centuries, since at least the time of Aristotle (4th Century BC), people (including scientists) believed that simple living organisms could come into being by spontaneous generation. This was the idea that non-living objects can give rise to living organisms. It was common “knowledge” that simple organisms like worms, beetles, frogs, and salamanders could come from dust, mud, etc., and food left out, quickly “swarmed” with life. For example:

Observation: Every year in the spring, the Nile River flooded areas of Egypt along the river, leaving behind nutrient-rich mud that enabled the people to grow that year’s crop of food. However, along with the muddy soil, large numbers of frogs appeared that weren’t around in drier times. Conclusion: It was perfectly obvious to people back then that muddy soil gave rise to the frogs.

Objective:

In this experiment, you will conduct an experiment similar to the one done by Pasteur whenever he disproved spontaneous generation.


Materials Needed:Experiment Set-Up

  • Low-salt broth (chicken or beef, home-made or purchased)
  • 2  250-mL Erlenmeyer flasks
  • 2  1-hole rubber stoppers with bent glass tubing inserted (see diagram)
  • Glycerine
  • Hot plate & pot holders
  • 50-ml Graduated Cylinder
  • Marker

Procedure:

  1. Students should work in teams of 2 to 3 people. Each team should perform the following steps.
  2. Use glycerine and a twisting motion to insert glass tubing into the stoppers. be sure to rinse off excess glycerine with water.
  3. Mark Erlenmeyer flasks accordingly:
    1. Flask 1 with stopper and glass tube going straight up
    2. Flask 2 with stopper and glass tube bent in S-curve
  4. Using a graduated cylinder, place about 50-mL of broth in each Erlenmeyer flask.
  5. Place appropriate lids on flasks.
  6. Use a hot plate to boil broth in flasks with appropriate lids on them for 30 min., then let cool.
  7. For the next ten days, observe the flasks and record any changes in color, turbidity, smell, etc. (Be careful to NOT remove the stoppers from the flasks.)

Data:

Microbial Growth Record
Record the appearance of the flask contents.

Day Flask 1 with Straight Tubing Day Flask 2 with S-shaped Tubing
1 1
2 2
3 3
4 4
5 5
6 6
7 7
8 8
9 9
10 10

Conclusion:

  1. What was the appearance on the broth in each flask on Day 1?
  2. Was their an observed appearance change in flask 1 over the 10 days? Describe the change, if any.
  3. Was their an observed appearance change in flask 2 over the 10 days? Describe the change, if any.
  4. Explain why there was or was not a change in the appearance of the broth in each flask.
  5. Why do you think the idea of spontaneous generation was believed to be true for so long (1000+ years)?
  6. Did your experiment support spontaneous generation of organisms? Explain why or why not?
Osmosis & Diffusion in Egg Lab


Osmosis & Diffusion in an Egg


Objective:
In this investigation, you will use a fresh hen’s egg to determine what happens during osmosis & diffusion across membranes.

Materials: (per lab group)
1-2 fresh hen eggs in their shells, masking tape & marker, distilled water, clear sugar syrup (Karo, for example), vinegar, clear jar with lid, tongs, electronic balance, paper towels, paper, pencil

Procedure:

Day 1   

  1. Label the jar with your lab group & the word “vinegar”.
  2. Mass the egg with the electronic balance & record in the data table.
  3. Carefully place the raw egg into the jar & cover the egg with vinegar.
  4. Loosely re-cap the jar & allow the jar to sit for 24 to 48 hours until the outer calcium shell is removed.

Day 2   

  1. Open the jar & pour off the vinegar.
  2. Use tongs to carefully remove the egg to a paper towel & pat it dry.
  3. Record the size & appearance of your egg in your data table.
  4. Mass the egg on an electronic balance & record.
  5. Clean and re-label the jar with your lab group & the word “distilled water”.
  6. Carefully place the egg into the jar & cover the egg with distilled water.
  7. Loosely re-cap the jar & allow it to sit for 24 hours.

Day 3   

  1. Open the jar & discard the distilled water.
  2. Use tongs to carefully remove the egg to a paper towel & pat it dry.
  3. Record the size & appearance of your egg in your data table.
  4. Mass the egg on an electronic balance & record.
  5. Clean and re-label the jar with your lab group & the word “syrup”.
  6. Carefully place the egg into the jar & cover the egg with clear syrup.
  7. Loosely re-cap the jar & allow it to sit for 24 hours.

Day 4   

  1. Open the jar & pour off the syrup.
  2. Use tongs to very carefully remove the egg & rinse off the excess syrup under slow running water.
  3. Pat the egg dry on a paper towel.
  4. Record the size & appearance of your egg in your data table.
  5. Mass the egg on an electronic balance & record.
  6. Clean up your work area & put away all lab equipment.

Data:


RESULTS OF DIFFUSION

Original Mass Final Mass Appearance of Egg
VINEGAR
WATER
SYRUP


Questions & Conclusion:

1. Vinegar is made of acetic acid & water. Explain how it was able to remove the calcium shell.


2. (a) What happened to the size of the egg after remaining in vinegar?

(b) Was there more or less liquid left in the jar?

   (c) Did water move into or out of the egg? Why?


3. (a) What happened to the size of the egg after remaining in distilled water?

(b) Was there more or less liquid left in the jar?

   (c) Did water move into or out of the egg? Why?


4. (a) What happened to the size of the egg after remaining in syrup?

(b) Was there more or less liquid left in the jar?

   (c) Did water move into or out of the egg? Why?


5. Was the egg larger after remaining in water or vinegar? Why?


6. Why are fresh vegetables sprinkled with water at markets?


7. Roads are sometimes salted to melt ice. What does this salting do to the plants along roadsides & why?


Nucleotide Model preap


Model of a Nucleotide


Introduction

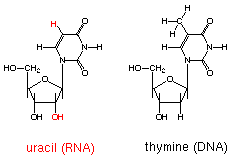
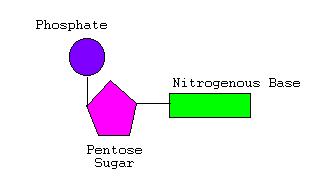
Nucleotides consist of three parts — a pentose sugar, a nitrogen-containing base, and a phosphate group. A pentose sugar is a five-sided sugar. There are 2 kinds of pentose sugars — deoxyribose and ribose. Deoxyribose has a hydrogen atom attached to its #2 carbon atom (designated 2′), and ribose has a hydroxyl group atom there. Deoxyribose-containing nucleotides are the monomers of DNA, while Ribose-containing nucleotides are the monomers of RNA.

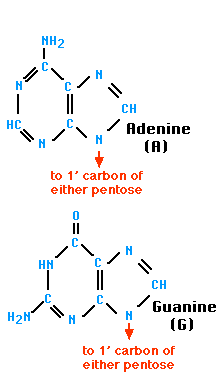
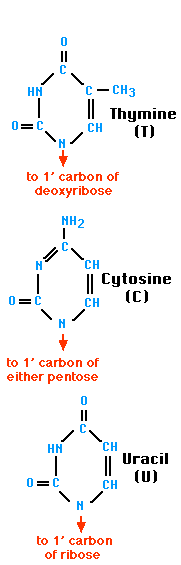
A nitrogen-containing ring structure is called a base. The base is attached to the 1′ carbon atom of the pentose. In DNA, four different bases are found — two purines, called adenine (A) and guanine (G) and two pyrimidines, called thymine (T) and cytosine (C). RNA contains The same purines, adenine (A) and guanine (G).  RNA also uses the pyrimidine cytosine (C), but instead of thymine, it uses the pyrimidine uracil (U).


The Purines The Pyrimidines

The combination of a base and a pentose is called a nucleoside.  A phosphate group is attached to the 5′ carbon of the pentose sugar.

Objective

Students will construct a 3-dimensional model of a single nucleotide, the monomer of which nucleic acids are composed.

Materials

Various materials may be used for the atoms that make up a nucleotide such as styrofoam balls, plastic coke bottle caps, beads, etc. Bonds between atoms may be made from toothpicks, plastic stirring sticks, popsicle sticks, etc. Single & double bonds must be represented by the correct number of “sticks”. The atoms and bonds may NOT be made of any food item. Your model should be glued together to make the model rigid for hanging. Attach string and a label with the nucleotide’s name to your model. Models must be sturdy, light weight, and small enough to hang from the ceiling.

Color Code for atoms:

CARBON – BLACK
HYDROGEN – YELLOW
OXYGEN – RED
NITROGEN – BLUE

Structural Formulas of Nucleotides:

Uracil Nucleotide (Ribose ) & Thymine Nucleotide (Deoxyribose)


Adenine Nucleotide (Deoxyribose)
Cytosine Nucleotide (Deoxyribose)
Guanine Nucleotide (Deoxyribose)


Metric System

Metric System (SI)
Scientist use a single, standard system of measurement.  The official name of the measurement system is SYSTEME INTERNATIONAL d’UNITES (International System of Measurements) or SI.

The metric system is based on the number 10.

Main Units of Measurement
Length Volume Mass
meter (m) liter (l) gram (g)

Using the above values (meter, liter, & gram) as the base, their value can be increased or decreased by moving the decimal point to the right (lowers the value) or left (raises the value).

Metric Conversion Table

Kilo-
(k)
Base Unit
(m, l, g)
Centi-
(c)
Milli-
(m)
Micro-
(µ)
nano-
(n)
x 1000 meter, gram, liter 100 1000 1000 1000
1000 1 .01 .001 .000001 .000000001

Convert the following values by moving the decimal point the correct number of spaces and in the right direction .

1. 69.8 meters (m) =  ________________ centimeters (cm)

2. 152.97 milliliters (ml)  =  ________________ liters (l)

3. 42.67 liters (l) = _____________ milliliters (ml)

4. 299.32 kilometers (km) = ____________ nanometers (nm)

5. 26 grams (g) = _____________ kilograms (kg)

6. 123.43 centigrams (cg) = ______________ grams (g)

7. 75.2 liters (l)  = __________________milliliters (ml)

8. 456.3 grams (g) = ________________ micrograms µg

9. 4507.22 kilometers (km) = _______________millimeters (mm)

10. 0.00297456 kilograms (kg) = ___________ nanograms (ng)

BACK

Mitosis Activity


Stages of Mitosis

Introduction

Mitosis, also called karyokinesis, is division of the nucleus and its chromosomes.  It is followed by division of the cytoplasm known as cytokinesis.  Both mitosis and cytokinesis are parts of the life of a cell called the Cell Cycle.  Most of the life of a cell is spent in a non-dividing phase called Interphase.  Interphase includes G1 stage in which the newly divided cells grow in size, S stage in which the number of chromosomes is doubled and appear as chromatin, and G2 stage where the cell makes the enzymes & other cellular materials needed for mitosis.

Mitosis has 4 major stages — Prophase, Metaphase, Anaphase, and Telophase. When a living organism needs new cells to repair damage, grow, or just maintain its condition, cells undergo mitosis.

During Prophase, the DNA and proteins start to condense. The two centrioles move toward the opposite end of the cell in animals or microtubules are assembled in plants to form a spindle. The nuclear envelope and nucleolus also start to break up.


Prophase

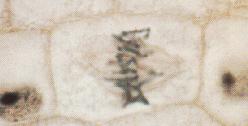
During Metaphase, the spindle apparatus attaches to sister chromatids of each chromosome. All the chromosomes are line up at the equator of the spindle. They are now in their most tightly condensed form.


Metaphase

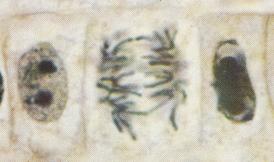
During Anaphase, the spindle fibers attached to the two sister chromatids of each chromosome contract and separate chromosomes which move to opposite poles of the cell.


Anaphase

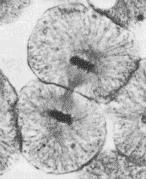
In Telophase, as the 2 new cells pinch in half (animal cells) or a cell plate forms (plant cells), the chromosomes become less condensed again and reappear as chromatin. New membrane forms nuclear envelopes and the nucleolus is reformed.


Telophase

Objective: 

In this lab, you will determine the approximate time it takes for a cell to pass through each of the four stages of mitosis. You may use your textbook and class notes to help you identify the stages of mitosis as seen under the microscope. 

Materials:

Microscope, prepared slide onion root tip or whitefish blastula, textbook, lab worksheet, pencil

Procedure:

  1. Set up a compound light microscope and turn on the light.
  2. Place a slide containing a stained preparation of the Allium (onion root tip) or Whitefish blastula.
  3. Locate the meristematic or growth zone, which is just above the root cap at the very end of the tip or
  4. Focus in on low power, and then switch to medium or high power. Below find micrographs of the four stages of mitosis. Use them to help you identify the stages on the microscope slide.


Prophase (onion)


Metaphase (onion)


Anaphase (onion)


Telophase (whitefish)


  1. Now count the number of cells found in each stage of mitosis and place the data in the chart below.
  2. Determine the percentage of time each cell will spend in each stage of mitosis. Divide the number of each cell by the total number of cells and multiply by 100 to determine the percentage. Place these values in the chart below.


Stage of Mitosis Number of Cells Percent of time in each stage =

# of cells in stage     X  100%
Total # of Cell

Prophase %
Metaphase %
Anaphase %
Telophase %
Interphase
(Not a Mitotic Stage)
%
Total # cells 100%


  1. Line graph the data you have just collected.  Be sure to label the X and Y axis & include the units of measurement.

Title: __________________________________________________

Graph Legend:


Questions:

1. Of the four stages of mitosis, which one takes the most time to complete? 


2. Which is the shortest stage in duration?


3. What would happen if the process of mitosis skipped metaphase?  telophase?

Further Study:

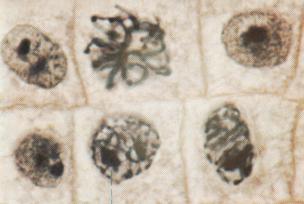
Normal Cell Division may be observed in onion root tips. Many of the processes are similar to those in animal cells. However, in plant cells, the cell plate between daughter cells forms from the Golgi.

Find all of the stages of mitosis and  interphase in the above picture. Make a sketch of each stage and briefly describe what is occurring. Count and record the number of cells you see in each stage.

Projects
Notes