| Unit 6 Evolution & Phylogeny Study Guide | |
|
|
| Unit 6 Evolution & Phylogeny Study Guide | |
|
|
Frog Dissection
Pictures: Modern Biology, Holt
![]()
Background:
As members of the class Amphibia, frogs may live some of their adult lives on land, but they must return to water to reproduce. Eggs are laid and fertilized in water. On the outside of the frog’s head are two external nares, or nostrils; two tympani, or eardrums; and two eyes, each of which has three lids. The third lid, called the nictitating membrane, is transparent. Inside the mouth are two internal nares, or openings into the nostrils; two vomerine teeth in the middle of the roof of the mouth; and two maxillary teeth at the sides of the mouth. Also inside the mouth behind the tongue is the pharynx, or throat.
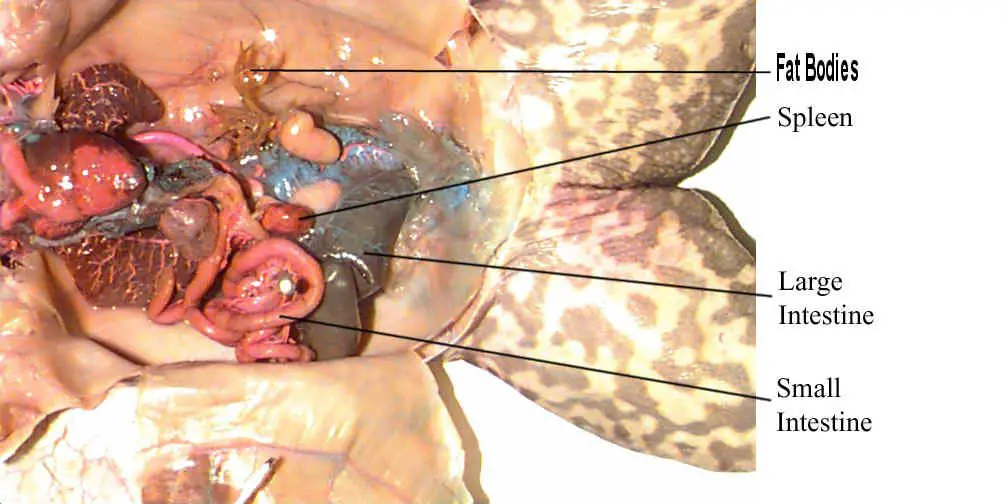
In the pharynx, there are several openings: one into the esophagus, the tube into which food is swallowed; one into the glottis, through which air enters the larynx, or voice box; and two into the Eustachian tubes, which connect the pharynx to the ear. The digestive system consists of the organs of the digestive tract, or food tube, and the digestive glands. From the esophagus, swallowed food moves into the stomach and then into the small intestine. Bile is a digestive juice made by the liver and stored in the gallbladder. Bile flows into a tube called the common bile duct, into which pancreatic juice, a digestive juice from the pancreas, also flows. The contents of the common bile duct flow into the small intestine, where most of the digestion and absorption of food into the bloodstream takes place.
Indigestible materials pass through the large intestine and then into the cloaca, the common exit chamber of the digestive, excretory, and reproductive systems. The respiratory system consists of the nostrils and the larynx, which opens into two lungs, hollow sacs with thin walls. The walls of the lungs are filled with capillaries, which are microscopic blood vessels through which materials pass into and out of the blood. The circulatory system consists of the heart, blood vessels, and blood. The heart has two receiving chambers, or atria, and one sending chamber, or ventricle. Blood is carried to the heart in vessels called veins. Veins from different parts of the body enter the right and left atria. Blood from both atria goes into the ventricle and then is pumped into the arteries, which are blood vessels that carry blood away from the heart.
The urinary system consists of the frog’s kidneys, ureters, bladder, and cloaca. The kidneys are organs that excrete urine. Connected to each kidney is a ureter, a tube through which urine passes into the urinary bladder, a sac that stores urine until it passes out of the body through the cloaca. The organs of the male reproductive system are the testes, sperm ducts, and cloaca. Those of the female system are the ovaries, oviducts, uteri, and cloaca. The testes produce sperm, or male sex cells, which move through sperm ducts, tubes that carry sperm into the cloaca, from which the sperm move outside the body. The ovaries produce eggs, or female sex cells, which move through oviducts into the uteri, then through the cloaca outside the body.
The central nervous system of the frog consists of the brain, which is enclosed in the skull, and the spinal cord, which is enclosed in the backbone. Nerves branch out from the spinal cord. The frog’s skeletal and muscular systems consist of its framework of bones and joints, to which nearly all the voluntary muscles of the body are attached. Voluntary muscles, which are those over which the frog has control, occur in pairs of flexors and extensors. When a flexor of a leg or other body part contracts, that part is bent. When the extensor of that body part contracts, the part straightens.
![]()
Objectives:
• Describe the appearance of various organs found in the frog.
• Name the organs that make up various systems of the frog.
Purpose:
In this lab, you will dissect a frog in order to observe the external and internal structures of frog anatomy.
![]()
Materials:
• safety goggles, gloves, and a lab apron
• forceps
• preserved frog
• dissecting pins (6–10)
• dissecting tray and paper towels
• plastic storage bag and twist tie
• scissors
• marking pen
• dissecting needle
![]()
Procedure:
 |
 |


 |
Click here for worksheet |
![]()
|
Fetal Pig Dissection
|
 |
Mammals are vertebrates having hair on their body and mammary glands to nourish their young. The majority are placental mammals in which the developing young, or fetus, grows inside the female’s uterus while attached to a membrane called the placenta. The placenta is the source of food and oxygen for the fetus, and it also serves to get rid of fetal wastes. The dissection of the fetal pig in the laboratory is important because pigs and humans have the same level of metabolism and have similar organs and systems. Also, fetal pigs are a byproduct of the pork food industry so they aren’t raised for dissection purposes, and they are relatively inexpensive.
Objectives of fetal pig dissection:
Materials:
preserved fetal pig, dissecting pan, dissecting kit, dissecting pins, string, plastic bag, metric ruler, paper towels
Pre-lab:
Before observing internal or external structures of the fetal pig, use your dissection manual, textbook, and dissection notebook to answer the pre-lab questions on the fetal pig. You may have to refer to more than one dissection manual to answer all the questions so trade and share with other dissection groups.
Click here for Prelab worksheet
***Wear your lab apron and eye cover at all times. Watch your time and be sure to clean up all equipment and working area each day before leaving.
Day 1 – External Anatomy
 Click here for Day 1 Worksheet
Day 2 Part A: The Incision
If time remains continue with part B, the digestive tract. Otherwise, clean up and return your materials and pig as you did on day 1.

 Click here for day 2 worksheet
Part B: Digestive System
Clean up your materials and work area. Wrap the pig in damp paper towels and put it in a zip-lock plastic bag. Return your lab equipment and pig to the supply cart and then thoroughly wash your hands with soap.
Day 3 Respiratory System
Clean up your materials and work area. Wrap the pig in damp paper towels and put it in a zip-lock plastic bag. Return your lab equipment and pig to the supply cart and then thoroughly wash your hands with soap.
Click here for day 3 worksheet
Day 4 Circulatory System
Clean up your materials and work area. Wrap the pig in damp paper towels and put it in a zip-lock plastic bag. Return your lab equipment and pig to the supply cart and then thoroughly wash your hands with soap.
Click here for day 4 worksheet
Day 5 Urogenital System
Male System
Female System
When you have completed your study of the urogenital system of both sexes, then clean up your materials and work area. Wrap the pig in damp paper towels and put it in a zip-lock plastic bag. Return your lab equipment and pig to the supply cart and then thoroughly wash your hands with soap.
 Click here for day 5 worksheet
Day 6 Nervous System
Clean up your materials and work area. Wrap the pig in damp paper towels and put it in a zip-lock plastic bag. Return your lab equipment and pig to the supply cart and then thoroughly wash your hands with soap.
 |
Evolution Answers |

| Frog Dissection Worksheet |  |
| BACK |
 Click here for day 6 worksheet