Simple Plants PowerPoint Questions

Simple Seedless Nonvascular & Vascular Plants
PowerPoint Worksheet

Seedless Nonvascular plants

1. Name the 3 divisions of seedless vascular plants and a member of each division.

     a.

     b.

     c.

Division Bryophyta

2. What is the common name for mosses, liverworts, and hornworts?

3. Bryophytes lack what type of tissue?

4. Name the 2 vascular tissues lacking in bryophytes and tell their function.


5. What is the 2 stage life cycle of plants called?

6. Name the 2 life cycle stages.

7. which stage is DOMINANT in bryophytes (mosses, liverworts, & hornworts)?

8. How do bryophytes reproduce?

9. Which stage of the moss looks like a lush green carpet?

10. Name the division for moss.

11. Why are moss small plants?

12. Do moss have TRUE roots, stems, or leaves?

13. In what type of area do moss grow?  Give several examples.


14.Moss gametophytes must grow close together in moist areas. Give 2 reasons why this is so.

     a.

     b.

15. What covers the outside of a moss plant to prevent water loss?

16. What anchors moss plants?

17. Can rhizoids absorb water like true roots?

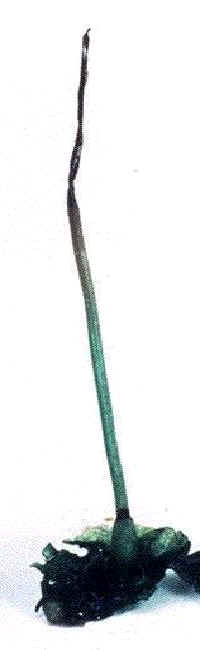
18. Where does the sporophyte generation occur on moss plants?


19. What is at  the top of the sporophyte?

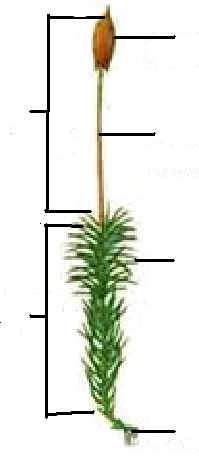
20. Label the following moss plant.

21. ___________ moss is used by florist. What characteristic makes it useful?


22. Because moss will grow on bare ground, it is called a _________ plant.

23. How is peat moss used?


24. Give 4 other uses for moss.


25. Moss are capable of asexual reproduction. Name and describe 2 types of this vegetative reproduction.

     a.

     b.

26. What are gemmae?


27. How are gemmae separate from the parent plant & dispersed?


28. Which stage of the moss is haploid and which is diploid?

29. The gametophyte generation produces what 2 cells? 

30. Why do these cells have half the chromosome number?

31. ____________ have a ________ set of chromosomes and reproduce ___________.

32. the sporophyte grows attached to the top of the ______________.

33. Since sporophytes lack chlorophyll, what cellular process are they incapable of doing?

34. How does the sporophyte get its food?

35. What is the setae on a moss plant?

36. How are the moss gametes protected?


37. Name the female gametangia & tell what it produces.

38. Eggs of moss are _____________ & ___________.

39. Label the female gametangia.

40.  Name the male gametangia & tell what it produces.

41.How does the sperm cell know the direction in which to swim to the egg?


42. Label the male gametangia.

43. The moss ___________ or fertilized egg develops into the ____________.

44. Spores of the sporophyte capsule germinate into young plants called ______________.

45. Protonema develop into the _____________ stage

46. Label the protonema & developing gametophyte in this picture.

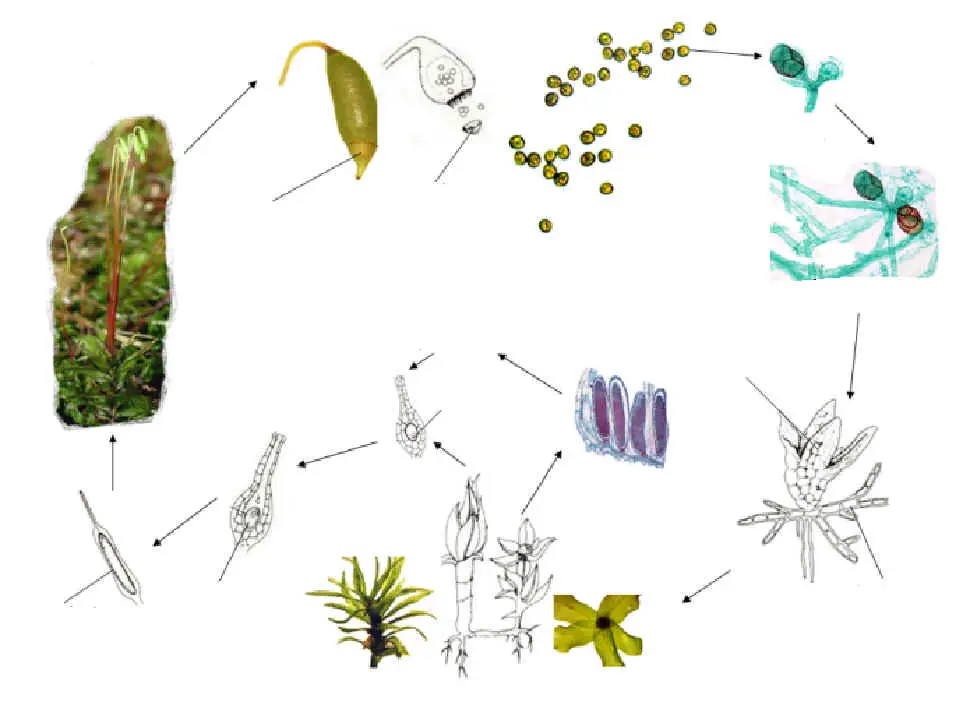
47. Label the life cycle of the moss.

Division Hepatophyta

48. ___________ are nonvascular, _________ producing bryophytes.

49. What stage is dominant in liverwort’s life cycle?

50. Describe the liverwort gametophyte.


51.Liverworts are found growing where?


52. Liverworts need lots of water for ____________.

53. How do liverworts reproduce asexually?

54. How do liverworts reproduce sexually?

Division Anthocerophyta

55._____________ are small, nonvascular ____________ with a dominant, leafy ____________ like liverworts.

56. Where are the antheridia & archegonia in hornworts?

57. Zygotes develop into ______________ sporophytes.

58. Is the horn-shaped sporophyte capable of photosynthesis?

59. Is the horn-shaped sporophyte attached to or separate from the gametophyte?

60. Label the parts of the hornwort.

Seedless Vascular Plants

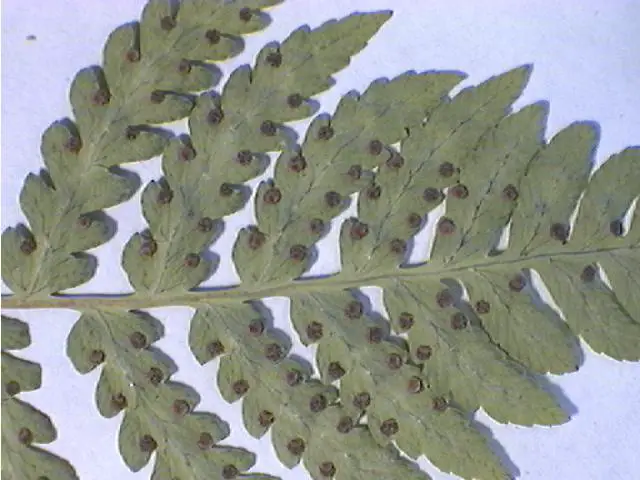
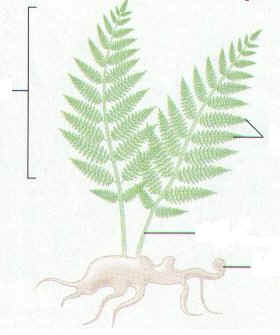
61.Label these structures on the back of this fern.

62. Name and give an example of a plant in the 4 divisions of seedless vascular plants.

     a.

     b.

     c.

     d.

63. Name the vascular tissues.

64. Do seedless vascular plants go through alternation of generations?

65. Which stage is dominant?

66. How do they reproduce?

Division Psilophyta

67.Describe whisk ferns.


68. Do they have true roots, stems, or leaves?

69.How many extant genera are there?

70. Name the root like structures of whisk ferns and tell whether they can or can’t absorb water.

71. How do whisk ferns reproduce asexually?

72. How do whisk ferns reproduce sexually?

73. Make and label a sketch of an aerial branch of whisk with sporangia.


74. What is the purpose of sporangia?

Division Lycophyta

75. The division Lycophyta contains the ______________ living vascular plants.

76. Club moss are commonly called ______________ ____________.  Explain why this is true.


77.Club moss have ________ growing root like ___________.

78. Describe the habitat needed by club moss.

79. Describe the leaves of club moss.


80. Are these TRUE leaves? Explain why.


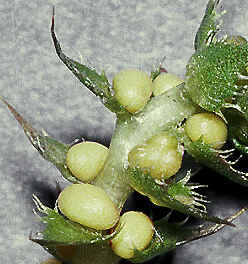
81. What is found in the axils of the leaves & what is their purpose?

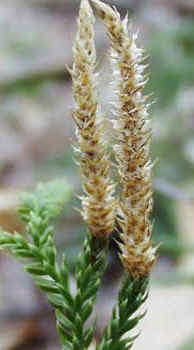
82. What are strobili?

83. Some club moss are homosporous while others are heterosporous.  Explain what each of these terms means.

     a. homosporous-

     b. heteroporous-

84. Give an example of a homosporous club moss.

85. Lycopodium is used in fireworks. Explain the reason for this.


86. What do the spores of Lycopodium look like?


87.What is the purpose of each of these structures.


88. Give 3 other uses for club mosses.

     a.

     b.

     c.

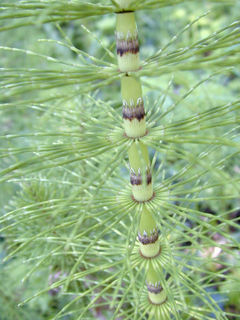
Division Sphenophyta

89. How many extant species of horsetails are there?

90. Name the living genera of horsetails.

91. What is another name for horsetails?

92. Why are they called this?

93. Describe the stems of horsetails.


94. Where does photosynthesis take place in horsetails?

95. How are horsetails anchored?

96. How do horsetails reproduce?

97. Where are their spores found?

98. In prehistoric times, what was true of the size of horsetails?

99. Describe the habitat of horsetails.

100. How do horsetails prevent water loss from the parts of the plant above ground?

101. What special spore dispersing structures are found on the spores of horsetails?

102. Describe how elaters work.


103. Label the stem, node, and leaves on this horsetail.

104. Give 3 other uses for  horsetails.

     a.

     b.

     c.

104. Can animals eat horsetails? Why or why not?


Division Pterophyta

105. Ferns are in the ____________ group of extant vascular plants.

106. Describe the habitats for ferns.


107. How do ferns reproduce asexually?

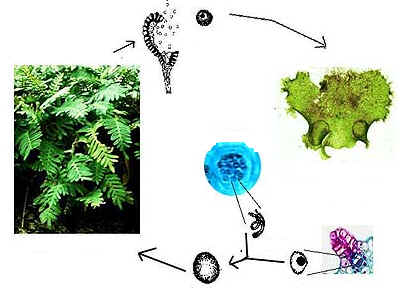
108. What stage is dominant in the life cycle of the fern?

109. What is the only part of the fern plant that appears above ground?  What parts are found below ground?

110. Fern leaves are called ______________ and are attached to the plant by short stems called ______________.

111. Describe the appearance of newly forming fern fronds and tell what they are called.


112. What are sori and where are they found?

113. How are fern spores spread?

114. What forms when a fern spore lands on moist ground and germinates (starts growing)?

115. The prothallus starts what stage in the life cycle?

116. What is the shape of the gametophyte and does it live long?

117. What 2 structures grow ON the gametophyte?

118. Label the gametophyte and the male and female gametangia.

119. Label the parts of a fern.

120. Label the life cycle of the fern.

121. Give 4 uses for ferns.     a.

     b.

     c.

     d.


Spongebob Safety Rules

 Sponge Bob Safety Rules
T. Trimpe 2003

The Bikini Bottom gang has been learning safety rules during science class. Read the paragraphs below to find the broken safety rules and number and underline each one. How many can you find? On the back of your sheet, write the number and the CORRECT safety procedure that should have been used.

SpongeBob, Patrick, and Gary were thrilled when Mr. Krabbs gave their teacher a chemistry set! Mr. Krabbs warned them to be careful and reminded them to follow the safety rules they had learned in science class. The teacher passed out the materials and provided each person with an experiment book. SpongeBob and Gary flipped through the book and decided to test the properties of a mystery substance. Since the teacher did not tell them to wear the safety goggles, they left them on the table.

SpongeBob lit the Bunsen burner, then reached across the flame to get a test tube from Gary . In the process, he knocked over a bottle of the mystery substance and a little bit splashed on Gary . SpongeBob poured some of the substance into a test tube and began to heat it. When it started to bubble he looked into the test tube to see what was happening and pointed it towards Gary so he could see. Gary thought it smelled weird so he took a deep whiff of it. He didn’t think it smelled poisonous and tasted a little bit of the substance.

They were worried about running out of time, so they left the test tube and materials on the table and moved to a different station to try another experiment. Patrick didn’t want to waste any time reading the directions, so he put on some safety goggles and picked a couple different substances. He tested them with vinegar (a weak acid) to see what would happen even though he didn’t have permission to experiment on his own. He noticed that one of the substances did not do anything, but the other one fizzed. He also mixed two substances together to see what would happen, but didn’t notice anything. He saw SpongeBob and Gary heating something in a test tube and decided to do that test. He ran over to that station and knocked over a couple bottles that SpongeBob had left open. After cleaning up the spills, he read the directions and found the materials he needed. The only test tube he could find had a small crack in it, but he decided to use it anyway. He lit the Bunsen burner and used tongs to hold the test tube over the flame. He forgot to move his notebook away from the flame and almost caught it on fire.

Before they could do another experiment, the bell rang and they rushed to put everything away. Since they didn’t have much time, Patrick didn’t clean out his test tube before putting it in the cabinet. SpongeBob noticed  that he had a small cut on his finger, but decided he didn’t have time to tell the teacher about it. Since they were late, they skipped washing their hands and hurried to the next class.

CLICK HERE FOR NOTEBOOK COPY

Starfish Dissection


Starfish Dissection starfish anatomy

Introduction:

Echinoderms are radially symmetrical animals that are only found in the sea (there are none on land or in fresh water). Echinoderms mean “spiny skin” in Greek. Many, but not all, echinoderms have spiny skin. There are over 6,000 species. Echinoderms usually have five appendages (arms or rays), but there are some exceptions.

Radial symmetry means that the body is a hub, like a bicycle wheel, and tentacles are spokes coming out of it (think of a starfish). As larvae, echinoderms are bilaterally symmetrical. As they mature, they become radially symmetrical. Most adult echinoderms live on the bottom of the ocean floor. Many echinoderms have suckers on the ends of their feet that are used to capture and hold prey, and to hold onto rocks in a swift current.

Sea Stars
Sea Star
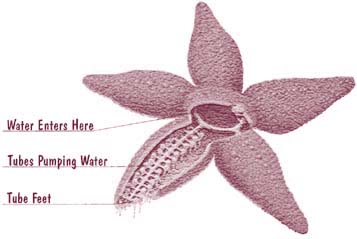
Sea stars (group name Stelleroidea) are sometimes called starfish, though they are not real fish (they lack both vertebrae and fins). There are two sub-types of sea stars:

  • Asteroideas are the true sea stars and sun stars.
  • Ophiuroideas are brittle stars and basket stars.

The differences between the two sub-types lies in how the arms connect to the central disk. Ophiuroids have arms that do not connect with each other. There is a distinct boundary between arm and central disk. Asteroids have arms that are connected to each other. Also, it is harder to tell with asteroids where the central disk ends and the arms begin. The sea star’s top surface (or skin) looks spiny if you examine it. If you look very closely you will notice that there are different types of growths on the surface. Some bumps are used to absorb oxygen, they are called dermal branchiae.  Pedicellaria are pincher-like organs used to clean the surface of the skin. Barnacle larvae could land on a sea star and start growing if it were not for these organs.

How Do Sea Stars Move?
Underside of a Sea StarEach sea star had hundreds of tiny feet on the bottom of each ray. These are tube feet, or podia. These tiny feet can be filled with sea water. The vascular system of the sea star is also filled with sea water. By moving water from the vascular system into the tiny feet, the sea star can make a foot move by expanding it. This is how sea stars move around. Muscles within the feet are used to retract them. Each ray of a sea star has a light sensitive organ called an eyespot. Though it can not see nearly as well as we do, sea stars can detect light and its general direction. They have some idea of where they are going.

Sea Star Anatomy


Prelab Questions (click here)

Materials:
Preserved starfish, dissecting pan, scissors, scalpel, forceps, T-pins, pencil, lab apron, safety glasses

Procedure (Aboral Surface):

  1. Obtain a preserved starfish and rinse off any preservative with water.
  2. Place the starfish in the dissecting pan with its dorsal or aboral (top) surface upward.
  3. Observe the starfish and determine  its symmetry.
  4. Locate the central disc in the center of the starfish. Count and record the number of arms or rays the starfish has.
  5. Locate the small, round hard plate called the madreporite on top of the central disc. Water enters through this into the water vascular system. Label the central disc, arms, and madreporite on Figure 1.
  6. Feel the upper surface of the starfish for spines. These spines protect the starfish and are part of their internal skeleton. Label these on figure 1.
  7. Look at the tip of each arm and find the eyespot. Label this on Figure 1.

Figure 1 -Aboral Surface

Procedure (Oral Surface):

  1. Turn the starfish over to its ventral or oral surface (underside).
  2. Locate the mouth in the center of the central disc. Find the ring of oral spines surrounding the mouth. Label these  on figure 2.
  3. Find the groove that extends down the underside of each arm. This is called the ambulacral groove. Label this on figure 2.
  4. Feel the numerous, soft tube feet inside each groove. these are part of the water vascular system & aid in movement and feeding. Label these on Figure 2.

Figure 2 – Oral Surface

Procedure (Internal anatomy):

  1. With the starfish’s aboral surface facing you, cut off the tip of a ray. Cut along lines a, b, and c (Figure 3) and then remove this flap of skin.

Figure 3 – Cuts in Arm

  1. Inside each arm, locate two long digestive glands called the pyloric caeca. These make enzymes to digest food in the stomach. Label these in Figure 4.
  2. Cut a circular flap of skin from the central disc. (You will have to also cut around the madreporite in order to remove this flap.) Observe the stomach under the central disc. Label this on Figure 4.
  3. Remove the pyloric caeca from the dissected ray. Find the gonads (testes or ovaries) underneath. These may be small if the starfish is NOT in breeding season. Label these on figure 4. Remove these to see the rest of the water vascular system.
  4. Cut off the tip of a ray to observe the parts of the tube feet. Find the zipper-like ridge that extends the length of the ray. The tube feet are attached to these.
  5. Locate the bulb-like top of a tube foot called the ampulla. This sac works like the top of an eyedropper to create suction. The bottom of the tube foot is a sucker. Label these in Figure 4.
  6. Embedded in the soft body wall are skeletal plates called ossicles. Locate these and label them in Figure 4.

Figure 4 – Starfish Digestive & Reproductive Systems

  1. Running down the center of each arm is a lateral canal to which tube feet are attached. Label this in Figure 5.
  2. In the central disc the five lateral canals connect to a circular canal called the ring canal. Find this canal & label it on figure 5.
  3. A short, canal called the stone canal leads from the ring canal to the madreporite where water enters. Find this canal & label the stone canal & madreporite on Figure 5.
  4. Draw an arrow on Figure 5 tracing the path that water takes when it enters & moves through the starfish.

Figure 5 – Water Vascular System


Starfish Anatomy Questions:

1. What type of symmetry did your starfish have?

2. What is the upper surface of the starfish called?

3. What is the lower surface of the starfish called?


4. On which surface are these parts of a starfish visible:

a. Mouth –

b. Madreporite –

c. Suckers –

d. Oral spines –

e.  Eyespots –

d. Ambulcaral groove –

5. In words, trace the path water takes through the water vascular system.


6. What part of the tube foot creates suction to open clams whenever the starfish feeds?

7. Why do the gonads sometimes appear larger?

8. What type of skeleton, endoskeleton or exoskeleton, does the starfish have?

9. What bony plates make up its skeleton?

10. What is the function of the pyloric caeca?

11. where is the stomach of a starfish located? What can the starfish do with its stomach when feeding on clams & oysters?


12. Name the kingdom, phylum, and class for the starfish you dissected.


Strawberry DNA


Strawberry DNA Extraction


Adapted from a lab by C. Sheldon

Introduction:

DNA is found in cells from Animals and Plants.  DNA is a double stranded macromolecule composed of nucleotide bases pairing Adenine with Thymine and Guanine with Cytosine.  DNA can be extracted from cells by a simple technique with household chemicals, enabling students to see strands of DNA with the naked eye.

Purpose:

To extract DNA from the fruit of a strawberry plant

Safety Precautions:

  • Do not eat or drink in the laboratory.
  • Wear Apron & Safety Goggles.

Materials / Equipment (per student group):

1. heavy duty zip-lock baggie

2.  1 strawberry (fresh or frozen and thawed)

3.  cheesecloth

4.  funnel

5.  100 ml beaker

6.  test tube

7.  wooden coffee stirrer

8. DNA Extraction Buffer (One liter: mix 100 ml of shampoo (without conditioner), 15 g NaCl, 900 ml water OR 50 ml liquid dishwashing detergent, 15 g NaCl and 950 ml water)

9.  Ice-cold 95% ethanol or 95% isopropyl alcohol

Procedure:

1.  Place one strawberry in a zip lock baggie and carefully press out all of the air and seal the bag.

2.  Smash the strawberry with your fist for 2 minutes.

3.  Add 10 ml extraction buffer to the bag and carefully press out all of the air and seal the bag.

4.  Mush again for one minute.

5.  Filter through cheesecloth in a funnel into beaker. Support the test tube in a test tube rack.

6.  Discard the extra mashed strawberry.

7.  Pour filtrate into test tube so that it is 1/8 full.

8.  Slowly pour the ice-cold alcohol into the tube until the tube is half full and forms a layer over the top of the strawberry extract.

9.  At the interface, you will see the DNA precipitate out of solution and float to the top. You may spool the DNA on your glass rod or pipette tip.

10.                    Spool the DNA by dipping a pipette tip or glass rod into the tube right where the extract layer & alcohol are in contact with each other. With your tube at eye level, twirl the rod & watch as DNA strands collect.

Prelab:

Take a look at the sketch of the plant cell below. The chromosomes (which are made of DNA) are in the nucleus. This is the only place where DNA is located.


Now match the procedure with what it is doing to help isolate the DNA from the other materials in the cell.


_____1. Break open the cell A. Squish the fruit to a slush


_____2. Dissolve cell membranes B. Filter your extract through cheesecloth
_____3. Precipitate the DNA (clump the DNA together C. Mix in a detergent solution
_____4. Separate organelles, broken cell wall, and membranes from proteins, carbohydrates, and DNA D. Layer cold alcohol over the extract


DNA Extraction Table

AMOUNT ADDED OR OBTAINED INITIAL COLOR PURPOSE
BUFFER
(soap-salt mixture)
STRAWBERRY
COLD ALCOHOL
DNA

SKETCH OF TEST TUBE WITH CONTENTS


Questions:

1.  Where can DNA be found in the cell?

2.  Discuss the action of the soap (detergent) on the cell.  What is the purpose of the soap in this activity?

3.  What was the purpose of the Sodium Chloride? Include a discussion of polarity and charged particles.

4.  Why was the cold ethanol added to the soap and salt mixture?

5.  Describe the appearance of your final product?

6.  Draw a diagram of DNA containing 5 sets of nucleotide bases labeling the hydrogen bonds between the bases.


Scientific Laws


Scientific Laws, Hypotheses, and Theories


Scientific Theory versus “Just a theory” Layman’s term:

In layman’s terms, if something is said to be “just a theory,” it usually means that it is a mere guess, or is unproved. It might even lack credibility. But in scientific terms, a theory implies that something has been proven and is generally accepted as being true.

Scientific Meanings:

SCIENTIFIC LAW: This is a statement of fact meant to describe, in concise terms, an action or set of actions. It is generally accepted to be true and universal, and can sometimes be expressed in terms of a single mathematical equation. Scientific laws are similar to mathematical postulates. They don’t really need any complex external proofs; they are accepted at face value based upon the fact that they have always been observed to be true. Specifically, scientific laws must be simple, true, universal, and absolute. They represent the cornerstone of scientific discovery, because if a law ever did not apply, then all science based upon that law would collapse.  Some scientific laws, or laws of nature, include the law of gravity, Newton’s laws of motion, the laws of thermodynamics, Boyle’s law of gases, the law of conservation of mass and energy, and Hook’s law of elasticity.

HYPOTHESIS: This is an educated guess based upon observation. It is a rational explanation of a single event or phenomenon based upon what is observed, but which has not been proved. Most hypotheses can be supported or refuted by experimentation.

THEORY: A theory is more like a scientific law than a hypothesis. A theory is an explanation of a set of related observations or events based upon proven hypotheses and verified multiple times by detached groups of researchers. One scientist cannot create a theory; he can only create a hypothesis. Theories may be expanded or modified with further scientific evidence.

Development of a Simple Theory by the Scientific Method:

  • Start with an observation that evokes a question: Broth spoils when I leave it out for a couple of days. Why?
  • Using logic and previous knowledge, state a possible answer, called a Hypothesis: Tiny organisms floating in the air must fall into the broth and start reproducing.
  • Perform an experiment or Test: After boiling some broth, I divide it into two containers, one covered and one not covered. I place them on the table for two days and see if one spoils. Only the uncovered broth spoiled.
  • Then publish your findings in a peer-reviewed journal. Publication: “Only broth that is exposed to the air after two days tended to spoil. The covered specimen did not.”
  • Other scientists read about your experiment and try to duplicate it. Verification: Every scientist who tries your experiment comes up with the same results. So they try other methods to make sure your experiment was measuring what it was supposed to. Again, they get the same results every time.
  • In time, and if experiments continue to support your hypothesis, it becomes a Theory: Microorganisms from the air cause broth to spoil.

BACK