How to Use Microscope

How to Use a Microscope

Compound Microscopes
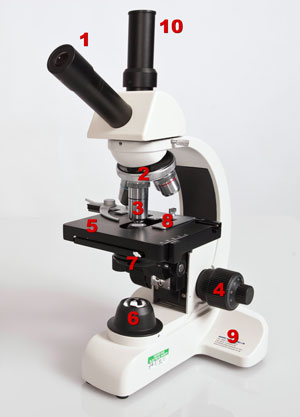
  1. Turn the revolving turret (2) so that the lowest power objective lens (eg. 4x) is clicked into position.
  2. Place the microscope slide on the stage (6) and fasten it with the stage clips.
  3. Look at the objective lens (3) and the stage from the side and turn the focus knob (4) so the stage moves upward. Move it up as far as it will go without letting the objective touch the coverslip.
  4. Look through the eyepiece (1) and move the focus knob until the image comes into focus.
  5. Adjust the condenser (7) and light intensity for the greatest amount of light.
  6. Move the microscope slide around until the sample is in the centre of the field of view (what you see).
  7. Use the focus knob (4) to place the sample into focus and readjust the condenser (7) and light intensity for the clearest image (with low power objectives you might need to reduce the light intensity or shut the condenser).
  8. When you have a clear image of your sample with the lowest power objective, you can change to the next objective lenses. You might need to readjust the sample into focus and/or readjust the condenser and light intensity. If you cannot focus on your specimen, repeat steps 3 through 5 with the higher power objective lens in place. Do not let the objective lens touch the slide!
  9. When finished, lower the stage, click the low power lens into position and remove the slide.


NOTES:

Your microscope slide should be prepared with a coverslip over the sample to protect the objective lenses if they touch the slide.

  • Do not touch the glass part of the lenses with your fingers. Use only special lens paper to clean the lenses.
  • Always keep your microscope covered when not in use.
  • Always carry a microscope with both hands. Grasp the arm with one hand and place the other hand under the base for support.


Stereomicroscopes
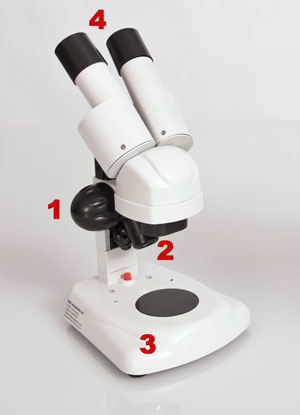
  1. Place your sample on the stage (3) and turn on the LED light (2).
  2. Look through the eyepieces (4) and move the focus knob (1) until the image comes into focus.
  3. Adjust the distance between the eyepieces (4) until you can see the sample clearly with both eyes simultaneously (you should see the sample in 3D).


NOTES:

  • When you move the sample, you will have to focus again by moving the focus knob.


Ink Chromatography Writeup

Chromatography of Inks

Introduction:

One of the main jobs of biochemists is to unravel the complexities of chemical compounds and reduce them to their individual components.  Separation of the components of chemical compounds can be done by using several methods. Liquids can be separate by High Performance liquid Chromatography (HPLC), while the components of gases are separated by Gas Chromatography.  Chromatography is a method for analyzing complex mixtures (such as ink) by separating them into the chemicals from which they are made. Chromatography is used to separate and identify all sorts of substances in police work. Drugs from narcotics to aspirin can be identified in urine and blood samples, often with the aid of chromatography.

Chromatography was first used to separate pigments (colors) in leaves, berries, and natural dyes. Paper chromatography is a technique used to separate, isolate, and identify chemical components of a compound. In paper chromatography, the solid surface is the cellulose fibers in the chromatography paper.  A solvent (water, alcohol, or acetone) is placed in the bottom of the chromatography chamber.


Insect Order Pictures

The Insect Orders An Introduction each to of the 32 Orders of Insects
http://www.earthlife.net/insects/orders.html

Key to the Orders of Insects

The Apterygota Protura proturans Collembola Springtails Thysanura Silverfish Diplura Two Pronged Bristle-tails The Exopterygota Ephemeroptera Mayflies Odonata Dragonflies Plecoptera Stoneflies Orthoptera Grasshoppers, crickets, cockroaches Phasmida Stick-Insects Dermaptera Earwigs Embioptera Web Spinners Dictyoptera Cockroaches and Mantids Isoptera Termites Zoraptera Zorapterans Psocoptera Bark and Book Lice Mallophaga Biting Lice Anoplura Sucking Lice Hemiptera True Bugs Thysanoptera Thrips The Endopterygota Neuropter Lacewings Coleoptera Beetles Strepsiptera Stylops Mecoptera Scorpionflies Siphonaptera Fleas Diptera True Flies Lepidoptera Butterflies and Moths Trichoptera Caddis Flies Hymenoptera Ants Bees and Wasps


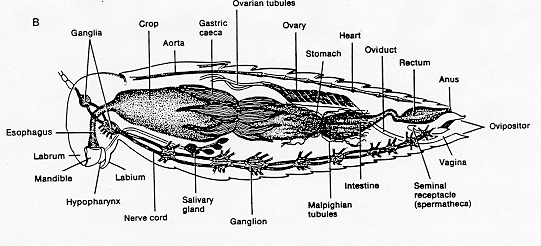
Grasshopper Internal

Procedure (Internal Anatomy):

With scissors and beginning at the tip of the abdomen, make an incision (lengthwise) in the body covering slightly to the left of the mid-dorsal line and along the entire length of the grasshopper. Make a similar cut ventrally and also up the front of the head. Keep the inner scissors point just inside the body covering to avoid damaging the internal organs. If the specimen is a mature female, the interior spaces may be filled largely with slender eggs in the ovaries. Remove some of these is so directed by the instructor.

Locate the following organ systems:

1. Integument and exoskeleton
2. Muscular – In studying the other systems, note the many muscles, especially those connecting the wings and the legs.
3. Digestive system – remove some of the lateral muscles and trachea as necessary without injuring other organs. Identify the following structures in the digestive system.
a. *Esophagus
b. *Crop
c. *Gizzard
d. *Gastric caeca
e. *Stomach
f. *Intestine
g. *Rectum
h. *Anus
4. Circulatory system – heart
5. Respiratory system – tracheae
6. Excretory system – Malpighian tubules
7. Nervous system – brain, nerve cord
8. Reproductive system – testes, *ovaries, oviduct


p[