Cell Parts 101: Plant And Animal Cell Helpful Study Guides

How much do you know about cell parts? Can you list the differences between plant and animal cells? Here are the main differences you need to know about between these two cell types. We have also found some study guides to help you go further.

animal cell

Plant and animal cells have many similarities, including shared organelles. However, these cells differ in size and structure. They also use a different mechanism for respiration. Here is what you need to know about animal and plant cell parts.

The Main Differences Between Plant And Animal Cells

plant cell

The most noticeable difference between plant and animal cells is the size. An animal cell will typically range between 10 and 30 micrometers in length, while a plant cell can reach 100 micrometers in length.

Plant cells are larger because they contain vacuoles that store water. Animal cells also have vacuoles, but these organelles aren’t used to store water.

The cell wall is another important difference. Animal cells are protected by a cell membrane. Plant cells also have a membrane, but there is an outer layer made of cellulose. This outer layer is called the cell wall since it is rigid.

The rigid cell wall helps shape plant cells. These cells typically have a rectangular or cube shape. There is far less variety in the shapes of plant cells compared to animal cells. Animal cells have more varied shapes and have irregular shapes.

The mechanism used for growth is also different. Animal cell growth is achieved by producing new cells while plant cells grow by increasing their size. This is achieved by storing more water in the vacuoles of a cell.

Energy is stored differently. Animal cells store energy in the form of complex carbohydrate glycogen while plant cells store energy in the form of starch.

Plant cells can produce more amino acids than animal cells. There are 20 different amino acids cells used to produce proteins. Animal cells can typically produce 10 of these amino acids and will need to obtain the rest from nutrients that come from the animal’s diet while plants can synthesize 20 amino acids.

Different Organelles

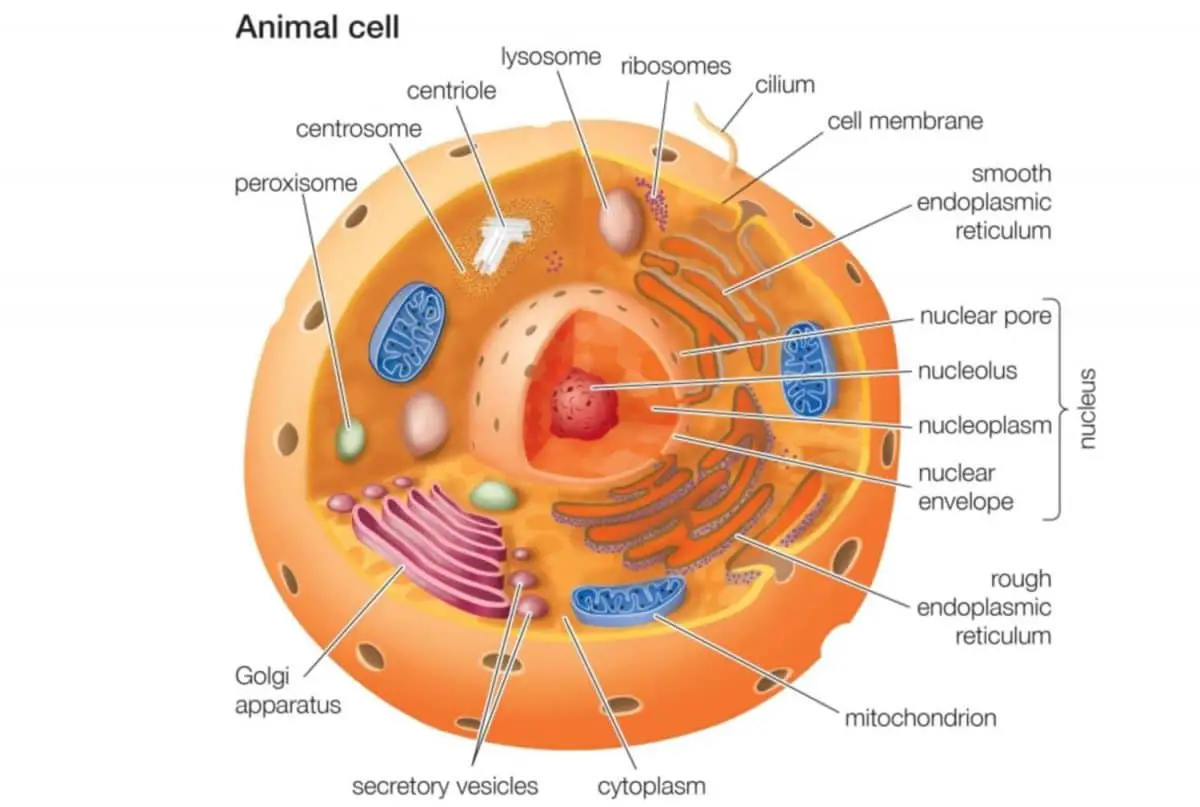
There are a few different cell parts that are unique to animal and plant cells. The core organelles such as the nucleus are shared by both cell types.

The centrioles are organelles that organize and structure the microtubules during the process of cell division. Animal cells have centrioles while plant cells don’t.

The primary cilium isn’t present in plant cells. Animal cells have a primary cilium to detect external stimuli, and some animal cells have more cilium to make the cell move.

Plant cells need to digest lipids, which is why they have organelles known as glyoxysomes. These cell parts aren’t found in animal cells.

Animal cells rely on lysosomes for digesting macromolecules. Lysosomes can digest old organelles, viruses, bacteria, and nutrients. The vacuoles have a similar purpose in plant cells.

The chloroplasts are another major difference between plant and animal cells. These cell parts play a crucial part in the photosynthesis process that plant cells are known for. These organelles transform light into energy the cell can use.

Even though vacuoles are present in both cell types, these organelles are different. Animal cells have small vacuoles while plant cells have vacuoles that can take up as much as 90 percent of a cell’s volume. Vacuoles are used for storing nutrients in animal cells, while they store water in plant cells.

Different Processes

The differences in structure and organelles mean that some processes happen differently between plant and animal cells.

Cell division is slightly different. With animal cells, the cytoplasm and the cell membrane is pinched in half until the cell completely divides. With plant cells, a plate is constructed to divide the cell in two.

Plant and animal cells communicate differently. There are pores called plasmodesmata in the wall of a plant cell. Molecules and communication signals can exit the cell via these pores.

Animal cells don’t have plasmodesmata. Instead, there are proteins embedded in the outer membrane of the cell that let nutrients and chemicals in and out of the cell. These proteins can bind with a hormone or another transmitter to communicate a signal.

There are some similarities in cell respiration. Both cell types will break down glucose molecules to produce carbon dioxide, water, and ATP. The main difference is that animal cells absorb glucose as a nutrient while plant cells produce glucose via photosynthesis.

Study Guides

You can learn more about plant and animal cells with these study guides. We have found the best resources for learning about cells and organelles and have organized them.

The Basics

You can get started with this table that sums up the main differences between plant and animal cells. This study guide is made for younger students, but this is a good way to brush up on what you already know about cells.

You can then move on to this more comprehensive study guide about the different organelles. You should print this study guide and use it as a reminder of what different organelles do. If you have already studied organelles in class, this study guide will help you keep this knowledge fresh in your mind. It’s a great starting point if you are new to learning about the different parts of a cell.

We have found this helpful quiz you can use to assess how much you know about organelles and their functions. Don’t move on to other topics until you can answer all these questions.

We also like this video about organelles. If you are more of a visual learner, this video should be a helpful resource you can go back to and go over the different organelles and their functions.

Plant Vs. Animal Cells

If you want to explore the differences between plant and animal cells, the Khan Academy has an excellent article on this topic. The material is designed for high school students, but it is a very comprehensive review of the differences between these cell types.

We have found another helpful resource on this topic. We like this study guide because it organizes the information by organelle. This is the best resource for studying how cell structures and parts differ between plant and animal cells.

Eukaryotic And Prokaryotic Cells

Eukaryotic And Prokaryotic Cells

We have been focusing on eukaryotes, but this study guide is an excellent resource if you need a reminder of the difference between eukaryotic and prokaryotic cells.

Test Your Knowledge

We have found this online activity where you can label the different parts of an animal cell. This activity requires you to label the different parts of a plant cell.

Try to briefly explain what the different organelles do as you label them. Take the time to practice with these activities because you are likely to have to label similar diagrams in tests.

Going Further

There are different topics that we briefly mentioned to point out the differences between plant and animal cells. You can use these study guides to explore these topics further.

Note that these study guides are more advanced and are designed for college-level students. You should still be able to follow these study guides if you are in an AP class or if you are curious to learn more about biology.

You can start learning about cell cycle with this study guide. It will help you gain a better understanding of how the functions of the different organelle help cells grow and reproduce.

This study guide is about cell division. It is best to start learning about the entire cell cycle and then focus on the process of cell division.

We talked about cell respiration and photosynthesis. You can assess how much you know about cell respiration by going over these questions and answering them as best as you can.

The Khan Academy has a very comprehensive course on the topic of cell respiration. The information is well-structured, and you will be able to take quizzes as you go through the content to see how much you have learned. You can explore the introduction section by itself to get an overview of how cell respiration works without going into details and looking at the chemical aspect of this process.

This overview of photosynthesis is very comprehensive and will help you gain a better understanding of this process.

Flashcards And Quizzes

Flashcards are a great way to assess how much you know and to review the information you have already studied. We have found different sets of flashcards and quizzes you can use to test your knowledge, expand your vocabulary, and make sure you have understood all the important concepts linked to cells.

Here are the best flashcards and quizzes we found:

The key to learning about plant and animal cells is to organize your study sessions. You could have some sessions dedicated to learning about the different organelles or decide to focus on a specific type of cell. You can then move on to learning about different mechanisms and processes like respiration and division.

Ten Punnett Square Worksheet Ideas for Middle School through AP Levels

The Punnett square worksheet is a great teaching tool for genetics. This worksheet helps students get an idea of the different possible combinations for genetic traits and helps them calculate how likely each combination is. Here are some ideas for using the Punnett square in your classroom.

Punnett square

The Punnett square is a diagram used to make sense out of genetics and inheritance. The purpose of this diagram is to show the different possible combinations of alleles. This is a useful tool you can use to teach biology and probabilities regardless of the level of your students. Here are a few ideas to use the Punnett square in your classroom.

Understanding Dominant And Recessive Alleles

You should talk about genetics and alleles before introducing the Punnett square worksheet in your classroom. Students should ideally also have a good understanding of how to calculate probabilities.

Students should be familiar with genes and understand that genes are a unit of hereditary information while an allele is a possible sequence or variant of a gene.

You should also talk about observable genetic traits, also known as phenotypes. Students should understand that there are dominant and recessive alleles that won’t become phenotypes unless they are combined with another recessive allele. You can introduce the notion of codominant alleles with high school students.

Make sure the Punnett square activities are connected to lessons about genetics, inheritance, and alleles. You can use these activities to introduce these concepts or to help students get a more thorough understanding of genetics and probabilities.

The Punnett Square

The Punnett square is a simple diagram that shows the different possible combinations. Here is an example for the offspring of two organisms with the same Aa allele combination:

  A a
A AA Aa
a Aa aa


Using this worksheet helps students see all the different possibilities and gives them an idea of which phenotype is more likely to occur.

Ten Ideas For Using The Punnett Square Worksheet In Your Classroom

Middle School

Introduce The Punnett Square With Legos

You can use Legos to introduce the Punnett square to your students. This visual approach would be ideal for an activity that you will use to introduce concepts like genetics and alleles.

You need to have Legos with two different shapes to represent the dominant and recessive alleles. Use cups or other small containers to represent the animals or plants that inherit the genetic material.

Start with two cups that contain a different combination of two Lego shapes to represent the parents. Have the students fill out the worksheet with the four possible combinations of Lego shapes.

The students can then place the four different combinations inside of four cups or small containers that represent the offspring.

This approach helps students understand the logic behind the Punnett square and gives them a visual reference you can use once you start talking about alleles.

Plant Genetics

Plant Genetics

Plants are a great example at the middle school level because you can easily identify a phenotype that students will understand, such as the color of a flower. You can even grow flowers in the classroom to illustrate the lesson.

Students can fill out a Punnett square worksheet for plant genetics. The purpose of this activity is to introduce the idea of dominant and recessive alleles and have students get used to seeing a capital letter for the dominant trait and a lowercase letter for the recessive trait.

Create a simple worksheet with four squares and ask students to write the different possible combinations. You can work with different phenotypes:

  • Create a worksheet for a blue flower BB and a blue flower Bb.
  • Create a worksheet for a blue flower Bb and a white flower bb.
  • Create a worksheet for a tall plant TT and a tall plant Tt.
  • Create a worksheet for a tall plant Tt and a small plant tt.

You can then ask students to identify the number of possible combinations and to calculate the probability of a flower being blue or of a plant being tall. You can also have students draw what the plants will look like.

High School

You can introduce advanced ideas at the high school level and connect the Punnett square with more real-life examples. You should introduce concepts like homozygous genes, heterozygous genes, or mutations.

You can also focus on probabilities and have students use a worksheet to calculate the probability of a trait appearing in offspring.

Predicted Outcome And Actual Outcome

Introduce the idea that the predicted outcome of a Punnett square doesn’t always reflect what happens in real life. Students should be aware that these worksheets will show how likely an allele combination is.

Have students use a Punnett square worksheet to predict the outcome of a coin flip or another random event. Once the worksheet is filled out, have students flip a coin and compare the outcome with what the Punnett square predicted.

Guessing The Parents’ Allele Combination

Provide students with different allele combination for the offspring and tell them how frequent each combination is.

Have them use the Punnett square to find the allele combinations of the parents. This is an activity that only takes a few minutes to complete, but it is a great way to brush up on how the Punnett square works and to make sure that students have a solid understanding of inheritance.

Bear Fur Color

You can work with phenotypes that are observable in animals and introduce the idea that there are different possible allele combinations for the same phenotype.

The brown bear fur color is an excellent example since a bear can have BB or Bb alleles and have brown fur. On the other hand, only a bear with a bb allele combination will have black fur.

Have your students use the Punnett square to calculate the probability of offspring having brown or black fur. This problem encourages students to create more complex tables since the bear parents can either have the BB or Bb allele combination.

Eye Color

eye

Predicting eye color is another interesting activity you can introduce at the high school level. Start by making a list of the different possible allele combinations for each eye color.

You can have students calculate the probability of their eye color based on the eye color of their parents, or have students determine the allele combinations of two parents based on the phenotypes of their children.

Eye color is more complex than other phenotypes and gives students an opportunity to create more advanced worksheets that reflect the different possible allele combinations of the parents based on their phenotypes.

You can make things more complicated and combine eye color with hair color.

Research

Have students research different genetic traits and create a presentation on how these traits are inherited. You can have students work in groups and assign a trait to each group.

Students will have to define the trait you assigned to them, explain how it is inherited, and create different Punnett squares that show how the trait can be inherited or skip a generation.

Here are a few examples:

  • A specific hair color.
  • A specific eye color.
  • Tongue rolling.
  • Freckles.
  • Free or attached earlobes.

This project will help students understand how complex genetic inheritance is and will also help them connect what they learned in class with real-world examples.

AP Level

Cat Coat Genetics

Students can look at pictures of cats and predict what the offspring will look like with Punnett squares. This is similar to the bear fur activity, but cat coat genetics are more complex.

Students will have to work with genotypes that affect hair length as well as color. Here are a few facts to help you get started with planning this activity:

  • A cat with short hair will have an LL or Ll genotype.
  • A cat with long hair will have an ll genotype.
  • A cat that is entirely white can have a WW or Ww genotype. A cat with white fur and some colored hair has a ww genotype.
  • White cats can have a W allele and another allele for a dense pigment or piebald spotting.
  • There is a gene for dense pigment. A black, brown, or orange cat will have a DD or Dd allele combination.
  • A cat with gray, cream or light brown fur will have a dd allele combination.
  • Piebald cats with the SS and Ss allele combination have some white hair, while piebald cats with no white hair have the ss genotype.

Genetic Disorders

Genetic Disorder

You can combine the Punnett square with topics like genetic disorders. Studying how sickle cell anemia is inherited could be an interesting project for AP level students.

You can have students create a worksheet to determine the probability of a child inheriting sickle cell anemia based on the parent’s allele combinations.

Have Students Create A Species

Have students design a species from scratch to test their understanding of genetic rules. Ask them to make a list of dominant and recessive traits. Determine how many traits students will have to work with depending on how much time you want them to spend on this project.

Creating a species and determining how common some genetic traits are going to be is a great way to make sure students have a solid understanding of the Punnett square. You can have students create illustrations for the different genetic combinations.

You can go further and ask students to create genetic traits for an imaginary species, determine which traits are dominant and recessive, and ask them to create problems that other students will have to solve.


How to Use Frayer Model in Your Biology Classroom: Five Ideas

The Frayer model is a great way to keep track of new vocabulary words and to create visual associations between these words and their definitions, characteristics, examples, and non-examples. Here is how you can start using this methodology in your biology classroom.

How to Use Frayer Models in Your Biology Classroom: Five Ideas

classroom

The Frayer model is a useful teaching tool for vocabulary words. This approach encourages students to connect a wide range of concepts with each new word instead of focusing on a definition. If you teach biology, you should start using this methodology in your classroom to help students remember new words and concepts.

What Is The Frayer Model?

Frayer Model

This is a method designed to help students retain new vocabulary words. It can be used in any subject, but there are many benefits associated with this methodology used in a scientific setting since definitions alone might not be enough for complex ideas.

The Frayer template is simple. You can easily find templates online and print them, or teach students how to create templates.

All you have to do is trace a circle or an oval in the center of a page. You should then divide the page into four equal sections around the circle or oval. Each section has a different purpose.

Start by writing the vocabulary word in the center of the page. Don’t hesitate to use a color that stands out. This is the most important element of the template and students should be able to easily find their Frayer page for a specific word.

The section located in the upper left corner is where students will write the definition of the word. Students should ideally come up with a definition by themselves, but it is best to give students a definition to write down if you are working with young students.

The section located in the upper right corner is where students will list characteristics and facts associated with the vocabulary word. They can add an illustration, or make a list of essential and non-essential characteristics.

The lower left section is where students will make a list of examples. Encourage students to come up with examples themselves. Students can go back later and add more examples on their Frayer flashcard as they encounter more examples.

The lower right section is where students should list non-examples. Just like with examples, students should come up with a unique list of non-examples and add to it as they find more.

The Frayer model is interesting because it helps students connect characteristics, facts, examples, and more with each new vocabulary word. They can use the sheets as flashcards to learn new words and assess how much they know about each concept.

Encourage students to keep all their Frayer sheets in a binder or to find another way to organize their flashcards. They can use their binder to brush up on their vocabulary regularly and can keep adding more sheets to their binder as they move on to more advanced biology classes.

Ideas For Using The Frayer Model In Your Biology Class

You need to make the Frayer templates an integral part of your lessons for students to start using this methodology. There are many different ways to introduce this model in your biology class.

Use The Frayer Model Throughout The Entire Year

teacher

You should introduce the Frayer template as early as possible in the school year and use it consistently. You can have students create a new sheet every time a new vocabulary word is introduced, but you can also have entire lessons dedicated to creating different vocabulary sheets to explore important concepts.

Here are a few examples of topics that can be explored with this methodology:

  • Classify living organisms.
  • Define concepts such as atoms, electrons, or chemical bonds.
  • Differentiate between molecules and their properties.
  • Teach students about different types of chemical reactions.
  • Go over different types of cells.
  • Teach students about the different elements of the cell.
  • Define the different elements of DNA.
  • Classify different eco-systems.
  • Talk about different human or animal behaviors.

You can also use this approach to sum up concepts like the laws of thermodynamics, photosynthesis, cell division, cell respiration, and cell signals.

A more comprehensive lesson will be needed for these concepts, but students can use a Frayer template to sum up the lesson and have a helpful flashcard for an important concept.

Talk to other teachers at your school, especially those who teach scientific subjects. Tell them about this method and encourage them to use it in their classroom as well. Students will benefit from taking classes that rely on the same methodology.

Make The Frayer Model Part Of The Lesson

Start each lesson by writing a list of new vocabulary words and concepts students are going to encounter during the lesson. Have students start a Frayer sheet for each word by writing the new word in the center.

Students will need to come up with a definition for each word by the end of the lesson. Ask them to go over their notes to find characteristics and facts about each new word or concept. They can find examples and non-examples by doing more research after the lesson.

Having these sheets to fill out during and after the lesson will help students adopt a more active attitude towards learning new vocabulary words. The Frayer methodology encourages students to look for the information they need to complete each sheet rather than simply writing down a definition.

You can go over each new word at the beginning of the next lesson to make sure the students have listed all the important characteristics and have picked accurate examples and non-examples.

Frayer Sheets As Homework

homework

You can use the Frayer model to help students learn new vocabulary words at home. You could ask students to create a few Frayer sheets for the new words they have learned or to research vocabulary words for the next lesson.

You can either assign specific words or let students choose the concepts that were new to them. Students should have some experience with using this template before you let them create their own Frayer sheets at home.

Make your expectations clear. You can either ask students to go over the course material to find the definition, characteristics, facts, and examples they need to fill out their vocabulary sheets, or you can ask them to do some research outside of their notes to go further.

Ask a few students to list the definitions, characteristics, examples, and non-examples they found at the beginning of each class. This will give everyone an opportunity to add a few important elements they might have missed on their Frayer sheets.

The Frayer Model And Classroom Activities

There are many ways to incorporate these vocabulary sheets into classroom activities. Because it is an easy way to synthesize information, you can have students or groups of students work on different words and concepts and share this information with the rest of the class.

You could, for instance, divide the class into different groups and have each group create a detailed Frayer sheet for a phylum of the animal kingdom, a type of virus, or a type of cell. Each group can share copies of the sheet they created with the rest of the class or do a short presentation about the concept they worked on while others take notes.

You could also hand out some incomplete Frayer sheets and have some activities designed to help students discover a specific concept. The goal would be to fill out the sheet as the students complete the activity.

If you are studying plants or the animal kingdom, plan a field trip and have students focus on the examples and non-examples sections of their Frayer sheets for the different classes and phylum they are likely to encounter during the trip.

Vocabulary Games

Introducing some vocabulary games in your classroom is a great way to encourage students to go over their Frayer sheets regularly. Playing vocabulary games motivates students and is also a great way to remind everyone of the words and concepts they have already encountered.

You could create a Frayer template on the blackboard, pick a word, and see who can list all the main characteristics associated with the word. You could also see who can come up with the most examples.

You can also list characteristics, examples, or non-examples and see who can identify the vocabulary word first.

You can make things more fun by having teams compete against each other, or by having a team pick a secret vocabulary word and provide the other team with characteristics or examples to see how quickly they can guess the word or concept.

If you want to test students on their vocabulary, you can create some Frayer sheets with most of the information filled out and have students guess the word that should be at the center. Incorporating vocabulary words in tests and quizzes will encourage students to review their Frayer sheets regularly.

The Frayer template is a great way to help students learn new vocabulary words in your biology class. This methodology will apply to many concepts your students are going to encounter, and it encourages them to actively look for definitions, characteristics, and examples for each new concept they come across.

Using A Microscope 101: Important Microscope Parts & Functions

Can you name all the different parts of a microscope? Knowing how to properly label microscope parts is important so you can communicate clearly and provide detailed instructions when teaching a class of young students. Here is everything you need to know about naming the parts of a microscope.

Using A Microscope 101: Parts Of A Microscope

A microscope is used to magnify small objects. Microscopes are often used in scientific or educational settings to observe objects and living organisms that wouldn’t be visible to the naked eye. It is important to learn about the different parts of a microscope to understand how these devices work.

Why Is Knowing About Microscope Parts Important?

one microscope

Learning about microscope parts provides you with a frame of references. You can use the correct terms to communicate with other scientists or students.

This is crucial when giving instructions. If you are an instructor, you should take the time to teach students about the different parts of a microscope so you can give detailed instructions on how to prepare a microscope and use it safely.

Knowing the correct terms for the different parts of a microscope will also help you troubleshoot problems. You will be able to look up information on a specific part you are encountering issues and figure out how to rectify the issue.

The Basic Components Of A Microscope

microscope diagram

Three microscope parts make up the frame of the device.

Base

The base is the large piece that supports the microscope. You need to keep your microscope steady to get a clear image of what you want to magnify. This is why the base is an important part.

The size of the base depends on how heavy the microscope is. If you need to carry a microscope, make sure you place one hand under the base to support the weight of the device.

Arm

This is the C-shaped section that connects the base of the microscope to the controls and tube. You can typically adjust the angle of the arm to use the microscope more comfortably.

The arm is the first part that young students should learn about. This is the part you would use to safely pick up and transport the microscope. Teach students that they should always grab the arm of the microscope if they need to change the position of the device.

When carrying a microscope, you should hold the device by the arm and have one hand under the base to support its weight.

If you are using a compound microscope, the base, arm, and stage of the device won’t be separate elements. However, these different parts are easily identifiable on most small microscopes with low magnification settings.

Tube

This is a large part at the top of the microscope. The tube is connected to the arm of the microscope.

You will find the turret or nosepiece with the magnifying lenses at the bottom of the tube. However, you don’t directly look down the tube since an eyepiece is mounted on top of the tube.

The tube of a microscope can’t be adjusted. Make sure you teach the name of this part to young students, so they know not to grab a microscope by its tube.

Some microscopes have two tubes and two eyepieces. Most models only have one tube and eyepiece.

How To Magnify An Object

Eight different microscope parts come into play when you use a microscope to magnify an object.

Stage

The stage is the small surface located under the turret or nosepiece of the microscope. This is where you need to place the object you want to magnify.

The stage is equipped with a couple of metal clips that will secure the object you need to magnify to the microscope. You would typically prepare the object or living organism you want to magnify by placing it on a microscope slide and use the stage clips to secure the slide to the stage.

There is a hole called the aperture in the center of the stage. Light comes through the aperture and illuminates the object. You need to make sure the object you want to magnify is aligned with the aperture when attaching it to the stage.

Mirror Or Illuminator

You can’t use a microscope without a light source. The mirror or illuminator is located under the stage and illuminates the object or living organism you want to magnify.

If your microscope is equipped with a mirror, you will need to adjust the mirror to reflect sunlight. Most microscopes are equipped with an illuminator that you simply switch on and off.

You will find a 110v bulb inside of the illuminator. Some microscopes have an iris diaphragm attached to the illuminator that can be used to control how much light comes out.

Turret Or Nosepiece

This is a rotating circle attached under the tube of the microscope. There are different objective lenses attached to the turret of the nosepiece.

The purpose of the turret or nosepiece is to support the different objective lenses and let you select the right one. Microscopes have at least two lenses attached to the turret or nosepiece but can have a lot more.

Eyepiece

The eyepiece is the part mounted on top of the tube. This is where you look into the microscope. The eyepiece usually has a lens with a 10x or 15x magnification power. You can calculate the magnification of a microscope by multiplying the eyepiece lens magnification power by the magnification power of the objective lens you are using.

Stereo microscopes have two eyepieces to create a three-dimensional image of the object. If you are an instructor, you probably won’t be working with stereo microscopes but showing images of these devices to your students could be an interesting way to introduce three-dimensional images and to show them there are different types of microscopes with more features.

Controls

You will find the controls on one side of the arm. Most microscopes use dials or knobs to let you adjust the magnification.

The controls work by bringing the stage closer or further away from the objective lens you have selected. You will usually have a coarse control to make broad adjustments and a fine control for more precise adjustments.

Some microscopes have an additional control mounted on the eyepiece. This is a diopter control to adjust the magnification of the lens you look into.

Some microscopes have an additional control attached to the base so that you can adjust the brightness of the illuminator.

Rack stop

The rack stop is a safety feature that prevents you from bringing the stage too close to the objective lens and accidentally damaging it. The rack stop is a small screw that is mounted next to the stage.

You shouldn’t have to adjust the rack stop of your microscope. The default setting will prevent you from getting the stage too close to the objective lenses.

If you are teaching young students how to use a microscope, make sure they know what the rack stop is and understand why they shouldn’t touch it. It is possible to loosen this screw and get the stage closer to the objective lenses, which could result in some damages to the lenses.

Objective Lenses

These lenses are attached to the turret or nosepiece and hang directly above the stage. Microscopes can have two, three, four, or five lenses depending on their magnifying power.

The magnification power of a lens typically ranges from 4x to 100x depending on how performing the microscope is.

The objective lenses are the most important and most fragile microscope parts. They are protected by small tubes, but students should be aware of how fragile the lenses are.

Condenser lens

Not all microscopes have a condenser lens. The purpose of the condenser lens is to focus the light on the object you want to magnify.

A condenser lens is often used with high magnifications since it gives a sharper image of the object. You can upgrade your microscope by adding a condenser lens, but this is something you might not need if your microscope only has low magnification settings.

The condenser lens is mounted on the stage and will concentrate light on the object.

How To Teach Students About Microscope Parts

children using a microscope

There are different ways to help students remember the different parts of a microscope. Here are a few ideas:

  • Bring a microscope to class and point to the different parts.
  • Have the students label a diagram of a microscope.
  • During activities that involve microscopes, make sure you ask each student to name a few parts.
  • Ask students to explain how they would prepare a slide or transport a microscope. Make sure they use the correct names for the different parts they mention.
  • Ask students to name the parts that come into play when magnifying an object.
  • Ask students what the purpose of a specific part is.
  • Have students try out different lenses and calculate the magnification power for each one.

Knowing the names of the different parts of a microscope is important because it helps you communicate clearly with students or colleagues. Remembering the different parts is easy if you keep a labeled diagram with you and make sure you always use the proper terms when referring to the different parts of a microscope.

Amino Acids: Definition, Charts, and Study Guides

Finding an excellent amino acid chart that is also a good reference and well suited for your needs can be a challenge. However, there are great charts and study guides available that use diagrams, videos, and text to quickly deliver information in a succinct and organized manner.

Amino Acids

Learning about amino acids and finding good charts and study guides can be a challenge, but there are reliable resources available. Our list includes some of the best reference charts and most diverse study guides to fit a variety of learning styles and other preferences.

Whether you are a beginner or a more advanced user, these charts and guides can be helpful in accelerating learning and testing the knowledge that you already possess. For those studying for the MCAT, having these tools at your disposal can help supplement your other materials and verify your knowledge by presenting content in alternative forms.

What Are Amino Acids? What Do They Do?

Amino acids are a class of organic compounds that include at least one carboxyl group, and one amino group. Amino acids are one of 20 different components that go into assembling proteins and are frequently referred to as “building blocks.”

There are a total of seven amino acids which are called “essential” because they must be obtained from the diet and the human body is unable to manufacture them. They include:

7 Amino Acids

  • Isoleucine
  • Leucine
  • Lysine
  • Valine
  • Tryptophan
  • Threonine
  • Phenylalanine

Amino acids are also procured from a healthy diet, and many can be taken as an oral supplement as needed. The proteins that amino acids create are an essential part of just about every biological process in your body.

Amino acids are responsible for carrying out bodily functions and making cells such as muscles and other tissues in the body. They also help give those cells structure and play vital roles in the transference and storage of nutrients to different parts of the body.

How your organs, tendons, arteries, and glands function also depend on different amino acids. Wound healing, tissue repair, and skin and hair growth are also related to how amino acids perform in the body.

Amino acids are responsible for building and transporting many substances within the body, but they also work to remove waste and other deposits that are produced as part of the body’s functions and metabolism.

Having an appropriate quantity of the needed amino acids also helps to regulate the body’s metabolism in different ways and can prevent disease, tissue damage, organ damage, and other health issues.

Helpful Reference: Amino Acid Chart

Amino acid charts

There are many different amino acids, and the way that they can combine leads to an even more significant number of potential compounds. In addition to that, each amino acid has a 3-letter symbol, 1-letter symbol, formula, molecular weight, and structure.

Different charts present information about amino acids in different ways, and our list of amino acid charts offers a variety of different formats to suit different needs. Having an amino acid chart on hand may help save time and prevent mistakes.

DTU Bioinformatics

The amino acid chart provided on the DTU Bioinformatics website is straightforward and offers up the 1-letter symbol, and the DNA codons. It lists 20 amino acids found in proteins, along with the 64 available 3-letter symbols that correspond to each respectively.

Although this table is somewhat bare-bones, it’s easily printed and hung up where it is convenient for reference. If all you need is some basic information about amino acids, then this chart is ideal for you.

This chart may not have all of the information necessary for an introduction to the subject, but it succinctly provides essential information without frills, distracting colors, icons, or logos, and comfortably fits on one page.

Oregon State

The amino acid chart provided by Oregon State is a color-coded table that makes it possible to translate different parts of mRNA code into a sequence of amino acids. The simple 3 step directions indicate that you first need to select the nitrogenous base, and then match it to the first letter on the table.

After that, you follow the row until it leads you to the second and third letter required for the sequence, and each letter is color coded in black, blue, red, or green.

Although the table looks complicated at first, once you go through the steps a few times it becomes a rather quick way to look up an amino acid sequence without needing to do an online search each time.

The table also does a great job of narrowing down the available options, so if you are unsure of one of the bases, you can at least get an idea of what the possible options are which may be all you need to figure it out.

This table is also relatively compact, and provided you have access to a color printer it could be beneficial to have printed out and on hand for when you need it.

Sigma- Aldrich

The amino acid charts provided by Sigma-Aldrich are much more extensive and present the information in both chart and structure format. You can quickly look up the drawn structure of an amino acid complete with different side chains, or you can scroll down to the tables that have more information about the amino acid properties.

This page has a wealth of information about the amino acids and lists them in different groupings and categories for convenience. You can peruse the chart that talks explicitly about properties such as symbols, weights, molecular formula, or residue formula, and you can also view them based on how hydrophobic they are.

The bottom of the page also lists some relevant technical articles that relate to amino acids, and there is a link that allows you to read the abstracts from those papers. This website also features a wealth of other information and charts related to medical science, biology, genetic research, and life science.

GenScript

The GenScript website offers some clean and easy to read charts that detail amino acid related information such as symbols, formula, weights, isoelectric points, and structure. There are small illustrative diagrams for the various structures, and each chart categorizes the amino acids according to type.

There are also links on the page that will navigate to other helpful charts, formulas, and calculators and the site offers many different genetics related reference charts. The page details universal genetic codes along with 20 standard residues that can be found in nature.

SmartDraw

SmartDraw is a unique website that isn’t specifically science oriented but offers a wide variety of charts and visual illustrations for reference material. It covers a wide range of topics, but the amino acid charts are both easy to see and can be uploaded into the SmartDraw website for customization.

The templates offered are fully editable, so you can make your own custom notes, color code, and make other customizations easily. It’s also possible to make a chart of your own with the information of your choosing.

a girl studying

Study Guides and Resources

An amino acid chart is somewhat quick to find, but a reliable study guide that is easy to use can be harder to locate. Luckily there are a few good sources available that offer just enough information to be helpful, without weighing you down with opaque content.

Albert

This site offers some helpful study tips when it comes to learning about amino acids, and even includes helpful diagrams and a complete study guide. If you like to learn by reading and viewing visual pictures, this site may be beneficial for you.

At various parts of this site, you’ll find summaries, and the content is broken up with practice questions to help you test your understanding. Everything is well organized and ideal for beginners looking to learn quickly.

Sporcle

Sporcle is a site specifically for quizzing yourself about amino acids and other content created by users in the community. While this would not be ideal as your only source of information and exposure to amino acids, the fun quizzes can help accelerate learning in a fun way.

There are a number of quizzes related to biology, and other sciences that are free for visitors to take. In the end, you get a score out of a total of 20 points which can help you track your progress as you learn.

Cliffs Notes

Cliffs Notes on amino acids don’t contain many diagrams, so this may be a better source for those that like to read exclusively. However, it does provide a good summary of the relevant information related to a number of different scientific categories.

In fact, there are well-categorized chapters available that discuss many different biological and other scientific concepts, and many of these come directly from books, or classroom approved study guides.

Khan Academy

Khan Academy offers a wealth of lectures, videos, diagrams, and other content that is posted by some of the brightest minds at the most well-renowned universities. The topics are widespread and feature a number of different categories included study guides specifically for amino acids, MCAT, and other science-related subjects.

For those that are stuck in their learning and want to speed up the process, the free content on Khan Academy can help liven up your studies with fun and interactive learning that you can take on at your own pace. The videos are generally very high quality and easy to watch, and the instructors are typically quite good at dissecting a topic, so it’s easy to understand.