Amino Acids: Definition, Charts, and Study Guides

Finding an excellent amino acid chart that is also a good reference and well suited for your needs can be a challenge. However, there are great charts and study guides available that use diagrams, videos, and text to quickly deliver information in a succinct and organized manner.

Amino Acids

Learning about amino acids and finding good charts and study guides can be a challenge, but there are reliable resources available. Our list includes some of the best reference charts and most diverse study guides to fit a variety of learning styles and other preferences.

Whether you are a beginner or a more advanced user, these charts and guides can be helpful in accelerating learning and testing the knowledge that you already possess. For those studying for the MCAT, having these tools at your disposal can help supplement your other materials and verify your knowledge by presenting content in alternative forms.

What Are Amino Acids? What Do They Do?

Amino acids are a class of organic compounds that include at least one carboxyl group, and one amino group. Amino acids are one of 20 different components that go into assembling proteins and are frequently referred to as “building blocks.”

There are a total of seven amino acids which are called “essential” because they must be obtained from the diet and the human body is unable to manufacture them. They include:

7 Amino Acids

  • Isoleucine
  • Leucine
  • Lysine
  • Valine
  • Tryptophan
  • Threonine
  • Phenylalanine

Amino acids are also procured from a healthy diet, and many can be taken as an oral supplement as needed. The proteins that amino acids create are an essential part of just about every biological process in your body.

Amino acids are responsible for carrying out bodily functions and making cells such as muscles and other tissues in the body. They also help give those cells structure and play vital roles in the transference and storage of nutrients to different parts of the body.

How your organs, tendons, arteries, and glands function also depend on different amino acids. Wound healing, tissue repair, and skin and hair growth are also related to how amino acids perform in the body.

Amino acids are responsible for building and transporting many substances within the body, but they also work to remove waste and other deposits that are produced as part of the body’s functions and metabolism.

Having an appropriate quantity of the needed amino acids also helps to regulate the body’s metabolism in different ways and can prevent disease, tissue damage, organ damage, and other health issues.

Helpful Reference: Amino Acid Chart

Amino acid charts

There are many different amino acids, and the way that they can combine leads to an even more significant number of potential compounds. In addition to that, each amino acid has a 3-letter symbol, 1-letter symbol, formula, molecular weight, and structure.

Different charts present information about amino acids in different ways, and our list of amino acid charts offers a variety of different formats to suit different needs. Having an amino acid chart on hand may help save time and prevent mistakes.

DTU Bioinformatics

The amino acid chart provided on the DTU Bioinformatics website is straightforward and offers up the 1-letter symbol, and the DNA codons. It lists 20 amino acids found in proteins, along with the 64 available 3-letter symbols that correspond to each respectively.

Although this table is somewhat bare-bones, it’s easily printed and hung up where it is convenient for reference. If all you need is some basic information about amino acids, then this chart is ideal for you.

This chart may not have all of the information necessary for an introduction to the subject, but it succinctly provides essential information without frills, distracting colors, icons, or logos, and comfortably fits on one page.

Oregon State

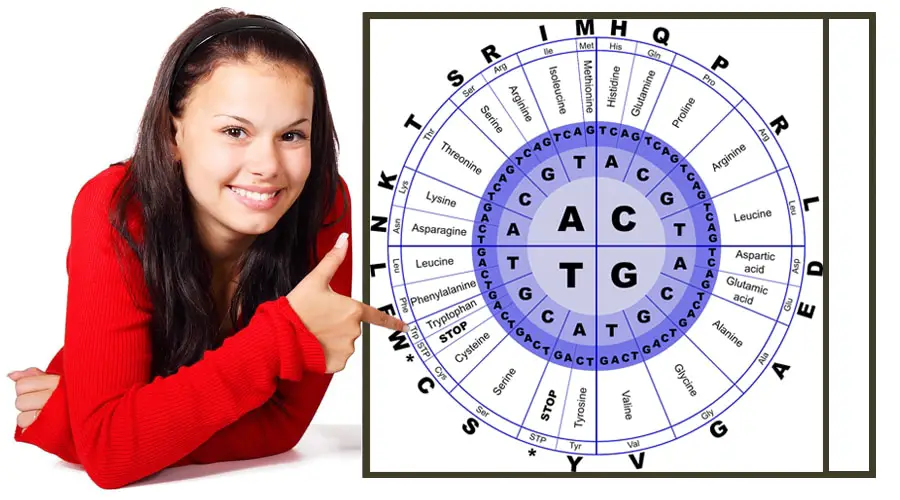
The amino acid chart provided by Oregon State is a color-coded table that makes it possible to translate different parts of mRNA code into a sequence of amino acids. The simple 3 step directions indicate that you first need to select the nitrogenous base, and then match it to the first letter on the table.

After that, you follow the row until it leads you to the second and third letter required for the sequence, and each letter is color coded in black, blue, red, or green.

Although the table looks complicated at first, once you go through the steps a few times it becomes a rather quick way to look up an amino acid sequence without needing to do an online search each time.

The table also does a great job of narrowing down the available options, so if you are unsure of one of the bases, you can at least get an idea of what the possible options are which may be all you need to figure it out.

This table is also relatively compact, and provided you have access to a color printer it could be beneficial to have printed out and on hand for when you need it.

Sigma- Aldrich

The amino acid charts provided by Sigma-Aldrich are much more extensive and present the information in both chart and structure format. You can quickly look up the drawn structure of an amino acid complete with different side chains, or you can scroll down to the tables that have more information about the amino acid properties.

This page has a wealth of information about the amino acids and lists them in different groupings and categories for convenience. You can peruse the chart that talks explicitly about properties such as symbols, weights, molecular formula, or residue formula, and you can also view them based on how hydrophobic they are.

The bottom of the page also lists some relevant technical articles that relate to amino acids, and there is a link that allows you to read the abstracts from those papers. This website also features a wealth of other information and charts related to medical science, biology, genetic research, and life science.

GenScript

The GenScript website offers some clean and easy to read charts that detail amino acid related information such as symbols, formula, weights, isoelectric points, and structure. There are small illustrative diagrams for the various structures, and each chart categorizes the amino acids according to type.

There are also links on the page that will navigate to other helpful charts, formulas, and calculators and the site offers many different genetics related reference charts. The page details universal genetic codes along with 20 standard residues that can be found in nature.

SmartDraw

SmartDraw is a unique website that isn’t specifically science oriented but offers a wide variety of charts and visual illustrations for reference material. It covers a wide range of topics, but the amino acid charts are both easy to see and can be uploaded into the SmartDraw website for customization.

The templates offered are fully editable, so you can make your own custom notes, color code, and make other customizations easily. It’s also possible to make a chart of your own with the information of your choosing.

a girl studying

Study Guides and Resources

An amino acid chart is somewhat quick to find, but a reliable study guide that is easy to use can be harder to locate. Luckily there are a few good sources available that offer just enough information to be helpful, without weighing you down with opaque content.

Albert

This site offers some helpful study tips when it comes to learning about amino acids, and even includes helpful diagrams and a complete study guide. If you like to learn by reading and viewing visual pictures, this site may be beneficial for you.

At various parts of this site, you’ll find summaries, and the content is broken up with practice questions to help you test your understanding. Everything is well organized and ideal for beginners looking to learn quickly.

Sporcle

Sporcle is a site specifically for quizzing yourself about amino acids and other content created by users in the community. While this would not be ideal as your only source of information and exposure to amino acids, the fun quizzes can help accelerate learning in a fun way.

There are a number of quizzes related to biology, and other sciences that are free for visitors to take. In the end, you get a score out of a total of 20 points which can help you track your progress as you learn.

Cliffs Notes

Cliffs Notes on amino acids don’t contain many diagrams, so this may be a better source for those that like to read exclusively. However, it does provide a good summary of the relevant information related to a number of different scientific categories.

In fact, there are well-categorized chapters available that discuss many different biological and other scientific concepts, and many of these come directly from books, or classroom approved study guides.

Khan Academy

Khan Academy offers a wealth of lectures, videos, diagrams, and other content that is posted by some of the brightest minds at the most well-renowned universities. The topics are widespread and feature a number of different categories included study guides specifically for amino acids, MCAT, and other science-related subjects.

For those that are stuck in their learning and want to speed up the process, the free content on Khan Academy can help liven up your studies with fun and interactive learning that you can take on at your own pace. The videos are generally very high quality and easy to watch, and the instructors are typically quite good at dissecting a topic, so it’s easy to understand.

8 Lesson Plan Template Resources for Biology Teachers

A lesson plan template can help save time but can also assist with creating an engaging and thought-provoking opportunity for students to learn. Using customizable templates, our list offers up multimedia content resources suitable for all grade levels and biology subjects.

8 Lesson Plan Template Resources for Biology Teachers

Lesson plan templates can help save teachers time and also improve their ability to successfully teach students without the hassle of starting from scratch for every lesson. Teachers around the world have grouped to share content on various platforms, and now students and educators alike can reap the benefits.

Lesson plans are also an excellent way to organize ideas and plan subject matter out in advance without having to memorize lectures or assemble multiple lists of resources. Creating a sound lesson plan complete with links, handouts, and thought-provoking questions can make learning fun, and create time for essential teaching moments.

Effective Use of Lesson Plans

writing on top of the table

Lesson plans can be a helpful guide for delivering engaging and thought-provoking lessons that help students understand the material and take an interest in the subject matter. A well thought out lesson plan also has the ability to serve as a reference to make sure a lecture stays on track and within a preset time limit.

Using a lesson plan template effectively can be a bit more of a challenge since it is likely that you’ll be working with formatting done by another person who may think differently about how to put together an engaging lesson for students.

However, there are many benefits to using a lesson plan template, including:

  • Discovering how other educators organize and deliver information
  • Innovative solutions to common problems
  • Time savings and efficiency

There’s no shame in managing your own time by using a lesson template, and frequently it can help you assess how reliable or efficient different templates can be in a real-world scenario. Lesson plans also can limit the amount of multi-tasking that you’ll be doing while trying to teach students which can simplify and space out learning opportunities.

Clear lesson plans also include enough time for questions, reflection, and opportunities to encourage in-depth student thinking to enhance learning. Assignments can then be coordinated to be purposeful instead of becoming just busy work that doesn’t reinforce the essentials discussed in class.

8 Lesson Plan Template Resources

lesson written on a paper

There are a number of lesson plan template resources available online for a variety of subjects but finding the right one can be time-consuming. Here’s our list of recommended resources to get you started and connect you with content that is both functional and applicable to biology instruction at all grade levels.

The Teacher’s Guide

The Teacher’s Guide may look a little outdated, but the lesson content provided includes free worksheets, lesson templates, and other planning materials that have been created by other teachers. You can view the material by subject, and grade level recommendations are also listed.

Many of the links go to a webpage that includes other helpful information, diagrams, links, and handouts to help you create a more engaging lesson. These pages can easily be copied into a word document, uploaded to google drive, or used on a laptop as is.

Share My Lesson

Share My Lesson is another excellent website where content is provided by other educators for free, and there are comments and ratings to help you navigate among the material.

Finding the best content is easier with the ratings, but there are also descriptions, and lesson tags to help you find what you need more quickly so you can assess your options.

The content itself is also listed by grade level, and you can use the search filter options to see what is available without having to click through countless pages. Many of the lessons include PowerPoints, word documents, handouts, and note how many times the content has been downloaded.

The comments on the page are also a helpful resource that can let you know the thoughts of other educators, and you can share any content you find via the helpful social media buttons located on each page. You can also email the content to yourself or others, and upload documents to google drive.

The Biology Corner

miology corner

This super basic lesson plan template from the Biology Corner is great for planning out your lessons week by week, but it doesn’t offer the same detailed breakdown as other templates. What it does do is provide a simple model that you can download as a pdf or save to google docs and use over and over.

Although it is simple, it can also be edited to have different headings and include more information. It will also save you from having to buy an expensive lesson plan book that you have to lug around day in and day out.

Science Teacher Program.org

The Science Teacher Program website is a treasure trove of templates listed by year and grade for a variety of different subject matter. If you have a specific topic in mind, this cohesive list can help you get a ton of material together and get started on a lesson plan quickly.

Each lesson plan is unique, and many of them include helpful diagrams and details that you can copy and paste into slides as a visual during the less. The lessons are also in a simple webpage format, so they are easy to convert to word documents or view on your laptop as is.

Slide Share

SlideShare is an exciting resource where people can upload presentations and slides on any subject they choose to share with the rest of the web. This website offers up tons of original content that works for other presenters, teachers, educators, speakers, and even conferences.

The wealth of material also provides ample inspiration and many times you can download the slides for your own personal use. Not only can this save you a considerable amount of time when creating your lesson plan, but you can also get new ideas for how to present information.

There are also ratings, statistics, and other information about how many people have clipped, downloaded, or viewed the slides so you can get an idea for how popular the format is. There are also comments and notes towards the bottom which can provide more detailed information.

NASA

The NASA site is chalk full of information related to science, but lesson plan templates are probably not the first thing that comes to people’s minds when they think about the organization. In fact, the website offers several different files and lesson plan examples for different subjects and a vast number of grade levels.

Each template includes a fillable area for organizing your thoughts and ideas about the lesson contents, and the template allows for a considerable number of notes. Subject matter can efficiently be arranged in a number of different ways based on teaching style, and the headings allow for quick reference during more extended sessions.

Teachers Pay Teachers

Teachers Pay Teachers is an innovative site to get a lesson plan template that has been designed by another teacher. These downloads are often very inexpensive, typically around $1 or so, and offer a preview of the document before you purchase.

There are details about what the template is for, and how it is meant to be used. Many of them indicated a time frame for how many hours and minutes each part of the lesson should take, and the template is completely customizable as well.

Most of the templates are word documents which makes them easy to download and edit. Many of them are also suitable for a wide range of grade levels and include a rating based on the feedback from other teachers who have used the template.

One Note

This Microsoft application is standard as part of the Windows 10 operating system, and the website offers a number of lesson plan templates suitable for different subjects. There are many fun and interactive templates that can be found and downloaded for free, and the tutorials make it a breeze to get caught up on all the features.

The best part about OneNote for teachers is that it allows them to easily save and collate previous lesson plans for reference, so they have all their information and links at their fingertips at all times. For busy teachers working on material for several subjects at a time, they can even have multiple digital notebooks that can each be customized for their intended use.

Additionally, One Note receives regular updates from Microsoft which mean that you can expect regular upgrades to both content and functionality, and the website is full of new material that arrives regularly.

For cutting-edge learning material, and excellent visualizations, you can’t beat One Note which has STEM material, Minecraft, Skype, and other apps that make it the most versatile and customizable option available for free.

If you’re worried about keeping your wealth of material safe, worry no longer because you can create a Microsoft account and backup all of your files as you create them to ensure you’ll always have access even if you don’t have your computer on hand.

You can even share your lessons with others and view pre-made lessons from other educators on hundreds of different topics. There is also a function on OneNote for a virtual career day, a toolkit for school leaders, and specific content for higher education.

Thumb Wrestling Lab Sample1 Preap

Scientific Method – “I’m All Thumbs”


Introduction:


What makes a “Class Champion” thumb wrestler? Does thumb diameter, length, or wrist diameter have an effect on the overall chances of winning a thumb wrestling match? If you want to find out the answers to these questions then you have to do some scientific study. Scientific study is not only about plants and animals; it is also about how we function. You will have to use the scientific method to answer thesis questions. Scientific method is the principles and empirical processes of discovery and demonstration considered characteristic of or necessary for scientific investigation, generally involving the observation of phenomena, the formulation of a hypothesis concerning the phenomena, experimentation to demonstrate the truth or falseness of the hypothesis, and a conclusion that validates or modifies the hypothesis.


Hypothesis:


The person with the longest thumb will win the thumb war.


Materials:


The materials that were used for this lab was a metric ruler, metric tape measure, scissors, string, and a calculator.


Methods:


First you should choose a partner. Then measure the circumference of your thumb in centimeters at its widest point. Next you measure the length of your thumb, from the tip to the end of its second joint. Then measure the circumference of the wrist over the ulnar knob. Then you copy all of your information on the board onto the table in the results section of the lab.


Results:


Thumb CircumferenceThumb Circumference (cm)Thumb Length (cm)Wrist Circumference (cm)Number of Wins
Cason, Drew8.4921.54
Dittrich, Chad9102419
Holt, Brad89.5212
Hooker, Chris7.19.3212
Jones, Jett8.59.8216
Lambert, Scott9.58230
Lewis, Cody89.520.51
Lockwood, Blake8.38.5210
Lorince, Alan9.49.5241
Moore, Clark8.510201
Phillips, Jaylon9.310241
Simpson, Jonathan88.3200
Smith, Zack8.38.422.10
Williams, Paul8.48210
Yancey, Jey91022.50


Questions:


1. Restate your hypothesis: The person with the longest thumb will win the thumb war.


2. Which student won? Male: Chad Dittrich Female: Ashley Kersieck


3. What were their measurements: Male: thumb circumference-9cm, thumb length -10cm, and wrist circumference-24 cm.

Female Thumb circumference 7.0, thumb length 8.5, and wrist circumference 20.5


4. What was the mean thumb circumference of the class? 21.0


5. What was the mean wrist circumference of the class? 8.1


6. Did all those with larger measurements win their matches? No


7. Was your hypothesis correct? Yes


8. If not, explain what was different. It was right


9. What is the independent variable? Total of each contestant’s wrist and thumb measurements


10. What is the dependent variable? The number of


11. List the controlled variables in this experiment. Compete only in same sex, and follow all rules.


12. Would this be considered a controlled experiment? No


13. Explain your answer. Their were too many variables


Error Analysis:


The people wrestling might not have followed the rules by picking their arm up when they were wrestling or people just not trying would affect the outcome. Also people might have written their measurements in someone else’s place, which would affect the outcome as well.


Discussion and Conclusion:


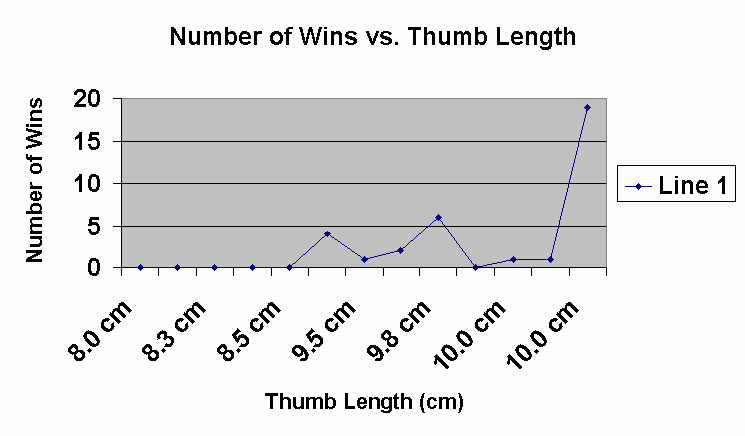
The male who won the most thumb wrestling matches, nineteen wins, also had one of the longest thumb lengths, 9.0 centimeters. However, three other males with longer thumb lengths, 10.0 centimeters had fewer wins. Therefore the original hypothesis that the person(s) with the longest thumb length would also have the most wins was incorrect. If the measurements for each person were totaled or averaged together, then the persons with the greatest total measurement or highest average would have had the most wins. The current data would support this hypothesis.

Transpiration


Transpiration

Introduction:
The amount of water needed daily by plants for the growth and maintenance of tissues is small in comparison to the amount that is lost through the process of transpiration and guttation. If this water is not replaced, the plant will wilt and may die. The transport up from the roots in the xylem is governed by differences in water potential ( the potential energy of water molecules). These differences account for water movement from cell to cell and over long distances in the plant. Gravity, pressure, and solute concentration all contribute to water potential and water always moves from an area of high water potential to an area of low water potential. The movement itself is facilitated by osmosis, root pressure, and adhesion and cohesion of water molecules.

The overall process: Minerals actively transported into the root accumulate in the xylem, increase solute concentration and decrease water potential. Water moves in by osmosis. As water enters the xylem, it forces fluid up the xylem due to hydrostatic root pressure. But this pressure can only move fluid a short distance. The most significant force moving the water and dissolved minerals in the xylem is upward pull as a result of transpiration, which creates a negative tension. The “pull” on the water from transpiration is increased as a result of cohesion and adhesion of water molecules.

The details: Transpiration begins with evaporation of water through the stomates (stomata), small openings in the leaf surface which open into air spaces that surround the mesophyll cells of the leaf. The moist air in these spaces has a higher water potential than the outside air, and water tends to evaporate from the leaf surface. The moisture in the air spaces is replaced by water from the adjacent mesophyll cells, lowering their water potential. Water will then move into the mesophyll cells by osmosis from surrounding cells with the higher water potentials including the xylem. As each water molecule moves into a mesophyll cell, it exerts a pull on the column of water molecules existing in the xylem all the way from the leaves to the roots. This transpirational pull is caused by (1) the cohesion of water molecules to one another due to hydrogen bond formation, (2) by adhesion of water molecules to the walls of the xylem cells which aids in offsetting the downward pull of gravity. The upward transpirational pull on the fluid in the xylem causes a tension (negative pressure) to form in the xylem, pulling the xylem walls inward. The tension also contributes to the lowering of the water potential in the xylem. This decrease in water potential, transmitted all the way from the leaf to the roots, causes water to move inward from the soil, across the cortex of the root, and into the xylem. Evaporation through the open stomates is a major route of water loss in the plant. However, the stomates must open to allow the entry of CO2 used in photosynthesis. Therefore, a balance must be maintained between the gain of CO2 and the loss of water by regulating the opening and closing of stomates on the leaf surface. Many environmental conditions influence the opening and closing of the stomates and also affect the rate of transpiration. Temperature, light intensity, air currents, and humidity are some of these factors. Different plants also vary in the rate of transpiration and in the regulation of stomatal opening.

Exercise 9A Transpiration

In this lab, you will measure transpiration under various laboratory conditions using a potometer. Four suggested plant species are Coleus, Oleander, Zebrina, and two week old bean seedlings.

Materials:
0.1 mL pipette, plant cutting, ring stand, clamps, clear plastic tubing, petroleum jelly, fan, lamp, spray bottle, and plastic bag.

Procedures:
Each lab group will expose one plant to one treatment.

1. Place the tip of a 0.1 mL pipette into a 16 -inch piece of clear plastic tubing.

2. Submerge the tubing and the pipette in a shallow tray of water. Draw water through the tubing until all the air bubbles are eliminated.

3. Carefully cut your plant stem under water. This step is very important, because no air bubbles must be introduced into the xylem.

4. While your plant and tubing are submerged, insert the freshly cut stem into the open end of the tubing.

5. Bend the tubing upward into a “U” and use the clamp on a ring stand to hold both the pipette and the tubing.

6. If necessary use petroleum jelly to make an airtight seal surrounding the stem after it has been inserted into the tube. Do not put petroleum jelly on the end of the stem.

7. Let the potometer equilibrate for 10 minutes before recording the time zero reading.

8. Expose the plant in the tubing to one of the following treatments( you will be assigned a treatment by your teacher):

a). Room conditions.

b). Floodlight (over head projector light).

c). Fan ( place at least 1 meter from the plant, on low speed, creating a gentle breeze).

d). Mist ( mist leaves with water and cover with a transparent plastic bag; leave the bottom of the bag open).

9. Read the level of water in the pipette at the beginning of your experiment(time zero) and record your finding in Table 9.1.

10. Continue to record the water level in the pipette every 3 minutes for 30 minutes and record the data in Table 9.1.

Table 9.1: Potometer Readings

Time (min)Beginning (0)v3ssfff6ff912151821242730
Reading (mL)4nnnnnnn4nnnnnnnnnn4

11. At the end of your experiment, cut the leaves off the plant and mass them. Remember to blot off all excess water before massing.

Mass of leaves ______________ grams.

Calculation of Leaf Surface Area
The total surface area of all the leaves can be calculated by using one of the following procedures.

__________________ = Leaf Surface Area (m2)


Leaf Trace Method:
After arranging all the cut-off leaves on the grid below, trace the edge pattern directly on to the grid. Count all of the grids that are completely within the tracing and estimate the number of grids that lie partially within the tracing. The grid has been constructed so that a square of four blocks equals 1 cm2. The total surface area can then be calculated by didvding the total number of blocks covered by 4. Record the value above.

Grid 9.1


Leaf Mass Method:

  • Cut a 1 cm2 section of one leaf.
  • Mass the 1 cm2 section.
  • Multiply the section’s mass by 10,000 to calculate the mass per square meter of the leaf. (g/m2) ____________
  • Divide the total mass of the leaves (step 11) by the mass per square meter (above). This value is the leaf surface area.
  • Record this value above.

12. Water lost per square meter: To calculate the water loss per square meter of leaf surface, divide the water loss at each reading (Table 9.1) by the leaf surface area you calculated.


Table 9.2: Individual Water Loss in mL /m2

Time Intervals ( minutes)
s0-33-66-99-1212-1515-1818-2121-2424-2727-30
Water Loss (mL)
Water loss per m2

13. Record the averages of the class data for each treatment in Table 9.3.

Table 9.3: Class Average Cumulative Water Loss in mL /m2

Time ( minutes)
Treatment036912151821242730
Room0      
Light0
Fan0
Mist0

14. For each treatment, graph the average of the class data for each time interval. You may need to convert data to scientific notation. All numbers must be reported to the same power of ten for graphing purposes.

Graph Title________________________________________


Graph 9.1


Analysis of Results:
1. Calculate the average rate of water loss per minute for each of the treatments:

Room: ______________________________________________________________________

Fan: _______________________________________________________________________

Light: _______________________________________________________________________

Mist: _______________________________________________________________________


2. Explain why each of the conditions causes an increase or decrease in transpiration compared to the control.

Conditions   EffectReasons
Room
Fan
Light
Mist

3. How did each condition affect the gradient of water potential from stem to leaf in the experimental plant?

_______________________________________________________________________

_______________________________________________________________________

_______________________________________________________________________

_______________________________________________________________________

4. What is the advantage to a plant of closed stomata when water is in short supply? What are the disadvantages?

_______________________________________________________________________

_______________________________________________________________________

_______________________________________________________________________

_______________________________________________________________________

5. Describe several adaptations that enable plants to reduce water loss from their leaves. Include both structural and physiological adaptations.

_______________________________________________________________________

_______________________________________________________________________

_______________________________________________________________________

_______________________________________________________________________

6. Why did you need to calculate leaf surface area in tabulating your results?

________________________________________________________________________

________________________________________________________________________

________________________________________________________________________

________________________________________________________________________