Biology Study Guides
All Materials © Cmassengale
Biology Study Guides
All Materials © Cmassengale

Introduction:
DNA is found in cells from Animals and Plants. DNA is a double stranded macromolecule composed of nucleotide bases pairing Adenine with Thymine and Guanine with Cytosine. DNA can be extracted from cells by a simple technique with household chemicals, enabling students to see strands of DNA with the naked eye.
Purpose:
To extract DNA from the fruit of a strawberry plant
Safety Precautions:
Materials / Equipment (per student group):
1. heavy duty zip-lock baggie
2. 1 strawberry (fresh or frozen and thawed)
3. cheesecloth
4. funnel
5. 100 ml beaker
6. test tube
7. wooden coffee stirrer
8. DNA Extraction Buffer (One liter: mix 100 ml of shampoo (without conditioner), 15 g NaCl, 900 ml water OR 50 ml liquid dishwashing detergent, 15 g NaCl and 950 ml water)
9. Ice-cold 95% ethanol or 95% isopropyl alcohol
Procedure:
1. Place one strawberry in a zip lock baggie and carefully press out all of the air and seal the bag.
2. Smash the strawberry with your fist for 2 minutes.
3. Add 10 ml extraction buffer to the bag and carefully press out all of the air and seal the bag.
4. Mush again for one minute.
5. Filter through cheesecloth in a funnel into beaker. Support the test tube in a test tube rack.
6. Discard the extra mashed strawberry.

7. Pour filtrate into test tube so that it is 1/8 full.
8. Slowly pour the ice-cold alcohol into the tube until the tube is half full and forms a layer over the top of the strawberry extract.
9. At the interface, you will see the DNA precipitate out of solution and float to the top. You may spool the DNA on your glass rod or pipette tip.
10. Spool the DNA by dipping a pipette tip or glass rod into the tube right where the extract layer & alcohol are in contact with each other. With your tube at eye level, twirl the rod & watch as DNA strands collect.
Prelab:
Take a look at the sketch of the plant cell below. The chromosomes (which are made of DNA) are in the nucleus. This is the only place where DNA is located.

Now match the procedure with what it is doing to help isolate the DNA from the other materials in the cell.
| _____1. Break open the cell | A. Squish the fruit to a slush
|
| _____2. Dissolve cell membranes | B. Filter your extract through cheesecloth |
| _____3. Precipitate the DNA (clump the DNA together | C. Mix in a detergent solution |
| _____4. Separate organelles, broken cell wall, and membranes from proteins, carbohydrates, and DNA | D. Layer cold alcohol over the extract |
DNA Extraction Table
| AMOUNT ADDED OR OBTAINED | INITIAL COLOR | PURPOSE | |
| BUFFER (soap-salt mixture) |
|||
| STRAWBERRY | |||
| COLD ALCOHOL | |||
| DNA |
SKETCH OF TEST TUBE WITH CONTENTS
Questions:
1. Where can DNA be found in the cell?
2. Discuss the action of the soap (detergent) on the cell. What is the purpose of the soap in this activity?
3. What was the purpose of the Sodium Chloride? Include a discussion of polarity and charged particles.
4. Why was the cold ethanol added to the soap and salt mixture?
5. Describe the appearance of your final product?
6. Draw a diagram of DNA containing 5 sets of nucleotide bases labeling the hydrogen bonds between the bases.
Study guide for Sponge, Cnidarians, & Ctenophores
· Know relatives of the jellyfish
· How are sponges different from other animals
· Know characteristics of all invertebrates
· Know characteristics of sponges
· What is the function of collar cells in sponges
· What are spicules
· Know characteristics of adult sponges
· Be able to explain skeletal support of sponges
· How do sponges obtain their food
· What helps draw water into a sponge
· What is the function of amebocytes in sponges
· How does excess water leave a sponge
· What is the purpose of gemmules in sponges
· What is a hermaphrodite
· How can sponges reproduce
· Know animals that capture prey by using nematocysts
· What are the 2 distinct life stages of cnidarians
· Describe nematocysts
· What organisms have tentacles with stinging cells
· Know examples of cnidarians
· Describe the life of a planula larva
· Know the life stage that is dominant in sea anemones
· What organisms would be anthozoans
· Know the dominant life stage of jellyfish
· Know the main characteristics of ctenophores
| Objectives: As a result of this lesson, students will be able to:
Materials:
Procedure
Place the squid with the dorsal (back) side up in the dissecting pan. This means put the side with the funnel down and the fin side up. Make sure the tentacles and arms are towards you. Locate the head, eyes, beaks (mouth), arms (8), two longer feeding tentacles, fins, mantle, and skin. Use the hand lens to examine the suckers on the tentacles and arms as well as the spots on the skin, which are chromatophores.
What are the differences between arm and tentacle suckers? Where are the suckers located on the feeding tentacles as compared to the location of the suckers on the arms?
How do you account for the different locations of the suckers on the tentacles and the arms? What are chromatophores?
|
| Starfish Dissection |
Introduction:
![]()
Echinoderms are radially symmetrical animals that are only found in the sea (there are none on land or in fresh water). Echinoderms mean “spiny skin” in Greek. Many, but not all, echinoderms have spiny skin. There are over 6,000 species. Echinoderms usually have five appendages (arms or rays), but there are some exceptions.
Radial symmetry means that the body is a hub, like a bicycle wheel, and tentacles are spokes coming out of it (think of a starfish). As larvae, echinoderms are bilaterally symmetrical. As they mature, they become radially symmetrical.
Most adult echinoderms live on the bottom of the ocean floor. Many echinoderms have suckers on the ends of their feet that are used to capture and hold prey, and to hold onto rocks in a swift current.
Sea Stars
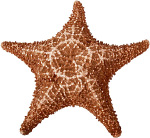 Sea stars (group name Stelleroidea) are sometimes called starfish, though they are not real fish (they lack both vertebrae and fins). There are two sub-types of sea stars:
The differences between the two sub-types lies in how the arms connect to the central disk. Ophiuroids have arms that do not connect with each other. There is a distinct boundary between arm and central disk. Asteroids have arms that are connected to each other. Also, it is harder to tell with asteroids where the central disk ends and the arms begin.
The sea star’s top surface (or skin) looks spiny if you examine it. If you look very closely you will notice that there are different types of growths on the surface. Some bumps are used to absorb oxygen, they are called dermal branchiae. Pedicellaria are pincher-like organs used to clean the surface of the skin. Barnacle larvae could land on a sea star and start growing if it were not for these organs.
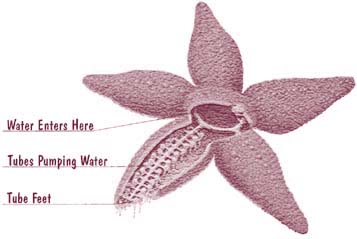
How Do Sea Stars Move?
 Each sea star had hundreds of tiny feet on the bottom of each ray. These are tube feet, or podia. These tiny feet can be filled with sea water. The vascular system of the sea star is also filled with sea water. By moving water from the vascular system into the tiny feet, the sea star can make a foot move by expanding it. This is how sea stars move around. Muscles within the feet are used to retract them.
Each ray of a sea star has a light sensitive organ called an eyespot. Though it can not see nearly as well as we do, sea stars can detect light and its general direction. They have some idea of where they are going.
Can Sea Stars Grow New Arms?
Given enough time, sea stars can grow back arms that have been damaged or removed. For a few species, the severed arm can grow back into a complete sea star! For most sea stars, however, a severed limb dies.
What Do Sea Stars Eat?
Sea stars eat many things. A sea star’s diet can include: barnacles, snails, sea urchins, clams, and mussels. A few species, such as the spiny star of the North Atlantic, eat other sea stars! Many sea stars eat mussels and clams in an interesting way. They surround the shell and use the suckers on their feet to pull the two shells (or valves) apart. The sea star has enough force in its arms to actually bend the shell! This creates an opening between the two shells that is only .01 inches wide. Using this tiny gap, the sea star puts its stomach into the clam’s shell and eats its insides. When it is done, nothing is left but an empty shell.
Materials:
![]()
Preserved starfish, dissecting pan, scissors, scalpel, forceps, T-pins, pencil, lab apron, safety glasses
Procedure:
![]()

Dorsal view of starfish showing external anatomy
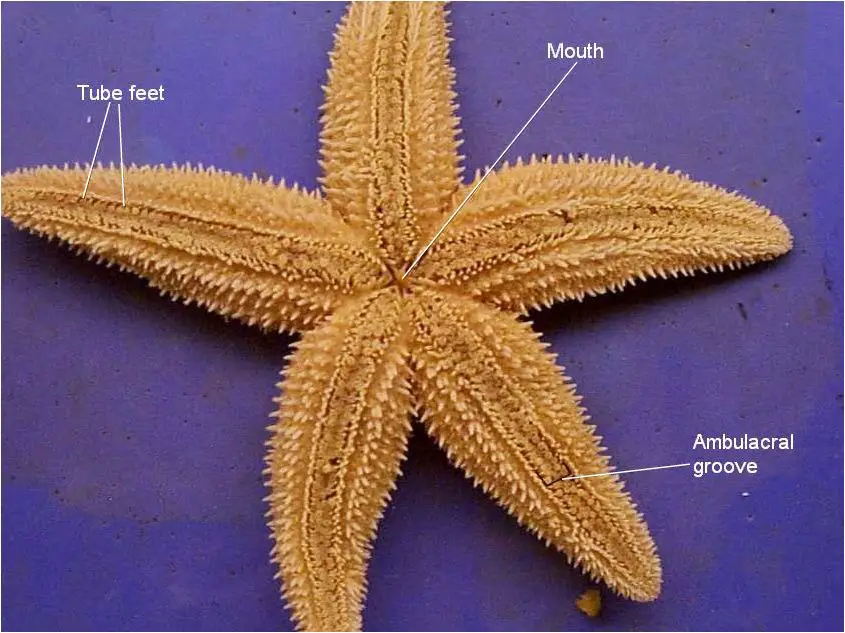
Ventral view of starfish showing external anatomy
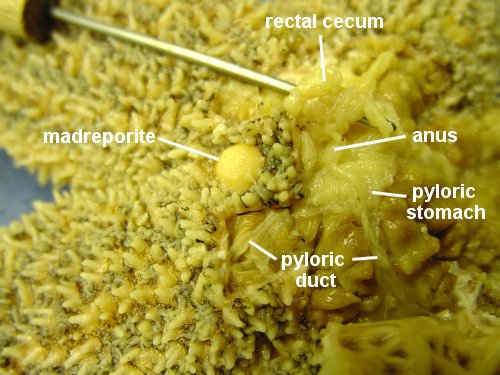
Dorsal view of a dissected starfish showing rectal cecum, anus, madreporite, pyloric stomach, pyloric duct

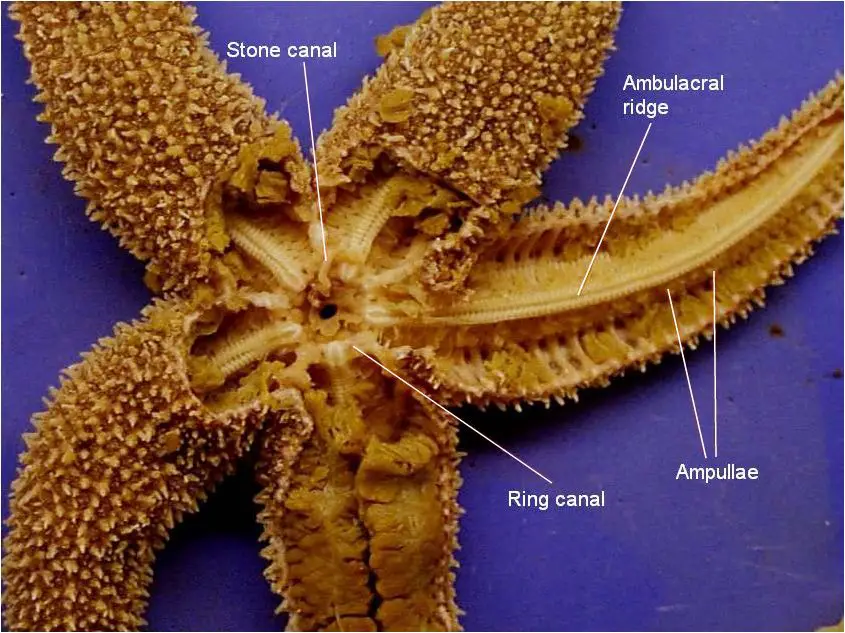
Dorsal view of a dissected starfish showing madreporite, stone canal, cardiac stomach, and ampullae

Dissection showing where cardiac stomach opens into the mouth
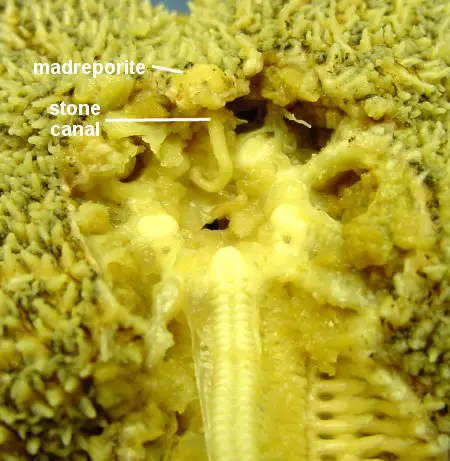
Close up of madreporite and stone canal

Dorsal view of a dissected starfish showing pyloric caecum and pyloric ducts

Dorsal view of a dissected starfish showing gonads and ampullae
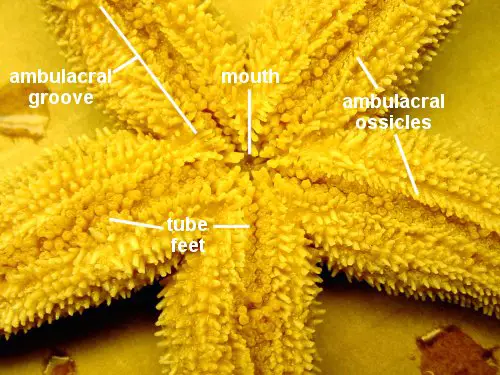
Ventral view of starfish showing external anatomy