Origin of life PPT Qs

Origin Of Life
ppt Questions

Early Thoughts on Life

1. What was Aristotle’s idea about how life arose called?

2. What is another name for spontaneous generation?

3. Explain spontaneous generation of life.


4. How long did the idea of abiogenesis or spontaneous generation last?

5. The idea of abiogenesis lasted so long because, instead of testing their ideas, people based their beliefs on what?


6. Were their observations tested?

7. Did they use the scientific method for their observations?

Examples of Spontaneous Generation

8. What observation about new life did Egyptians make when the Nile River flooded each year?


9. What observation about new life did Medieval farmers make when they stored their grain each year?


10. The English people centuries ago, threw their garbage and sewage out on the streets. What observation about new life did these people make?


11. This practice led to a plague that killed many Europeans. What was this plague called and what carried the disease organism?


12.Before refrigerators, large slabs of meat were hung after being purchased. What observation about new life was made from this practice?


13. People believed so strongly in abiogenesis that they had recipes for making living things. Name two organisms that had accepted recipes.


Disproving Spontaneous Generation

14. Francesco ____________ was an early scientists who conducted experiments to try and disprove spontaneous generation.

15. What was Redi’s hypothesis?


16. Explain how Redi tried to prove this.


17. What were the results Redi found in the closed jars & why?


18. What were the results in the open jars?


19. How did maggots appear in the open jars?


20. Complete this table summarizing Redi’s experiment:


Evidence Against Spontaneous Generation
Unsealed Jar
Sealed Jar
Gauze Covered jar


21. Redi’s experiment disproved spontaneous generation for _____________ organisms.

Use of the Scientific Method

22. Did Francesco Redi use the scientific method in his experiment?

23. What served as the control in Redi’s experiment?


24. What jars served as the experimental groups?

25. What was Redi’s conclusion?


Disproving Spontaneous Generation of Microbes

26. Anton Van _______________ made one of the first simple microscopes.

27. Leeuwenhoek called the living things he saw in pond water ______________.

28. By the end of the 19th century, these organisms were known as ______________.

29. John _____________ did experiments with microorganisms growing in broths.

30. Needham believed there was a __________ __________ present in nonliving substances like air.

31. Why were bacteria able to grow in Needham’s soups?


32. What could have been done to the broths to kill the bacteria already present?

33. What scientists repeated this experiment but with boiled broth?

34. After boiling, what did Spallanzani do to the tops of the bottles? how did this help?


35. Critics of Spallanzani’s experiment said there was not enough _______ for the bacteria to survive and that boiling had destroyed the _________ __________.

The Theory Changes

36. What did the Paris Academy of Science do in 1860 to solve the problem?


37.Who won the prize? 

38. What was Pasteur’s experimental hypothesis?


39. What was the shape of Pasteur’s flasks? Include a sketch.


40. What was the special S-shaped neck intended to do?


41. Did Pasteur boil the broth in his flasks? Why?


42. The flasks were left at ___________ locations.

43. Did the broth change cloudy because microbes were growing in it?


44. What was visible in the neck of the flask after collecting there?

45. Once the S-shaped stem was broken off the top of the flasks, what happened to the broth and why?


46. Pasteur’s S-shaped flasks kept ___________ out but let ______ inside.

47. Pasteur’s experiment proved that living things only come from other _________ ___________.

48. What is the name of Pasteur’s theory?

Review

49. Where did the maggots come from in Redi’s experiment?

50. What was the purpose of the sealed jars?

51. Redi was trying to disprove – spontaneous generation or biogenesis?

52. Where did the microbes come from in Needham’s broth?

53. Needham & Spallanzani were trying to disprove – spontaneous generation or biogenesis?

54.Who proved biogenesis?


Metric Measurement Lab


Metric Measurement Lab


Part A: Count your drops!


Take a guess – How many drops of water will it take to equal 1 milliliter? _____ drops

Follow the directions to find the number of drops in 1 milliliter of water, then answer the questions. You will need a small graduated cylinder (25 ml), a beaker of water, and an eyedropper for this section.  Remember to read the bottom of the meniscus when you are reading the volume of a liquid in a graduated cylinder.


  1. Fill a small graduated cylinder with 10 ml of water.
  2. Count the number of drops it takes to raise the water to 11 ml. Record the number in the chart.
  3. Leave the water in the graduated cylinder and count the number of drops it takes to raise the water to 12ml. Record the number in the chart.
  4. Leave the water in the graduated cylinder and count the number of drops it takes to raise the water to 13ml. Record the number in the chart.
  5. Calculate your average and round to the nearest tenth.


Picture of graduated cylinder


# of drops to 11 ml # of drops to 12 ml # of drops to 13 ml Average


Based on your average, how close were you to your guess?________

Based on your average, how many drops would it take to make 1 liter? _______

Part B: Water Displacement


Follow the directions to find the volume of three marbles using water displacement.

  1. Add 20 ml of water to a 100 ml graduated cylinder. Record this amount in the chart.
  2. Add three marbles to the cylinder and measure the volume. Record this amount in the chart.
  3. Find the difference between the two measurements and record in the chart. The difference between the two measurements will be the volume of the three marbles.
Volume of Water Before adding Marbles (ml) Volume of Water After Adding Marbles (ml) Difference in Volume (ml) Volume of 3 Marbles


Part C: Mass Mania


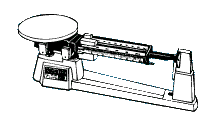
The gram is the standard unit of mass in the metric or SI system. The basic instrument used to measure mass is the mass balance.  Some mass measurements can be made using an electronic balance.


  1. Check to see that the Pointer is pointing to zero.
  2. If it is not, check to see that all the Riders (weights) are all the way to the left at the Zero mark.
  3. Adjust the balance by turning the Adjustment Screw slowly until it points to zero.
  4. Place your metric ruler on the pan and read & record the ruler’s mass.
  5. After resetting the balance to Zero, measure and record the mass of the empty 50-ml graduated cylinder and then the 3 marbles.
  6. Reset the balance to ZERO when all items have been massed.


Mass of Metric Ruler (g) Mass of Empty 50-ml graduated cylinder (g) Mass of 3 Marbles (g)


Part D: Volume by Formula


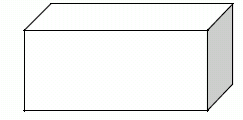
Use the formula to find the volume of the box. Measure to the nearest centimeter before calculating your answer.  If necessary, Round your answer to Two Decimal places.


Volume = length x width x height

__________ x __________ x __________ =________________cm3


Part E: Color Challenge


1. Obtain the following items from your teacher:

  • 3 beakers with colored water- 25 ml of each color (red, blue, and yellow)
  • 1 graduated cylinder (25 ml – 50 ml)
  • 1 eyedropper
  • 6 test tubes labeled A, B, C, D, E, and F

2. Perform each step outlined below using accurate measurements.

  1. Measure 17 ml of RED water from the beaker and pour into test tube A.
  2. Measure 21 ml of YELLOW water from the beaker and pour into test tube C
  3. Measure 22 ml of BLUE water from the beaker and pour into test tube E.
  4. Measure 5 ml of water from test tube A and pour it into test tube B.
  5. Measure 6 ml of water from test tube C and pour it into test tube D.
  6. Measure 8 ml of water from test tube E and pour it into test tube F.
  7. Measure 5 ml of water from test tube C and pour it into test tube B.
  8. Measure 2 ml of water from test tube A and pour it into test tube F.
  9. Measure 4 ml of water from test tube E and pour it into test tube D.

3. Complete the chart.

Test Tube Color Final Volume (ml)
A
B
C
D
E
F

Click HERE for Notebook Copy


Mitosis Activity


Stages of Mitosis

Introduction

Mitosis, also called karyokinesis, is division of the nucleus and its chromosomes.  It is followed by division of the cytoplasm known as cytokinesis.  Both mitosis and cytokinesis are parts of the life of a cell called the Cell Cycle.  Most of the life of a cell is spent in a non-dividing phase called Interphase.  Interphase includes G1 stage in which the newly divided cells grow in size, S stage in which the number of chromosomes is doubled and appear as chromatin, and G2 stage where the cell makes the enzymes & other cellular materials needed for mitosis.

Mitosis has 4 major stages — Prophase, Metaphase, Anaphase, and Telophase. When a living organism needs new cells to repair damage, grow, or just maintain its condition, cells undergo mitosis.

During Prophase, the DNA and proteins start to condense. The two centrioles move toward the opposite end of the cell in animals or microtubules are assembled in plants to form a spindle. The nuclear envelope and nucleolus also start to break up.


Prophase

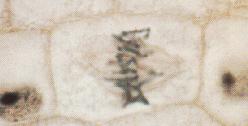
During Metaphase, the spindle apparatus attaches to sister chromatids of each chromosome. All the chromosomes are line up at the equator of the spindle. They are now in their most tightly condensed form.


Metaphase

During Anaphase, the spindle fibers attached to the two sister chromatids of each chromosome contract and separate chromosomes which move to opposite poles of the cell.


Anaphase

In Telophase, as the 2 new cells pinch in half (animal cells) or a cell plate forms (plant cells), the chromosomes become less condensed again and reappear as chromatin. New membrane forms nuclear envelopes and the nucleolus is reformed.


Telophase

Objective: 

In this lab, you will determine the approximate time it takes for a cell to pass through each of the four stages of mitosis. You may use your textbook and class notes to help you identify the stages of mitosis as seen under the microscope. 

Materials:

Microscope, prepared slide onion root tip or whitefish blastula, textbook, lab worksheet, pencil

Procedure:

  1. Set up a compound light microscope and turn on the light.
  2. Place a slide containing a stained preparation of the Allium (onion root tip) or Whitefish blastula.
  3. Locate the meristematic or growth zone, which is just above the root cap at the very end of the tip or
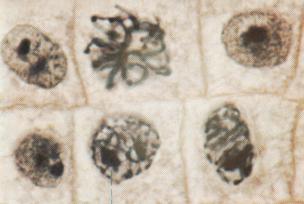
  4. Focus in on low power, and then switch to medium or high power. Below find micrographs of the four stages of mitosis. Use them to help you identify the stages on the microscope slide.


Prophase (onion)


Metaphase (onion)


Anaphase (onion)


Telophase (whitefish)


  1. Now count the number of cells found in each stage of mitosis and place the data in the chart below.
  2. Determine the percentage of time each cell will spend in each stage of mitosis. Divide the number of each cell by the total number of cells and multiply by 100 to determine the percentage. Place these values in the chart below.


Stage of Mitosis Number of Cells Percent of time in each stage =

# of cells in stage     X  100%
Total # of Cell

Prophase %
Metaphase %
Anaphase %
Telophase %
Interphase
(Not a Mitotic Stage)
%
Total # cells 100%


  1. Line graph the data you have just collected.  Be sure to label the X and Y axis & include the units of measurement.

Title: __________________________________________________

Graph Legend:


Questions:

1. Of the four stages of mitosis, which one takes the most time to complete? 


2. Which is the shortest stage in duration?


3. What would happen if the process of mitosis skipped metaphase?  telophase?

Further Study:

Normal Cell Division may be observed in onion root tips. Many of the processes are similar to those in animal cells. However, in plant cells, the cell plate between daughter cells forms from the Golgi.

Find all of the stages of mitosis and  interphase in the above picture. Make a sketch of each stage and briefly describe what is occurring. Count and record the number of cells you see in each stage.

Projects
Notes


Mitosis PPT Questions

Cell Cycle and Mitosis
ppt Questions

Cell Cycle

1.Prokaryotic organisms include ___________, while plants and animals are ____________.

2. Describe prokaryotes.


3. How do bacteria asexually reproduce?

4. Name the 3 main steps of binary fission in bacteria.

    a.

    b.

     c.

5. Name a bacterial cell that reproduces by binary fission.

6. Describe eukaryotes.


7. How do eukaryotes asexually reproduce cells?

8. The stages in the growth and reproduction of a cell are called the __________ ___________.

9. List the 5 stages in the cell cycle.


10. What does G1 stage stand for?

11. Name two things that happen to a cell during G1?


12. What is the S stage of the cell cycle?

13. _________ instructions are copied in the S phase as ___________ are duplicated.

14. _______ stands for second growth stage.

15. G2 is the time between ____________ and ___________.

16. Cells continue to _________ during G2 and to make __________ that will be needed for mitosis or cell division.

17. Mitosis or cell division is known as the ________ stage.

18. How does a cell use its energy during the M phase?

19. Does a cell continue growing & making proteins in the M phase?

20. Mitosis is also called _______________ which means division of the ____________.

21. ____________ is called the resting stage and makes up the longest part of a cell’s life cycle.

22. What happens to cells during interphase?


23. Are chromosomes visible during interphase?

Mitosis

24. Name the 4 stages of mitosis.


25. Name 2 things that happen to a cell during prophase.

     a.

     b.

     c.

     d.

     e.

26. Can chromosomes be seen during prophase?

27. Sketch a eukaryotic chromosome and label the centromere and kinetochore fiber that attaches to it.


28. How many pairs of chromosomes are found in humans?

29. List 3 things that occur during metaphase.

     a.

     b.

     c.

30. Where are chromosomes located during metaphase of a cell?

31. What stage occurs after metaphase?

32. List 2 things that happen to cells during anaphase.

     a.

     b.

33. Sketch and label the mitotic spindle and attached chromosomes.


34. What is the last stage of mitosis?

35. Where are the two sets of chromosomes located at Telophase?

36. What two things reform during Telophase?

37. Chromosomes ___________ during Telophase so they are no longer visible.

38. In plants, what begins to form that will separate the two cells?

39. How are the two cells separated from each other in animals?


40. _____________ or division of the cytoplasm follows ___________, division of the nucleus, and forms ____________ daughter cells.

41. How do the two, new daughter cells compare to each other?


42. Label the following stages of mitosis.


Printable Copy

Leaf Collection Instructions

Arkansas is essentially a forest state because more than half of the state is covered with trees.  The climate and soils of Arkansas also support a great variety of trees, both conifers and deciduous.  Trees are one of Arkansas’ most important crops.  Forests are also valuable in preventing erosion, in offering parks and recreational areas, and in providing homes for wildlife.  In addition, many trees have been introduced into the state as ornamentals.

Leaf collecting is a good way to learn the trees native to your area.  Collecting leaves will also help you to learn leaf margins, shapes, and  venations and how to use different taxonomic keys to identify trees.

Materials needed:

  • leaf press
  • black ink pen
  • pencil
  • small notebook
  • scissors
  • Elmer’s glue
  • art paper, poster board, etc. for mounting
  • labels
  • taxonomic keys (Trees of Arkansas published by the Arkansas Forestry Commission)

Top

Directions for making a leaf press:
1.   Cut 15 – 20 pieces of corrugated cardboard 30 cm by 50 cm in size.
2. Cut several sheets of newspaper the same size as the cardboard.
3. Lay 10 or 12 sheets of newspaper between each cardboard layer sandwich style.  These sheets will need to be changed every couple of days as they absorb moisture from your leaves; therefore, cut extra sheets.
4. Use one, preferably two, stretch belts to bind the press together.
5. Leave the press in an area so that air can circulate &  more quickly dry the leaves.

Top

Getting started with your collection:
1. Study the shapes, margins, venations, tips, bases, etc. in your Trees of Arkansas book.

Click here to view reference page

2. Learn to distinguish simple leaves from compound leaves and conifers from deciduous trees.
3. Learn to distinguish a tree from a shrub.
4. Gather your collecting materials together – press, pencil, scissors, & small notebook.
6. Always get permission before collecting leaves on someone else’s property.
7. Be sure to collect at least
two of each type of leaf so both the bottom & top side of the leaf can be shown in your collection.
8. Place leaves in your press immediately after collecting them so they do not start to dry out and wrinkle.
9. Record the name of each leaf, date collected, and place collected in your notebook as you collect.  Also record tree characteristics such as shape of the crown, color and type of bark, etc.

Top

Collecting:
1. Remember to collect two of every type of leaf!
2. Carefully remove an entire leaf, not a leaflet, from the tree, and place this in your press between newspaper layers.
3. If leaves are damaged or torn, don’t use them because you will not receive credit.
4. Make sure that none of the leaf parts extend beyond the edge of the press.
5. You may also collect &press seeds and/or fruits from some trees if they fit in your press.
6. Leave the leaf in the press for 3 – 5 days depending on its thickness and moisture content.  Remember to change the newspaper when needed.
7. Keep the press in an area where air is circulating (in front of a fan).

Top

Labeling and identifying:
1. Obtain printed labels from your teacher.
2. Use only black ink to write labels, & do not mark out or white out mistakes on the labels; rewrite them.
3. Use taxonomic keys to identify each leaf, and include both the scientific & common name of the tree on the label.
4. Determine the shape, margin, tip, base, and venation of your leaf and whether it is a simple or compound leaf; record this on your label.
5. Use you key to give a description of the tree, not the leaf.
6. Research uses for the tree, its fruit, etc. and record on your label.
7. Tell if the leaf is deciduous or coniferous.

Top

Mounting leaves:
1. Use pieces of cut poster board or art paper to mount your leaves.  Make sure all sheets are uniform in size! (The size of your sheets will be determined by your largest leaf.)
2. Use Elmer’s glue to adhere two leaves to each page — one showing the upper surface of the leaf and the other showing the underside of the leaf.
3. Each page should have only one type of leaf on it.
4. Arrange the leaves so they do not overlap each other and so there is room to glue the label in the lower right hand corner.  The leaves should look nice on the page.
5. On compound leaves, mount the topside of the complete leaf and then mount the underside of a single leaflet. Make sure the leaflet comes from another leaf to receive credit!
6. Use a small amount of Elmer’s glue to adhere the completed label in the lower right hand corner of the page.
7. LET THE PAGES DRY COMPLETELY BEFORE ASSEMBLING THEM TOGETHER IN YOUR COLLECTION OR THE PAGES WILL STICK TOGETHER!!!!!
8. Once the pages are dry, lay them in the correct order (see your list of required leaves), and then number the pages in the lower right corner with black ink.
9. Make a stiff front and back cover for your collection from poster board, cardboard, wood, etc.  Include the following items on your cover:

  • title (Tree Identification Through Leaves)
  • your complete name
  • date collection turned into teacher
  • class period
  • subject
  • teacher’s name

10. Use ribbon, string, etc. to bind the pages together or assemble the collection in a scrapbook.  DO NOT COVER THE LEAVES WITH PLASTIC!!!

Top

Required leaves:
1. Only native, Arkansas trees may be used.  Refer to your Trees of Arkansas book.
2. Leaves must be in perfect condition without damage or tears.
3. No more then 4 oaks are allowed in the collection.
4. No fruit trees such as apple, pear, orange, peach, etc. are allowed.
5. Place the following leaves in your collection first and in this order:

  • sweet gum
  • American sycamore
  • pine (any type)
  • flowering dogwood
  • redbud
  • ash (any type)
  • persimmon
  • Eastern red cedar
  • red or silver maple
  • hickory (any type)
  • pecan
  • pin oak
  • willow oak
  • water oak
  • elm (any type)

6. The remaining leaves that you include must be trees native to Arkansas!

Top

*Pre AP Biology is required to collect 30 leaves including the 15 required.

 *Biology I is required to collect 20 leaves including the 15 required.

   Pre AP      Biology I