Leaf Collection Instructions

Arkansas is essentially a forest state because more than half of the state is covered with trees.  The climate and soils of Arkansas also support a great variety of trees, both conifers and deciduous.  Trees are one of Arkansas’ most important crops.  Forests are also valuable in preventing erosion, in offering parks and recreational areas, and in providing homes for wildlife.  In addition, many trees have been introduced into the state as ornamentals.

Leaf collecting is a good way to learn the trees native to your area.  Collecting leaves will also help you to learn leaf margins, shapes, and  venations and how to use different taxonomic keys to identify trees.

Materials needed:

  • leaf press
  • black ink pen
  • pencil
  • small notebook
  • scissors
  • Elmer’s glue
  • art paper, poster board, etc. for mounting
  • labels
  • taxonomic keys (Trees of Arkansas published by the Arkansas Forestry Commission)

Top

Directions for making a leaf press:
1.   Cut 15 – 20 pieces of corrugated cardboard 30 cm by 50 cm in size.
2. Cut several sheets of newspaper the same size as the cardboard.
3. Lay 10 or 12 sheets of newspaper between each cardboard layer sandwich style.  These sheets will need to be changed every couple of days as they absorb moisture from your leaves; therefore, cut extra sheets.
4. Use one, preferably two, stretch belts to bind the press together.
5. Leave the press in an area so that air can circulate &  more quickly dry the leaves.

Top

Getting started with your collection:
1. Study the shapes, margins, venations, tips, bases, etc. in your Trees of Arkansas book.

Click here to view reference page

2. Learn to distinguish simple leaves from compound leaves and conifers from deciduous trees.
3. Learn to distinguish a tree from a shrub.
4. Gather your collecting materials together – press, pencil, scissors, & small notebook.
6. Always get permission before collecting leaves on someone else’s property.
7. Be sure to collect at least
two of each type of leaf so both the bottom & top side of the leaf can be shown in your collection.
8. Place leaves in your press immediately after collecting them so they do not start to dry out and wrinkle.
9. Record the name of each leaf, date collected, and place collected in your notebook as you collect.  Also record tree characteristics such as shape of the crown, color and type of bark, etc.

Top

Collecting:
1. Remember to collect two of every type of leaf!
2. Carefully remove an entire leaf, not a leaflet, from the tree, and place this in your press between newspaper layers.
3. If leaves are damaged or torn, don’t use them because you will not receive credit.
4. Make sure that none of the leaf parts extend beyond the edge of the press.
5. You may also collect &press seeds and/or fruits from some trees if they fit in your press.
6. Leave the leaf in the press for 3 – 5 days depending on its thickness and moisture content.  Remember to change the newspaper when needed.
7. Keep the press in an area where air is circulating (in front of a fan).

Top

Labeling and identifying:
1. Obtain printed labels from your teacher.
2. Use only black ink to write labels, & do not mark out or white out mistakes on the labels; rewrite them.
3. Use taxonomic keys to identify each leaf, and include both the scientific & common name of the tree on the label.
4. Determine the shape, margin, tip, base, and venation of your leaf and whether it is a simple or compound leaf; record this on your label.
5. Use you key to give a description of the tree, not the leaf.
6. Research uses for the tree, its fruit, etc. and record on your label.
7. Tell if the leaf is deciduous or coniferous.

Top

Mounting leaves:
1. Use pieces of cut poster board or art paper to mount your leaves.  Make sure all sheets are uniform in size! (The size of your sheets will be determined by your largest leaf.)
2. Use Elmer’s glue to adhere two leaves to each page — one showing the upper surface of the leaf and the other showing the underside of the leaf.
3. Each page should have only one type of leaf on it.
4. Arrange the leaves so they do not overlap each other and so there is room to glue the label in the lower right hand corner.  The leaves should look nice on the page.
5. On compound leaves, mount the topside of the complete leaf and then mount the underside of a single leaflet. Make sure the leaflet comes from another leaf to receive credit!
6. Use a small amount of Elmer’s glue to adhere the completed label in the lower right hand corner of the page.
7. LET THE PAGES DRY COMPLETELY BEFORE ASSEMBLING THEM TOGETHER IN YOUR COLLECTION OR THE PAGES WILL STICK TOGETHER!!!!!
8. Once the pages are dry, lay them in the correct order (see your list of required leaves), and then number the pages in the lower right corner with black ink.
9. Make a stiff front and back cover for your collection from poster board, cardboard, wood, etc.  Include the following items on your cover:

  • title (Tree Identification Through Leaves)
  • your complete name
  • date collection turned into teacher
  • class period
  • subject
  • teacher’s name

10. Use ribbon, string, etc. to bind the pages together or assemble the collection in a scrapbook.  DO NOT COVER THE LEAVES WITH PLASTIC!!!

Top

Required leaves:
1. Only native, Arkansas trees may be used.  Refer to your Trees of Arkansas book.
2. Leaves must be in perfect condition without damage or tears.
3. No more then 4 oaks are allowed in the collection.
4. No fruit trees such as apple, pear, orange, peach, etc. are allowed.
5. Place the following leaves in your collection first and in this order:

  • sweet gum
  • American sycamore
  • pine (any type)
  • flowering dogwood
  • redbud
  • ash (any type)
  • persimmon
  • Eastern red cedar
  • red or silver maple
  • hickory (any type)
  • pecan
  • pin oak
  • willow oak
  • water oak
  • elm (any type)

6. The remaining leaves that you include must be trees native to Arkansas!

Top

*Pre AP Biology is required to collect 30 leaves including the 15 required.

 *Biology I is required to collect 20 leaves including the 15 required.

   Pre AP      Biology I

Loss of Biodiversity Activity


Loss of Biodiversity


Students will make a PowerPoint presentation on the topic of loss of biodiverisity in one of the following areas:

  • Fauna of Arkansas
  • North American Vertebrates
  • North American Invertebrates
  • North American Plants
  • Flora of Arkansas
  • Aquatic Habitats of Arkansas
  • Florida Everglades
  • Alaskan Tundra
  • United States Deserts
  • Along the Mississippi River
  • North American Waterfowl
  • North American Raptors
  • North American Reptiles
  • North American Amphibians
  • North American Mammals

The PowerPoint presentation will be presented to the class and must include 25 slides, 15 of which must include graphics such as images from your web search (save on disk as .jpeg), pictures from books or magazines that you have scanned and inserted into your program, or photographs taken with a digital camera. You should also include three of the following as part of your slide presentation:

  1. Maps
  2. Graphs
  3. Lists
  4. Photograph of a person you interviewed

Your PowerPoint presentation must be accompanied by a written script that corresponds to the numbered order of your slides. The following must be included in your PowerPoint presentation and script:

  1. Name/Description of your chosen area (include a picture if available)
  2. Explanation of the physical environment of the area — climate, water, temperature, etc.
  3. Examples of threatened organisms ( include pictures)
  4. Reasons for organisms endangerment
  5. How the loss of these organisms is affecting other organisms &/or the environment
  6. Conservation measures being taken to prevent the loss of biodiversity in this area


Isopod Behavior


Isopods in Training  


Introduction:

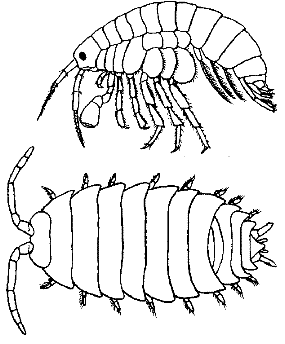
Terrestrial isopods are land dwelling crustaceans, commonly known as sowbugs or pillbugs (or rollypollys). They are related to lobsters, crabs, and shrimp and terrestrial isopods breath with gills. While they look similar, sow bugs are different from pill bugs. Pill bugs will curl into a ball when threatened whereas sow bugs will attempt to flee.

Ethology is the study of animal behavior. Many behaviors involve movement of the animal within its environment. In this exercise, you will investigate some innate (instincts) behaviors of isopods. Orientation is a process by which animals position themselves with respect to spatial features of their environments. Taxis involves the turning of an animal’s body relative to a stimulus – either toward or away. Kinesis is a random turning or movement of an animal in relation to a stimulus.

Materials:

isopods, behavior chamber, paper towels, water

Procedure – Orientation of Isopods in Response to Moisture

  1. Cut paper towels to fit into the bottom of BOTH sides of your behavior chamber.
  2. Moisten one side with tap water while keeping the other side dry.
  3. Transfer 5 isopods to each side of the chamber (total of 10).
  4. Count and record the number of animals on each side of the chamber every 30 seconds for ten minutes.
  5. Record your data in the data table.

Data:


Time # in Wet # in Dry
0:00
0:30
1:00
1:30
2:00
2:30
3:00
3:30
4:00
4:30
5:00
5:30
6:00
6:30
7:00
7:30
8:00
8:30
9:00
9:30
10:00


Analysis:

1. Based on your observations, do isopods prefer a moist or dry environment.

2. Would this movement be taxis or kinesis? Explain your answer.


3. Suggest a reason why this behavior might be advantageous to an isopod


4. Select one of the following factors and design an experiment to test for your hypothesis.


Factor Materials (suggested)
Temperature cold pack, warm pack
Light lamps, flashlights, dark construction paper, aluminum foil
pH low pH (HCl), high pH (NaOH)
Substrate (surface) soil, sand, sandpaper, bark, paper, cedar chips, gravel
Odor ammonia
Food apple, potato, fish food, lunchmeat
Other Organisms mealworms, crickets, earthworms


No Slide Title

This page uses frames, but your browser doesn’t support them.

Koch Postulates & Fungal Disease


Koch’s Postulates 


Introduction: 

    In the late nineteenth century, German scientist Robert Koch established a set of procedures to isolate and identify the causative agent of a particular microbial disease. The following four steps, which are still used today, are known as Koch’s Postulates.

  1. A specific organism must be always be observed in association with the disease.
  2.  The organism must be isolated from an infected host and grown in pure culture in the laboratory.
  3. When organisms from the pure culture are inoculated into a susceptible host organism, it must cause the disease.
  4. The infectious organism must be re-isolated from the diseased organism and grown in pure culture.

Objective:

In this investigation, your group will demonstrate Koch’s Postulates by using oranges as the host organisms. The infectious agent will be Penicillium notatum, a mold. You will isolate the culture on petri dishes of Potato Dextrose Agar.


Materials:

Penicillium notatum mold,  3 oranges, incubator, 10% bleach solution, apron, gloves, paper towels, detergent, small scrub brush, wide-mouth jar, portable burner, dissecting needle, large Ziplock bags, permanent marker, petri dish, potato dextrose agar, sterile swab


Click here for Aseptic Techniques


Procedure – Part A:     


Postulate 1.  A specific organism must be always be observed in association with the disease.


1. Disinfect the work area.


2. Obtain an orange and wash it thoroughly in cool, soapy water, scrubbing with a scrub brush. Rinse well.


3. Place the orange in a jar and cover with a 10% bleach solution. Let it stand for 10 minutes.


4. Rinse the orange for 10 minutes.


5. Flame a dissecting needle and allow it to cool. Then pierce the skin of the orange three or four times with the needle.


6. Flame the mouth of the tube of fungus and, using a sterile swab, aseptically remove a small sample and smear it over the puncture wounds in the orange.


7. Place the orange in a Ziploc bag. Label with your group number and date. The bag will be allowed to remain at room temperature or in an incubator at 25oC for about a week.


7. Prepare a data chart (Figure 1) to record daily observations. The chart should have places for the date, room temperature or incubator temperature, description of changes in the orange, and sketches.


8. Each day, record in a data chart your observations of the orange and the progress of the infection.


FIGURE 1:

Date Room/Incubator Temperature Observations


Procedure – Part B  


Postulate 2. The organism must be isolated from an infected host and grown in pure culture in the laboratory.


During the week or so of incubation, you should see a white powdery spore mass on the orange that soon changes to a greenish color. When the green appears, it is time to isolate the pathogen.


1. Disinfect work area.


2. Obtain a petri dish of Potato Dextrose Agar. Label the bottom of the plate with your group number and the date.


3. With a sterile swab, aseptically transfer some of the spore mass to the plate of Potato Dextrose Agar. Streak across the plate in parallel lines.


4. Incubate the plates upside down at room temperature or in an incubator at 25oC for 5 – 7 days until the mold produces spores.


5. Make another data chart (Figure 2) to record observations of the growth on the petri dish.


6. Each day, record in a data chart your observations of the growth in the petri dish. (Do not remove the cover of the dish when making observations.)


FIGURE 2:

Date Room/Incubator Temperature Observations


Procedure – Part C:  


Postulate 3. When organisms from the pure culture are inoculated into a susceptible host organism, it must cause the disease.


Once the culture in the petri dish has produced spores, you can inoculate susceptible organisms.


1. Disinfect work area.


2. Obtain two oranges and scrub them thoroughly in cool, soapy water. Rinse well.


3. Place the oranges in a jar and cover with a 10% bleach solution. Let stand for 10 minutes.


4. Rinse the oranges for 10 minutes.


5. Flame a dissecting needle and allow it to cool. Then pierce the skin of each orange three or four times with the needle.


6. Using a sterile swab, aseptically remove a small sample of mold spores from the petri dish. Smear it over the puncture wounds in one of the oranges.


7. Place the oranges in separate Ziploc bags. Label with your group number and date. Label the orange that is NOT inoculated, “CONTROL.” The bags will be allowed to remain at room temperature or in an incubator at 25oC for about a week.


8. Prepare a data chart (Figure 3) to record daily observations.


9. Each day, record in the data chart your observations of the oranges and the progress of the infection.


FIGURE 3:

Date Room/Incubator Temperature Observations


Procedure – Part D:  


Postulate 4. The infectious organism must be re-isolated from the diseased organism and grown in pure culture.


When the spore mass appears on the inoculated orange, it is time to re-isolate the culture.


1. Disinfect work area.


2. Aseptically transfer a sample of the spores from the inoculated orange from Procedure 3 to a petri dish of Potato Dextrose Agar. Label the plate.


3. Incubate for the same length of time that you incubated in Procedure 2.


4. Make a data chart (Figure 4) to record your observations.


6. Each day, record in the data chart your observations of the growth in the petri dish.


FIGURE 4:

Date Room/Incubator Temperature Observations


Analysis:


1. What is the importance of Koch’s Postulates?


2. Why have Koch’s Postulates remained unchanged for over a century?


3. Why were oranges and a mold used in this investigation?


4. Why were you instructed to scrub the oranges with a brush?


5. What was the reason you punctured the control orange?


6. What led you to the conclusion that the same organism caused the infection each time? Be sure that your data sheets support your answer.


7. Other than observations of appearance, what further investigations might have been done to prove that the organism that grew on the plates in Procedure 4 was the same one that you started with in Procedure 1?